
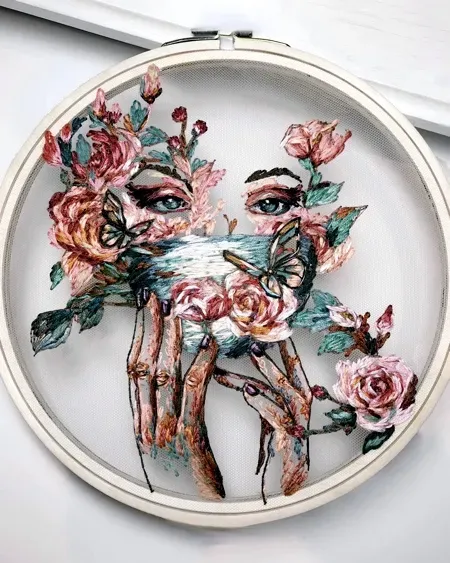
3D embroidered art opens a textured gateway between sketch and sculpture, turning imagination into a tactile, layered reality. Deep with padding and stacked stitches, this approach uses 3D puff embroidery to create lift that catches light from different angles. To turn a concept into a compelling piece, designers map out the project, selecting fabrics, threads, and stabilizers to support layered stitches. This planning extends from initial sketch to finished display, where color, texture, and stitch height collaborate to convey volume in a finished textile piece. As patterns evolve, the hands-on craft of layering and mounting remains essential to ensure durability and a gallery-ready finish.
Seen from another angle, this form resembles a three-dimensional textile sculpture built from raised stitches and carefully padded regions. In this LSI-inspired view, the work behaves like textile relief, using fabric, threads, and padding to create volume and tactile contrast. Designers think in layers, balancing color, texture, and thread density to maintain cohesion while emphasizing form. The result plays with light and shadow, inviting viewers to move closer and examine the dimensional details that a flat motif cannot convey. This approach is applicable to wall displays, installations, or bespoke gifts, where crafted texture elevates the piece from decoration to narrative sculpture.
From Concept to 3D Embroidered Art: Mastering the Embroidery Design Process
Turning a concept into tangible art begins long before the first stitch. In 3D embroidered art, the journey blends imagination with robust planning and an understanding of the embroidery design process. Rather than tracing a flat sketch, designers translate ideas into layered forms, where height and padding create tangible volume. By thinking in three dimensions from the outset, you set up a framework that guides material choice, stitch selection, and construction steps. The discipline of 3D embroidery design invites experimentation with texture, color, and light, allowing a concept to emerge as a tactile sculpture rather than a decorative motif.
A successful piece typically moves through a clear pipeline: concept development, digital planning, material testing, and prototype reviews. This is where abstract ideas become actionable instructions for custom embroidery art. Tools such as vector sketches and digital embroidery planning software help preview how layers will align and how different stitch heights will read at distance. Documenting the embroidery design process with a bill of materials and color maps helps you maintain consistency across multiple pieces while ensuring the final embroidered wall art aligns with client dreams and space constraints.
Building Depth: Techniques for 3D Puff Embroidery and Layered Stitches
Depth in 3D puff embroidery comes from deliberate height differences and the strategic use of padding. Performed in layers, the technique elevates selected shapes while leaving surrounding areas flatter to ground the composition. When you combine 3D puff embroidery with carefully chosen threads and foam, light can skim the raised surfaces, creating subtle shadows that give the design a life beyond a flat surface. Layered stitches—such as offset satin or long short stitches—enhance contour without sacrificing stitch economy or durability.
These methods translate seamlessly to both wearable pieces and embroidered wall art. By considering the embroidery design process as a sequence of lift, definition, and texture, you can craft pieces that read clearly from a distance and invite close inspection up close. Practice and testing on swatches help you calibrate padding height and density so that the final work preserves form when framed or displayed without glass. The result is a cohesive expression of depth that remains robust under daily handling.
Choosing Materials for Custom Embroidery Art: Fabric, Stabilizers, and Threads
Materials selection is foundational to successful custom embroidery art. Start with a stable fabric that supports layers while preserving edge crispness, such as a medium-weight cotton or linen. Stabilizers prevent sagging under the weight of stacked stitches and padding, keeping the raised elements precise. For 3D effects, plan padding that matches the intended silhouette, then choose threads that offer both color brightness and tactile variation. The combination of fabric, stabilizers, and thread types shapes how the piece will wear, photograph, and endure as embroidered wall art in a real space.
Testing variations in material pairing early in the embroidery design process saves time and reduces frustration later. Consider the difference between a high-sheen rayon for luminous highlights and a matte cotton thread for softer, more tactile textures. Your bill of materials should specify fiber content, recommended needle sizes, and any seam allowances or mounting aids. When done well, the choice of materials reinforces the concept behind custom embroidery art, ensuring the final piece is both beautiful to touch and durable for display.
Color Theory for Embroidered Wall Art: Elevating Realism with Light and Shadow
Color theory plays a crucial role in implying depth in embroidered wall art. Because stitches create physical texture, you can use value, saturation, and temperature to simulate light and shade without relying on painting techniques. Warm tones tend to advance toward the viewer, cool tones recede, and subtle transitions between neighbors help the eye follow contours. Test colorways on small samples before committing to a full 3D embroidered art piece, then document the palette to guide future iterations in a consistent series.
Strategic color placement also serves storytelling. By aligning color shifts with the intended light source, you can emphasize focal features and create mood. In wall-hung pieces, the surrounding environment matters—contrast with a neutral backdrop or harmonize with interior schemes to ensure the embroidery design reads as intended. When you approach color thoughtfully, the depth and dimensionality of your 3D embroidery design become more believable and cohesive with the subject.
Planning with Clients: Communicating Scope, Size, and Texture in Embroidery Design
Planning with clients begins with a clear briefing about size, mounting method, and the desired texture. Communicate expectations early and document these details in the embroidery design process plan, including timelines and milestones. Sharing sample colorways, layer previews, and a proposed BOM helps clients understand how their custom embroidery art will evolve from sketch to stitch. A well-structured process reduces ambiguity and builds confidence that the final embroidered wall art will meet or exceed specifications.
Digital files that separate layers by color and stitch type are essential for both solo makers and studios producing series. Establishing proof stages—sketch approvals, color checks, and prototype reviews—aligns production with client vision. This collaborative approach is at the heart of the embroidery design process and ensures your piece remains faithful to the concept while accommodating practical constraints like fabric availability and display requirements.
Finishing, Mounting, and Caring for 3D Embroidery Design Pieces
Finishing and mounting techniques preserve the dimensional qualities of 3D embroidery design pieces. Consider shallow frames or non-glare displays that reduce reflections and protect the raised stitches. When relevant, choose mounting methods that accommodate fabric elasticity and prevent sag over time. The display choices you make influence how viewers experience depth, texture, and color in embroidered wall art.
Care and ongoing maintenance are essential for longevity. Dust lightly with a soft brush, avoid moisture, and handle pieces with clean hands to keep padding from compressing. Regular checks on stabilizers and backing materials help prevent distortion, especially in high-traffic or humid spaces. With thoughtful finishing, mounting, and care, a 3D embroidered art piece can remain a tactile centerpiece in any interior for years to come.
Frequently Asked Questions
What makes 3D embroidered art distinct from traditional embroidery, and how does 3D embroidery design contribute to depth?
3D embroidered art creates depth through raised stitches, padding, and layered threads, transforming a flat sketch into a textile sculpture. Unlike traditional embroidery, it relies on techniques like 3D puff embroidery and careful layering to build volume. The process often starts with a concept and proceeds through planning, substrate choice, and precise stitch height choices to keep the texture crisp, making it ideal for embroidered wall art and custom embroidery art.
Which materials are essential for starting a project in 3D puff embroidery within custom embroidery art?
Key materials include a stable fabric canvas, foam or padding for lift, stabilizers to prevent sag, and high-quality threads appropriate for the design. For 3D puff embroidery, padding height is critical, so select foam thickness and batting matched to your sketch. This combination supports the embroidery design process and yields durable custom embroidery art suitable for wall display.
Can you outline the embroidery design process for turning a sketch into 3D embroidered wall art?
Yes. Start with concept development and rough sketches, then move to digital planning to map layers, colors, and stitch types. Translate depth into layers, using padding and raised stitches for 3D effects. Prototyping on swatches allows you to test height and tension, before finalizing for embroidered wall art. Finally, prepare a production file and mounting plan.
How do color and stitch height influence depth in 3D embroidered art?
Color theory guides depth: warmer colors advance while cooler tones recede, helping simulate light and volume on 3D embroidered art. Stitch height and layer order are adjusted to emphasize contours, with satin and long-short stitches chosen for edge definition. Proper planning ensures the final piece reads as sculpture rather than flat embroidery.
What steps should designers take when managing a 3D embroidered art project from brief to finished piece?
Begin with a clear brief and concept, then draft sketches and a bill of materials. Create a digital file with layered colors and stitch types to guide production, and share a visual plan with the client for approvals. Consider mounting method and environment to ensure the 3D effects translate to the final embroidered wall art.
How should one care for and mount embroidered wall art to preserve its 3D texture?
Mount the piece in a shallow frame or display without glass to preserve depth, and avoid direct moisture. Gently dust and store away from high humidity. For pieces with 3D puff embroidery, ensure padding remains intact and check stitches occasionally. Proper mounting and care keep the texture vibrant in embroidered wall art for years.
| Key Point | Summary |
|---|---|
| Depth and Texture | 3D embroidered art uses raised stitches, padding, and layering to create depth and tactile texture, turning flat sketches into living textile sculpture. |
| Design Process Stages | Concept development, digital planning, material selection, stabilization, and finishing; organize planning, execution, and finishing to guide depth and cohesion. |
| Techniques that Lift the Work | 3D puff embroidery, padding, and layered stitches create lift; stitch choice influences how light interacts with the surface and the final volume. |
| Planning & Production Documentation | Clear communication with clients, a bill of materials, and digital files that separate layers by color and stitch type to maintain depth and consistency. |
| Color Theory and Light | Color value and saturation cue depth; warmer tones tend to advance while cooler tones recede; test colorways on small samples before finalizing. |
| Materials and Tools | Fabrics like cotton or linen provide a natural base; stabilizers prevent sagging; padding materials (foam, batting); threads vary in sheen and texture to influence highlights and matte areas. |
| Challenges and Quality | Scaling can alter perceived depth; manage tension to prevent sag; practice on swatches for padding height and stitch density; consider lighting to verify depth in the display piece. |
| Presentation and Care | Mounting and framing should preserve texture; use minimal glass to avoid reflections; protect from humidity and handle with care to maintain layered integrity. |
Summary
3D embroidered art invites the senses into a tactile narrative where depth, texture, and color coalesce to transform ideas into living textile sculpture. Across the design journey—from initial concept to finished piece—the craft harmonizes imagination with technique, offering wall art that communicates with eye and touch. In this field, 3D embroidered art stands apart as a form of custom embroidery art that emphasizes layered stitches, padding, and strategic color to sculpt surfaces. Whether for a client commission or a personal project, embracing the principles of depth, color, and material choices can help realize compelling 3D embroidered art that resonates in any space.