
3D embroidered patches bring depth, texture, and personality to textiles, appealing to fashion brands, hobbyists, and DIY enthusiasts alike. In practice, dimensional embroidery patches use puff stitches, foam, or layered fabrics to rise from the surface and become tactile statements. They work well on jackets, backpacks, caps, and sneakers, and they double as a versatile branding and customization tool. For designers and retailers, staying on top of embroidered patch trends and offering iron-on patches vs sew-on patches helps teams stand out. If you’re new to making them, this guide covers the basics of design, materials, and wearability, plus practical tips like how to make patches that last.
Beyond the simple term raised fabric decorations, designers describe the look as dimensional embroidery or raised badges that sit proudly on fabric. These phrases reflect the same concept, emphasizing layers, padding, and strategic stitching that create depth and durability. Using terms like puff embroidery, multi-layered patches, and textured appliqués helps address broader search intent while keeping the topic accessible. Regardless of terminology, the approach remains the same: define the shape, choose backing and padding, plan stitches, and test the texture on a sample. As you explore ideas for apparel, bags, or teams, using LSI-friendly language that connects to related topics can widen reach and relevance.
What Are 3D Embroidered Patches and How They Elevate Design
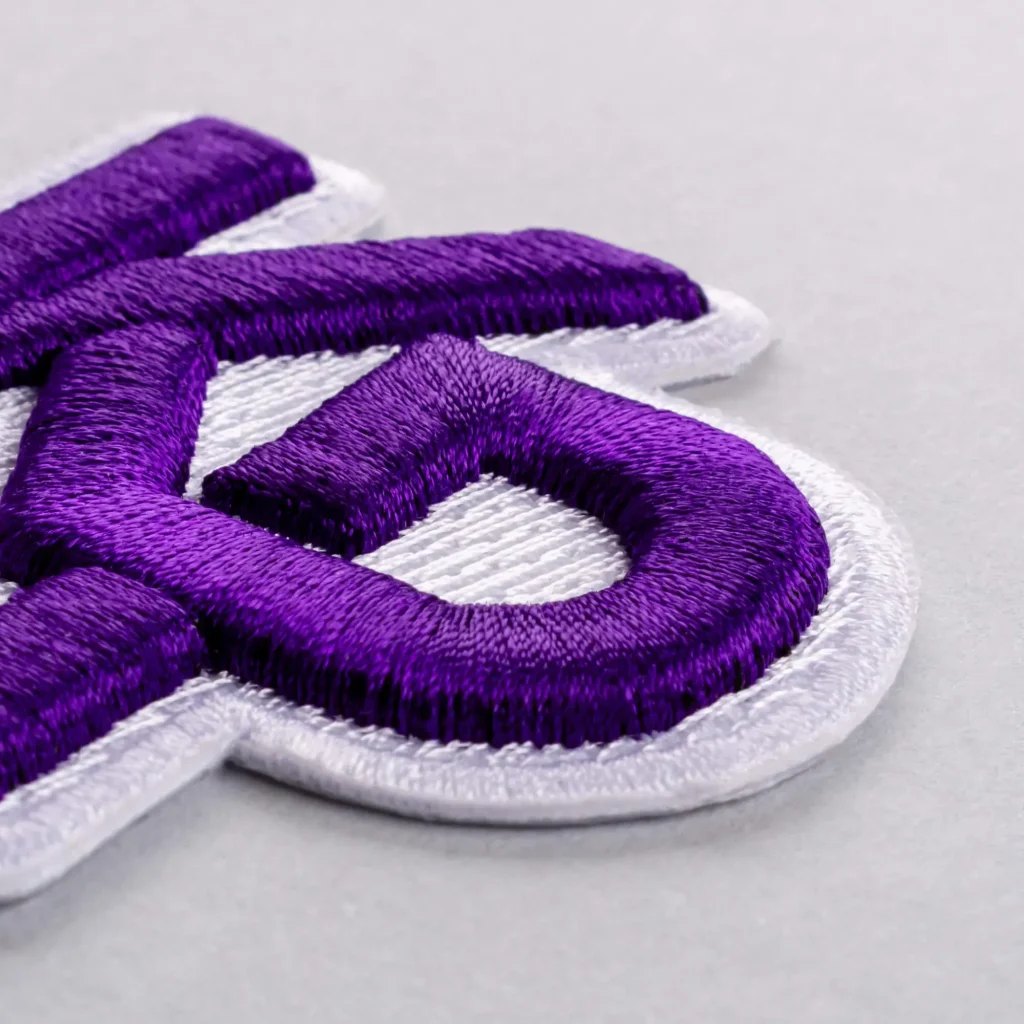
3D embroidered patches rise from the fabric surface through puff stitches, foam, or layered fabrics, creating depth and texture that instantly attracts the eye. They transform simple logos into tactile statements, elevating jackets, caps, backpacks, and even sneakers into design-forward pieces. Because the 3D effect adds volume, these patches communicate energy, brand personality, and craft in a way flat patches cannot.
Material choices and backing options play a crucial role in how well these patches wear. Stabilizers keep fabric stable, foam padding defines the puff, and edge finishes—merrow borders or laser-cut silhouettes—lock in the silhouette. When you select backing and thread types carefully, you maximize durability and washability, so the patch remains vibrant through seasons of use.
Current Embroidered Patch Trends: Size, Texture, and Sustainable Materials
Embroidered patch trends show a clear move toward large-scale patches with bold color blocks that command attention on outerwear and bags. Clean, chunky outlines and high-contrast palettes help patches read from a distance, turning them into primary design elements rather than afterthought accents.
Another wave of trends emphasizes multilayered textures—foam, felt, and fabric layers—to create tactile collage effects. Eco-friendly materials and processes—recycled backings, sustainable threads, water-based adhesives—are expanding the market, while licensing and artist collaborations bring fresh color stories and collectible appeal.
Patch Customization Ideas that Spark Collectability
Patch customization ideas invite designers to push shape, color, and texture beyond conventional forms. Move from circles to custom badges inspired by logos, characters, or natural forms, with clean edge finishes that stay sharp when scaled. 3D embroidery patches can emphasize depth by layering foam or felt under precise stitch work, making each piece feel unique.
Layered dimensions can be achieved with foam for the main body, felt for accents, and a satin stitch outline, creating depth that catches light and touch. Backings, finishes like merrow borders, and limited editions or artist collaborations further enhance collectability and narrative across a collection.
A Practical Guide: How to Make Patches from Idea to Finish
Design to production starts with a clear concept, rough sketch, and a color direction, followed by digitizing the artwork into an embroidery-ready file. For 3D patches, plan padding layers and the puff strategy to ensure the raised areas hold their shape during stitching.
Next comes material selection, a digitized stitch plan, prototyping, and a controlled production run with quality checks. If you’re looking for a quick answer to how to make patches, follow these steps: concept and color palette, digitize with puff planning, material selection, test stitch, refine, then produce and finish with care instructions and authentic labeling.
Choosing Backings: Iron-On Patches vs Sew-On Patches for Different Garments
Backings dramatically affect usability and care. Iron-on patches offer quick decoration but can soften or peel with heat and wash cycles; sew-on patches deliver durability for long-term wear. When comparing iron-on patches vs sew-on patches, consider heat tolerance, washing, and comfort.
Velcro backings provide removable options for bags and uniforms, expanding patch applicability across garments and gear. For heavy-use items, sewing-backed patches or other durable backings may outperform adhesive-only options, ensuring the patch stays in place through repeated use.
Care, Durability, and Longevity: Keeping 3D Patches Looking Fresh
Care and durability begin with material choices and proper finishing. Patches that use foam require gentle washing, turning inside-out, and avoiding high heat to preserve puff and edge integrity. Stabilizers and high-quality threads also play a critical role in resisting wear over time.
End-use considerations, including frequent washing or exposure to sunlight, can influence thread choices and backing durability. By planning care instructions, testing patches on target fabrics, and selecting robust edge finishes, brands can extend the life of 3D patches and keep colorfastness intact through seasons of use.
Frequently Asked Questions
What are 3D embroidered patches and how do they differ from flat patches?
3D embroidered patches rise from the fabric surface using puff stitches, foam, or layered fabrics to create depth. This 3D effect makes the patches more tactile and eye catching than traditional flat patches, supporting stronger branding and style statements on jackets, bags, hats, and more.
What are the latest embroidered patch trends for 3D embroidery patches?
Current 3D embroidered patch trends include large scale patches with bold color blocks, multilayered textures using foam and felt, eco friendly materials and water based finishes, detailed micro patches for collections, new backings and fastenings such as iron on, sew on, and Velcro, licensing and art collaborations, and streamlined digital design to production workflows.
What are some patch customization ideas for 3D patches?
Patch customization ideas for 3D patches include exploring unique shapes beyond circles, bold color strategies, layered dimensions with foam and fabric, elevated text and typography, multiple backings for versatility, limited editions and artist collaborations, crisp edge finishes, and thematic series that tell a story across a collection.
How to make patches: what is the design to production workflow for 3D embroidered patches?
A practical workflow for 3D embroidered patches starts with a concept and color palette, followed by digitizing with puff planning for padding layers, material selection including backing and foam, a digitized stitch plan that defines puff areas, prototyping to check texture and balance, production with quality checks, and finishing and packaging that highlights care instructions.
Iron on patches versus sew on patches for 3D patches which backing should I choose?
For 3D embroidered patches, iron on patches offer quick decoration for temporary use, while sew on patches provide durability and washability. The preferred backing depends on the end use; Velcro backings add removability, while sew on is best for long lasting wear on garments and bags.
How to care for and ensure durability of 3D embroidered patches and what backing and finishing options matter?
Care for 3D embroidered patches includes washing on gentle cycles with similar fabrics, turning garments inside out, and avoiding high heat that can affect foam padding. Choose backing based on use case, such as iron on for quick decoration or sew on for durability, and consider edge finishes like merrow borders or laser cut edges for longevity. Use colorfast threads and test patches on the intended material.
| Section | Key Points | Details / Examples |
|---|---|---|
| What are 3D embroidered patches? | 3D effect via puff stitches, foam, or layered fabrics; adds depth, texture, and personality; versatile branding and customization tool. | They rise from the fabric surface and are built with padding layers and durable materials to convey energy and brand personality beyond flat patches. |
| Trend: Large-scale patches | Bold color blocks and focal points on outerwear/bags. | High-contrast colors and chunky outlines create impact from a distance. |
| Trend: Multilayered textures | Foam, felt, and fabric layers for a tactile collage. | Different materials emphasize elements like raised lettering or glossy outlines. |
| Trend: Eco-friendly materials | Sustainable threads, recycled backing, water-based adhesives. | Consumers expect stylish patches that are also responsible. |
| Trend: Detailed micro-patches | Small patches with intricate stitching for capsule collections. | Used to build a patch wall or complement larger patches. |
| Trend: Custom backing and fastenings | Iron-on, sew-on, Velcro backings. | Expands application across garments, bags, and gear. |
| Trend: Licensing and artist collaborations | Partnerships with artists, teams, and brands. | Drives unique textures, color palettes, and collector interest. |
| Trend: Design-to-production efficiency | Digitizing for 3D embroidery. | Faster iteration from concept to sample. |
| Customization idea: Shape and silhouette | Move beyond circles/shields to custom badges. | Complex shapes with clean edges stand out. |
| Customization idea: Color strategy | Bold foreground hues with muted backdrops; metallic/iridescent finishes. | Enhances raised elements while maintaining durability. |
| Customization idea: Layered dimensions | Multiple layers (foam, felt, satin stitch) for depth. | Creates deep, tactile texture. |
| Customization idea: Text and typography | Careful stitch density for legibility at different sizes. | Supports block, script, or custom typography. |
| Customization idea: Backings and usability | Iron-on for quick wear, sew-on for durability, Velcro for removability. | Broadens use across garments, bags, gear. |
| Customization idea: Limited editions and artist collabs | Limited runs with artist motifs and colorways. | Increases collectability and audience engagement. |
| Customization idea: Finishing touches | Merrow borders or laser-cut edges. | Crisp outlines and clean silhouettes. |
| Customization idea: Functional textures | Non-traditional textures (suede-like, plush, metallic threads). | Conveys premium look and feel. |
| Customization idea: Thematic series | Coordinated patches that tell a story across a collection. | Effective for lifestyle brands and school teams. |
| Design-to-production workflow: Concept and sketch | Start with a clear idea, rough sketch, and color direction. | Sets foundation for digitizing and material choices. |
| Design-to-production workflow: Digitizing | Convert sketch into embroidery-ready file; plan padding layers. | Critical for 3D effects and proper padding placement. |
| Design-to-production workflow: Material selection | Choose backing, foam density, thread types, finishes. | Polyester is common for durability; rayon for sheen. |
| Design-to-production workflow: Digitized stitch plan | Outline satin borders, fill stitches, puff areas; check density. | Validate stitch count to avoid puckering. |
| Design-to-production workflow: Prototyping | Produce a prototype to test texture and edge quality. | Adjust thickness and placement as needed. |
| Design-to-production workflow: Production | Full production with quality checks (edge, backing). | Ensure consistency and durability. |
| Design-to-production workflow: Finishing and packaging | Backings chosen, care instructions and authenticity labeling. | Packaging highlights care for longevity. |
| Materials and techniques | Padding and foam; stabilizers; threads; edges; backings; adhesives and finishes. | Foam depth, stabilizer strength, thread colorfastness, merrow or laser-cut edges, iron-on/sew-on/Velcro backings. |
| Care, durability, and end-use considerations | Wash/dry carefully; avoid high heat; choose appropriate backings; colorfast threads. | Follow care tips to extend life and preserve appearance. |
| Where 3D embroidered patches fit best | Versatile across fashion brands, hobbyists, sports teams, corporate branding, designers. | Use for identity, storytelling, mascots, event logos, collaborations, and catalogs. |
| Conclusion (summary not in table) | Note: Table summarizes key points from the base content. |