
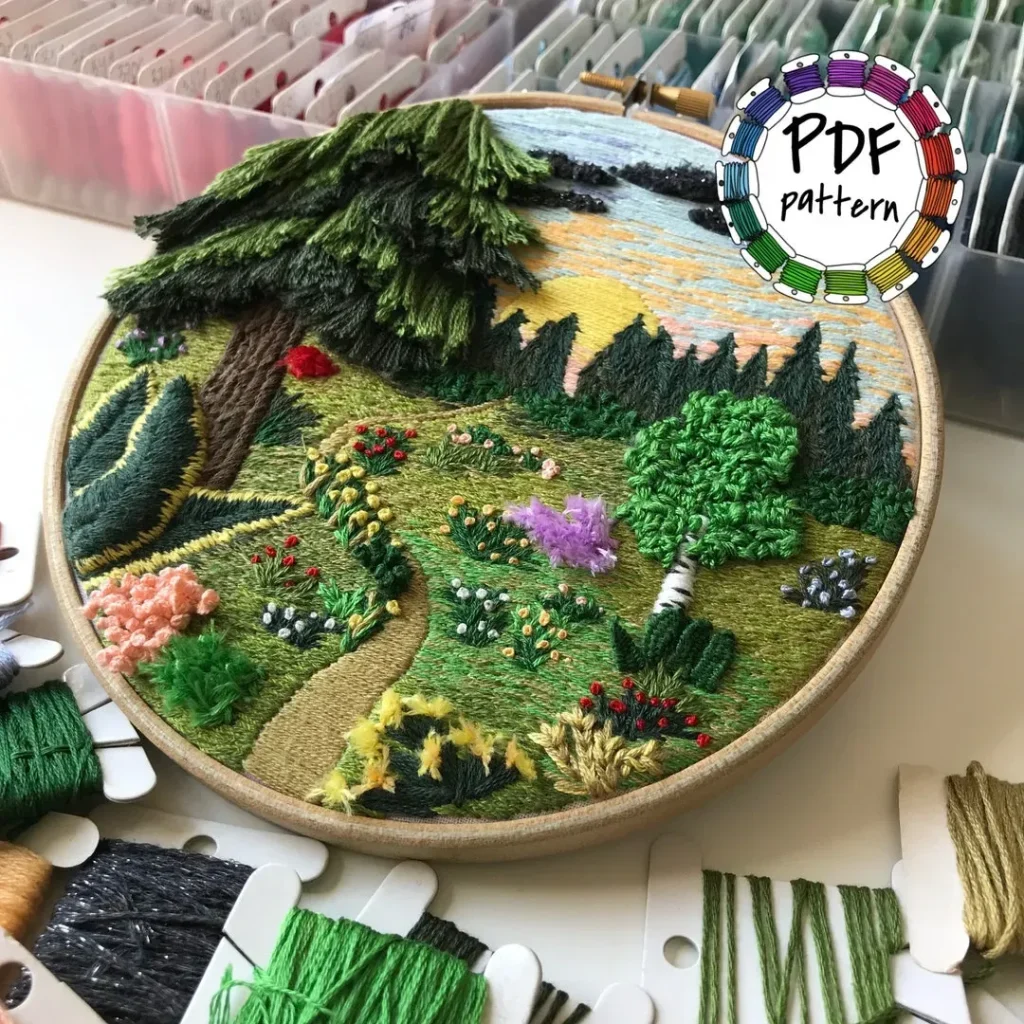
3D embroidered patterns are transforming the way crafters think about fabric, thread, and texture. Rather than lying flat, these designs pop off the cloth, adding dimension, shadow, and tactile interest to home decor and wearable art. If you’re new to this world, starter projects offer a gentle entry point to test stitches, stabilizers, and threads. The key is understanding how layering, padding, and different stitches create height without overwhelming your project. With curiosity and patience, you can turn simple motifs into finished pieces you’re eager to show off.
In broader terms, this field shifts from flat stitching to raised motifs and layered textures that catch light and invite touch. You’ll encounter terms that describe height and depth, including puff effects and layered textures. To support discovery, this guide points to resources such as free embroidery patterns that help learners gain confidence. Beginner embroidery projects provide practical milestones, letting you practice padding, layering, and stitch variety before tackling more complex designs. Whether you stitch by hand or with a computer-assisted setup, the core ideas remain the same: build texture, refine tension, and enjoy the dimensional results.
What Are 3D Embroidered Patterns?
3D embroidered patterns are motifs stitched with layers, padding, or raised stitches to create a textured, dimensional surface on fabric. They achieve height by layering fabric behind the embroidery, using felt or foam padding, or combining different stitch types to build up the surface. The result is tactile and visually dynamic, transforming simple designs into pieces with depth and shadow.
In practice, you’ll encounter terms like 3D embroidery designs, 3D puff embroidery, and 3D embroidered patterns. For beginners, start with 3D embroidered patterns that align with free embroidery patterns and starter embroidery patterns, so you can learn layering without getting overwhelmed. These terms anchor the technique while you explore materials and stitches.
Getting Started with Starter Embroidery Patterns for Beginners
Choosing the right starter embroidery patterns helps you learn gradually. Look for small, symmetrical motifs, limited color palettes, and clear instructions for fabric type, stabilizer, hoop size, and stitch count. Patterns labeled as starter embroidery patterns or free embroidery patterns let you practice without a large commitment while you master basic stitches and layering.
As you progress, you can transition from hand embroidery to machine embroidery designs, but the focus remains on fundamentals: keeping the hoop taut, selecting an appropriate stabilizer, and building height in stages with padding. This progression mirrors common beginner embroidery projects, starting with simple shapes and evolving into more complex layers and textures.
Techniques to Create Realistic 3D Texture
Techniques to create realistic 3D texture include layering, strategic padding, satin stitches, and long-and-short stitches to add shading. By building up padding behind selected areas, you create raised features that cast natural shadows and give life to flowers, animals, or geometric motifs. This is the heart of translating flat motifs into 3D embroidered patterns.
Color variation and texture variety help mimic real-world surfaces, while you can choose between hand embroidery for tactile control or machine embroidery designs for precise height and repeatability. The goal is believable depth in your 3D embroidered patterns, whether you’re stitching by hand or with a hoop-and-hoist setup.
Free Resources to Find Starter Patterns
Free Resources to Find Starter Patterns: There are many places to discover free embroidery patterns suitable for beginners. Online craft communities, embroidery blogs, and maker marketplaces curate starter embroidery patterns that include notes on fabric type, stabilizer, hoop size, and stitch counts.
Look for patterns labeled as free embroidery patterns or starter embroidery patterns, and check whether they support both hand embroidery and machine embroidery designs. Many patterns also offer padding tips and color suggestions to help you practice layering and achieve dimensional results.
Project Ideas for Quick 3D Embroidered Patterns
Put your skills into practice with simple, beginner-friendly projects. Consider a pillow cover with a raised floral motif, a tote bag accent, or a small wall hanging built from repeating geometric shapes. These beginner embroidery projects let you enjoy the 3D effect without overwhelming stitches.
As you grow, adapt starter embroidery patterns into larger pieces and experiment with padding placement and thread shades to create a personal touch. Use free embroidery patterns as starting points, but don’t be afraid to mix machine embroidery designs with hand embroidery to achieve the desired texture.
From Hand to Machine: Adapting 3D Embroidered Patterns
While hand embroidery offers an intimate, tactile feel, machine embroidery designs open options for repeatability and speed when producing 3D effects. Learn to translate the same motif into layers and padding with machines, or apply machine techniques to hand-crafted patterns for a different texture.
Key considerations include selecting the right stabilizer, adjusting thread density, and planning padding behind key areas to maintain the dimensional look. Starter embroidery patterns often provide guidance for both hand and machine methods, helping you move from straightforward beginner embroidery projects to more ambitious 3D designs.
Frequently Asked Questions
What are 3D embroidered patterns and how do they add depth to fabric?
3D embroidered patterns are motifs stitched with layers, padding, or raised stitches to create a textured, three-dimensional effect on fabric. Depth is achieved through padding behind elements, satin stitches, and layered colors, producing a dimensional look you’ll find in 3D embroidery designs. Both hand embroidery and machine embroidery designs can achieve this feel, and beginners can start with simple 3D embroidery patterns or starter embroidery patterns to learn the basics.
Where can I find free starter embroidery patterns for exploring 3D embroidered patterns?
Look for free embroidery patterns labeled as starter embroidery patterns on online craft communities, embroidery blogs, and maker marketplaces. Choose designs that include padding or layered elements so you can practice the 3D effects without getting overwhelmed. Many options are adaptable to both hand embroidery and machine embroidery designs, making them ideal for beginners.
What beginner-friendly techniques help create realistic 3D texture in patterns?
Key techniques include layering and padding behind the motif, satin stitches for a smooth top, and long-and-short stitches for shading. Use subtle color variation to suggest light and shadow, and keep the initial designs small to stay within a beginner embroidery project’s comfort zone. Selecting the right stabilizer also helps prevent puckering while building texture.
Can I create 3D embroidered patterns by hand or with a sewing machine?
Yes. Hand embroidery offers tactile control for texture, while machine embroidery designs can reproduce 3D effects through careful layering and padding with stitches. Both approaches work well with free starter designs and beginner embroidery projects, so choose the method you enjoy and learn at your own pace.
How should I choose my first starter pattern for a 3D embroidered pattern project?
Choose small, symmetrical motifs with a limited color palette to keep the learning curve gentle. Look for patterns labeled as starter embroidery patterns and suitable for beginner embroidery projects, ensuring they include padding or layering to practice the 3D effect.
What steps should I follow to complete a 3D embroidered pattern from a free starter design?
Gather your materials, select an appropriate stabilizer, and prepare and hoop the fabric. Build the 3D effect by adding padding behind elements, then apply top layers with satin or long-and-short stitches. Finish by securing threads and following the pattern’s embroidery sequence, especially if you’re using a machine embroidery design.
| Topic | Key Points | Practical Tips |
|---|---|---|
| What are 3D embroidered patterns? | Motifs stitched with layers, padding, or raised stitches create a textured, three‑dimensional effect. Methods include layering fabric under the embroidery, using padding behind stitches, adding extra stitches to build height, or combining stitch types. The result is a tactile design with depth from multiple angles. | Plan padding or layered elements; consider layering under motifs and combining stitches. For machine embroidery, ensure appropriate layering; hand embroidery offers more texture control. |
| Starter designs & learning path | Free starter designs provide a no‑cost entry to practice basics, test stabilizers and threads, and reduce intimidation for beginners. | Choose patterns labeled “starter”; begin with small motifs and a simple color palette to build confidence. |
| Materials & fundamentals | Stabilizers, threads, and needles are essential. Stabilizers prevent puckering; thread choice affects sheen or matte texture; beginner patterns favor simple shapes and few color changes. | Use thicker thread weights for 3D effects; choose padding materials like foam or felt; keep shapes simple to ease learning. |
| Finding & choosing patterns | Many sources offer free starter designs; documentation should include fabric type, stabilizer, hoop size, stitch count; look for padding or layered elements; patterns should be adaptable to hand or machine embroidery. | Pick patterns with clear instructions; ensure they stay within your comfort zone; prefer patterns adaptable to both hand and machine embroidery if needed. |
| Step-by-step approach | Gather materials, choose stabilizer, prepare and hoop fabric, start with base shapes, build 3D padding, add layers and texture, finish, and follow machine embroidery sequences if used. | Follow pattern order; plan the workspace; maintain hoop tension and organization. |
| Techniques for realism | Layering, strategic padding, satin and long‑and‑short stitches, texture variety, color variation, and clean edge finishing contribute depth and believability. | Use padding behind motifs; vary thread shades; ensure clean edges around padding to maintain silhouette. |
| Projects & care | Ideas include pillows, tote bag accents, wall hangings, clothing embellishments, and soft toys. Care involves hand wash or gentle machine cycles, mild detergents, and air drying; refresh padding if needed. | Choose patterns within your comfort zone; maintain padding integrity during care. |
Summary
Conclusion: 3D embroidered patterns offer a compelling way to add depth, tactile interest, and personality to fabric projects. Free starter designs are perfect for beginners who want to learn the basic techniques of 3D embroidery, test color strategies, and experiment with padding and layering. By combining simple motifs with thoughtful texture choices, you can create pieces that are visually striking and delightful to touch. Whether you’re pursuing hand embroidery projects or exploring machine embroidery designs, the journey from flat to dimensional is approachable, enjoyable, and rewarding.