
3D embroidery for beginners opens a world of texture, dimension, and playful creativity. This approachable guide introduces the core techniques, the right beginner embroidery materials, and the best 3D embroidery tools for beginners so your first projects feel rewarding. You’ll learn how to do 3D embroidery with padding, layering, and secure finishing, while exploring popular 3D embroidery techniques. Starting with simple shapes and gentle padding helps you build confidence as you finish your first 3D embroidery projects for beginners. By the end, you’ll have a toolkit of tips for securing layers, selecting fabrics, and planning projects that pop with texture.
Three-dimensional embroidery for beginners can also be explored as dimensional stitching that builds raised motifs through padding, layering, and careful contouring. This alternate framing uses terms like dimensional stitchwork, textured surface embroidery, and beginner-friendly materials to help you find related tips and tutorials across different search terms. If you’re seeking a softer entry, think of it as sculptural sewing—adding volume with stuffing behind fabric shapes, securing edges, and choosing fabrics that hold form. By using varied textures and padding densities, you’ll discover how to translate ideas into tangible, tactile designs ready for display.
1) Getting Started with 3D Embroidery for Beginners: Tools, Materials, and Setup
Starting 3D embroidery hinges on a well-organized space, the right set of tools, and beginner-friendly materials. Embracing 3D embroidery techniques from the outset helps you visualize texture and depth, making each stitch count toward a tangible lift in your designs. As you plan, keep in mind the core terms of the craft—3D embroidery techniques, 3D embroidery tools for beginners, and beginner embroidery materials—to guide your purchases and practice sessions.
Set up a comfortable workspace with an embroidery hoop in the 8- to 10-inch range, a sharp embroidery needle or a chenille needle for padding, and a small pair of scissors. Having simple padding supplies like polyester fiberfill or cotton batting nearby makes it easy to experiment with volume. Pair these basics with tear-away stabilizers for stability and a water-soluble option for delicate areas, and you’ll have a solid foundation for your first 3D projects.
2) Core 3D Embroidery Techniques Every Beginner Should Learn
A strong start in 3D embroidery centers on padding and layering to build volume. Padding behind stitches, combined with satin stitch or long-and-short fill, creates the raised surfaces that define petals, leaves, and little figures. As you practice, you’ll broaden your toolkit with running stitches for outlines, backstitches for crisp edges, and seed stitches for texture—each contributing to the dimensional feel of your work.
To deepen your understanding of how to do 3D embroidery, begin combining techniques on a simple motif. Layer padding gradually, then secure edges with neat satin stitches. Use contrasting textures—matte cotton for the base, a shinier thread for highlights—to add depth. This approach reinforces 3D embroidery techniques while keeping projects approachable for beginners.
3) Choosing Beginner Embroidery Materials for Texture and Depth
Material selection directly affects the texture and durability of your 3D embroidery. Start with forgiving bases like cotton, linen, or felt, which hold shapes well and reduce fraying. For threads, blend stranded cotton and perle cotton with occasional novelty fibers to introduce subtle differences in sheen and dimension, contributing to a richer surface that speaks to 3D embroidery techniques.
Padding options matter as well. Polyester fiberfill, wool roving, or cotton batting can create different volumes behind raised elements, and stabilizers (tear-away, cut-away, or water-soluble) provide essential support during stitching. When planning, also think about base shapes—small appliqué pieces you can layer and pad—to anchor raised forms and keep your 3D embroidery projects for beginners cohesive and durable.
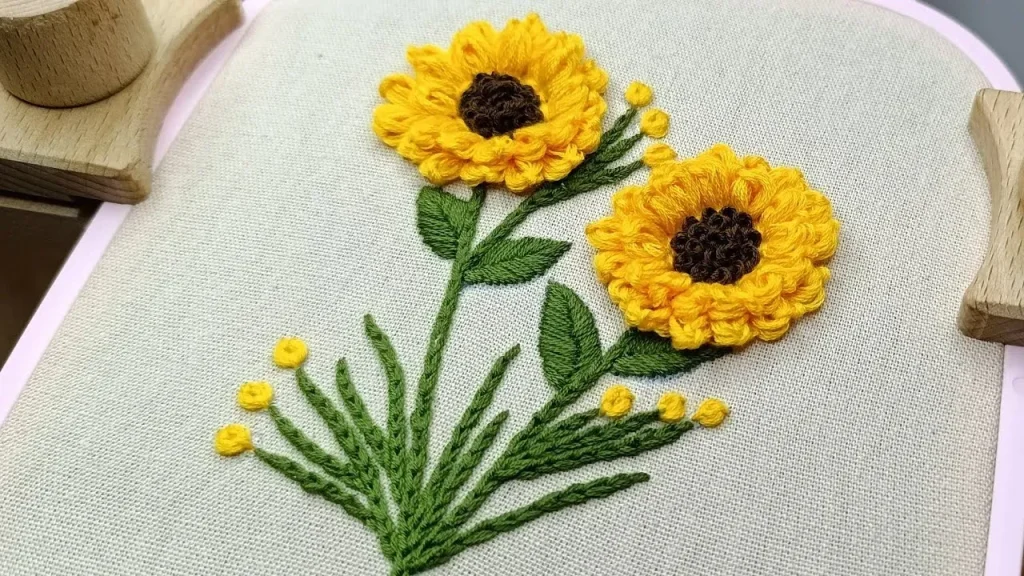
4) A Starter Project for 3D Embroidery for Beginners: Puff Flower
A puffed flower is a classic entry point for 3D embroidery for beginners. Start with a small center base and three layered petals, using padding behind the petals to create a rounded center and a gentle lift around the edges. As you stitch, you’ll apply basic techniques—layering, satin stitches for the petal bodies, and a few seed stitches along the edges—to establish a convincing 3D look without overwhelming yourself.
This starter project also demonstrates how to do 3D embroidery in practice: position each petal around the padded center, secure with short, even stitches, and finish with a light press from the back to preserve the shape. Completing this puff flower builds confidence in padding, layering, and securing raised elements, setting you up for more intricate 3D embroidery projects for beginners.
5) Troubleshooting and Finishing: Keeping Your 3D Embroidery Durable
Even experienced stitchers encounter issues like wrinkling, gaps between layers, or unraveling threads. If fabric pucks or wrinkles appear, re-tension the piece in the hoop and adjust padding to be more evenly distributed. Gaps can be addressed by ensuring edges are firmly anchored and padding is applied consistently behind raised areas, while unraveling threads benefit from securely tied knots and weaving the ends back into nearby stitches.
Finishing touches are essential for durability. Weave thread tails into adjacent stitches, trim cleanly, and consider mounting the finished piece on a frame or fabric panel to showcase the 3D elements. If you used a wash-away stabilizer, follow the product instructions for removal after completing your piece to prevent any shift in shape. These finishing steps help your 3D embroidery withstand handling and time.
6) Expanding Your Skills: 3D Embroidery Projects for Beginners to More Complex Designs
As you gain confidence, begin exploring more 3D embroidery projects for beginners, such as a 3D butterfly, raised fruit, or a layered landscape with hills and trees. Each new project reinforces the core skills of padding, layering, and securing shapes, while introducing variations in color, texture, and form that keep practice engaging. This progression aligns with your growing familiarity with 3D embroidery techniques and your ability to orchestrate more complex textures.
To accelerate growth, establish a consistent practice routine—20 to 30 minutes of focused stitching most days, or a weekly set of motifs you want to master. Keep a small notebook of stitches used, padding methods, and color combinations that worked well, then review completed pieces to identify a single area for improvement in your next project. By continually applying what you’ve learned about how to do 3D embroidery, you’ll expand from beginner-level 3D embroidery projects for beginners to richer, more ambitious designs.
Frequently Asked Questions
What is 3D embroidery for beginners and why start with it?
3D embroidery for beginners creates raised forms on fabric using padding and layering. It’s ideal for building basic hand-stitching skills with simple shapes before tackling more complex designs. You’ll learn to manage fabric tension and secure padding for durable, textured results.
Which 3D embroidery tools for beginners should I gather first?
Core tools include an embroidery hoop to keep fabric taut, sharp needles (embroidery or chenille), small scissors, and pins or fabric glue. A needle threader helps with fine threads. These basics set you up for clean, compact padding and shapes.
What beginner embroidery materials should I choose for 3D embroidery?
Start with cotton, linen, or felt as bases, plus padding like polyester fiberfill. Use a mix of threads (stranded cotton, perle cotton) and optional ribbon for texture. Stabilizers and base shapes support your raised elements and keep edges neat.
How to do 3D embroidery as a total beginner?
Begin with a small motif, place padding behind the top fabric, and secure edges with running or satin stitches. Layer gradually, attach parts with short, flexible stitches, and finish by trimming threads and stabilizing the back. Practice on simple shapes before moving to more complex 3D embroidery projects.
What are the essential 3D embroidery techniques for beginners to learn?
Key techniques include padded stitches to build volume, satin stitch and long-and-short fill for smooth surfaces, and running or backstitch for outlines. Seed stitches add texture, while couching can create decorative raised lines. Mastery of these provides a solid foundation for 3D embroidery.
What are some beginner-friendly 3D embroidery projects for beginners I can try?
Try a small 3D puffed flower, a leaf with raised veins, or a tiny animal. These 3D embroidery projects for beginners teach padding, layering, and securing shapes, building confidence for more ambitious pieces.
| Topic | Key Points |
|---|---|
| What is 3D embroidery for beginners? |
|
| Why start with 3D embroidery? |
|
| Essential tools for 3D embroidery beginners |
|
| Key materials for creating 3D effects |
|
| Common beginner-friendly techniques to master |
|
| A simple starter project idea |
|
| Techniques in detail: how to do 3D embroidery for beginners |
|
| Step-by-step starter project: a 3D puffed flower |
|
| Troubleshooting common issues |
|
| Advanced tips for future projects |
|
| Maintenance and finishing touches |
|
| How to continue learning: 3D embroidery projects for beginners |
|
| Building a practice routine |
|
Summary
3D embroidery for beginners is a creative and rewarding path that blends traditional stitching with playful volume, texture, and dimension. By starting with the right tools and materials and mastering padding, layering, and secure finishing, you’ll build confidence to tackle more ambitious 3D embroidery projects for beginners. With patience and steady practice, your textile art will gain depth, texture, and character that make your pieces stand out.