
3D embroidery techniques transform flat fabric into tactile art by adding height, texture, and dynamic color. From puff embroidery to foam padding embroidery, these methods create raised elements that catch light and invite touch. Dimensional embroidery, with layered stitching and padding, helps petals, letters, and motifs pop off the surface. This introductory guide covers the core concepts and practical tips you need to master 3D embroidery stitches that elevate any project. By planning, padding, and careful digitizing, you can turn ordinary fabrics into expressive, durable works of art.
A handy way to frame this is raised-stitch work or volume stitching, where fabrics gain dimensional character through padding and layered threads. Designers often refer to dimensional embroidery, raised appliques, or 3D embroidery with felt to achieve tactile detail. The goal remains to build structure from the inside out, using padding, backing, and careful digitizing so the motif reads sculptural rather than flat. Think of it as sculpting with thread—layer by layer, zone by zone—to capture shading, volume, and movement. Whether you call it dimensional embroidery, raised embroidery, or textural stitching, this approach adds tactile appeal to apparel, decor, and branding.
Exploring 3D embroidery techniques: depth, texture, and impact
3D embroidery techniques add height and tactile presence to fabric, turning flat surfaces into sculpted art. By layering stitches, padding, and raised elements, you can create dimensional embroidery that catches light and invites touch. In practice, this means thinking beyond simple satin or fill stitches and planning where padding will live under the thread to push it upward. Techniques like dimensional embroidery, puff embroidery, and foam padding embroidery each contribute different shapes and levels of elevation, while even felt can become a structural ally in 3D embroidery.
Successful implementation starts with a plan: choosing the right stabilizers, selecting padding materials, and digitizing for multi-pass stitching. The goal is consistent height and clean transitions between layers, so designs like flowers, letters, or playful characters feel anchored yet buoyant. Whether you’re aiming for subtle shading or bold pop, these 3D embroidery techniques give you a toolkit to transform ordinary projects into statement pieces.
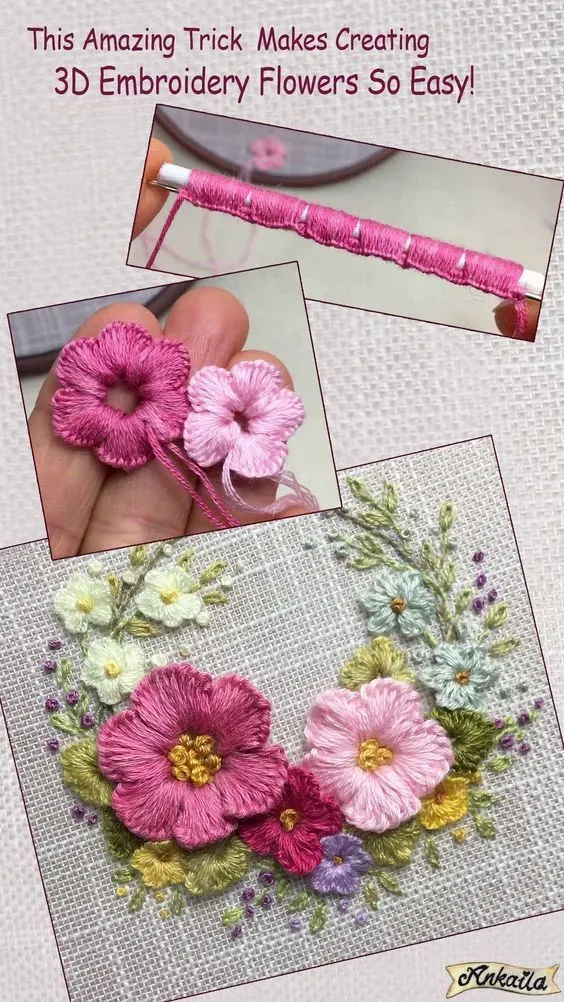
Puff Embroidery: Quick Height and Soft, Round Bumps
Puff embroidery creates soft, rounded bumps by stitching around a ring or placing padding beneath threads. The result is a quick elevation that adds visible dimension without heavy padding. Puff embroidery is particularly effective for small motifs, logos, or edge-oriented designs where a crisp edge with gentle volume is desired, and it pairs well with dimensional embroidery layering for more complex shapes.
For best results, choose thread types that hold shape—rayon or polyester on sturdy fabric—and consider padding thickness to achieve the desired height. Position the padding inside or behind the edge of the motif, then stitch with dense satin or long-armed stitches. Remember that puff embroidery can complement other 3D stitches without overwhelming the fabric, and when used thoughtfully, it becomes an essential tool in your dimensional embroidery repertoire.
Foam Padding Embroidery: Bold Volume Across Large Areas
Foam padding embroidery places a sheet of foam behind stitches to push the threads upward, creating pronounced height across larger surfaces such as petals, leaves, or character features. This is a go-to method when you want cartoon-like depth or plush texture that remains durable after washing. Foam padding embroidery works particularly well in conjunction with layered applique and 3D stitches for sculptural shapes.
To execute well, cut padding to fit each petal or shape area and secure it with careful stitching so it doesn’t shift. Choose a slightly heavier stitch density along the outer edges to maintain sharp definition while allowing inner areas to breathe. Depending on thickness, foam padding embroidery can pair with puff embroidery or dimensional embroidery to build multi-layered scenes that feel lively and tactile.
Dimensional Embroidery: Layered Stitches for Subtle Shading
Dimensional embroidery emphasizes layering and precise planning to create depth that reads as shading rather than just height. By stacking multiple passes with progressive stitch lengths and densities, you can sculpt shapes such as petals, letters, or geometric motifs with nuanced light play.
A successful dimensional embroidery project uses separate layers for base shapes, padding, and top stitches. Label layers in the software to manage padding thickness and ensure alignment. Safe build lines and test runs on similar fabrics help prevent puckering and sharp transitions, turning flat designs into believable dimensional forms.
3D Embroidery with Felt: Adding Structure and Softness
3D embroidery with felt introduces a soft, structural backbone that supports raised stitches. Felt layers behind the design can stabilize complex shapes and provide a stable platform for foam padding embroidery or puff embroidery. This combination lets you achieve crisp silhouettes with tactile depth, especially in character features, letters, or decorative motifs.
When using felt, choose thin sheets that won’t bulk excessively and ensure your backing stabilizer handles the added thickness. Felt can be used as a base layer or as cut-out shapes attached with 3D stitches, enabling dramatic dimension without sacrificing fabric integrity. Pair felt with dimensional embroidery to keep edges clean while enjoying the plush volume a well-chosen felt layer affords.
Digitizing, Stabilizers, and Troubleshooting for 3D Effects
Behind every successful 3D embroidery project is careful digitizing and stabilizer selection. Multi-pass stitches, layering, and defined stop points are essential to building height without distorting the fabric. Ensure your digitizer supports layer management for base, padding, and top stitches, and plan padding thickness to fit the garment or project you’re working on.
Common issues like puckering, uneven height, or padding shifting can derail a 3D effect. Use the right stabilizers (tear-away, cut-away, or water-soluble overlays as needed) and test on similar fabric before committing. Adjust stitch density, reduce tension if needed, and use low-tack tape to keep padding in place. With careful planning, you’ll consistently achieve the precise, raised elements that define 3D embroidery stitches and dimensional embroidery.
Frequently Asked Questions
What are 3D embroidery stitches, and how do puff embroidery and foam padding embroidery contribute to a design?
3D embroidery stitches add height and dimension by building up layers and padding. Puff embroidery creates soft, rounded bumps for quick, elevated detail, while foam padding embroidery uses a backing foam to push stitches upward for bold volume. Together, they add tactile depth and visual interest to fabric.
How can dimensional embroidery techniques be used to make flower petals look as if they’re blooming?
Dimensional embroidery builds depth through layered stitching. Plan multiple petal layers, place padding behind each layer, and use denser stitches along edges to anchor height, producing petals that appear sculpted and lifelike.
What is 3D embroidery with felt, and how can felt be integrated with raised stitches for impact?
3D embroidery with felt combines cut felt shapes with raised stitches. Secure the felt pieces in place, then surround or over-stitch them to create defined, dimensional elements. Layering padding nearby helps maintain consistent height across the design.
Which stabilizers and threads work best for achieving even height in 3D embroidery stitches?
Use a stable foundation with tear-away or cut-away stabilizers, possibly with a water-soluble topping. Choose threads like rayon, polyester, or cotton for different textures, and add padding materials (foam padding or fusible foam) to support raised areas and maintain uniform height.
How do you digitize designs for dimensional embroidery to ensure consistent height and alignment?
Digitize with a multi-pass, layer-based approach. Create separate layers for base, padding, and top stitches, label them clearly, and plan safe build lines. Always test on scrap fabric to verify height, alignment, and edge sharpness before final stitching.
What are common pitfalls in puff embroidery and foam padding embroidery, and how can you troubleshoot them?
Common issues include uneven height, puckering, and padding shifting. Fixes include adjusting stabilizers and tension, ensuring padding is securely placed with light tape or spray, and rechecking alignment after the first pass to maintain consistent dimensionality.
| Topic | Key Points |
|---|---|
| What are 3D embroidery techniques? | A group of methods that build height and volume in embroidery; use layers, padding, and raised stitches to create a dimensional effect. Common terms include dimensional embroidery, puff embroidery, and foam padding embroidery; goal is to give shapes form and presence. |
| Why care about 3D embroidery techniques? | – Visual impact: raised elements catch light and draw the eye. – Textural interest: multi-texture work invites touch and exploration. – Design flexibility: combining different 3D stitches achieves complex silhouettes and layered effects. – Versatility: suitable for apparel, home decor, and more. |
| Getting ready: tools, stabilizers, and basics | – Stabilizers: tear-away or cut-away with water-soluble overlays as needed. – Thread choices: rayon, polyester, cotton; metallic or chenille for richness. – Padding materials: foam padding, fusible foam, soft batting. – Foam padding basics: padding behind stitches to push the thread upward. – Tools: hoop/frame, sharp scissors, appropriate needles, and a machine or hand methods. |
| Understanding the key techniques | – Puff embroidery: elevates threads by padding to create a soft, rounded bump. – Foam padding embroidery: behind stitches to create pronounced height. – Dimensional embroidery: layered stitching for depth. – Trapunto-inspired approaches: padding on selective areas for raised pockets. – Layered applique with 3D accents: combining fabric pieces with 3D stitches for dimensional designs. |
| Step-by-step: a practical 3D embroidery project | Project: a 3D floral badge with raised petals and textured center. 1) Design and planning: sketch a simple flower with petal layers and plan padding locations. 2) Stabilize: mount fabric, use tear-away/cut-away stabilizer, add water-soluble topping if needed. 3) Provide padding: cut foam behind petal areas to create height. 4) Start with base outline: outline the flower with a medium-weight stitch. 5) Create padding layers: position foam behind first petals and stitch to push edges upward. 6) Build petals: add more padding behind subsequent layers; keep layers offset for depth. 7) Add the center: use tight satin stitch or French knots; add padding if desired. 8) Finishing touches: remove stabilizer, trim threads, optional glue/sealant, gentle pressing with a cloth. 9) Final assessment: check height consistency and edge transitions; add micro-stitches if needed. |
| Techniques in practice: when to use puff embroidery vs foam padding | – Puff embroidery: quick, compact height at edges or geometric motifs; fast and forgiving; good for logos or small patches. – Foam padding embroidery: bold dimension over larger areas (petals, leaves, curved shapes). – Dimensional embroidery: best for nuanced shading and layered depth; requires careful planning and digitizing. |
| Digitizing and planning for 3D effects | Think through layering and multi-pass stitches in software: – Use layer-based design with separate padding positions. – Choose stitch types/densities to support height (edges) and softness (inner areas). – Plan for padding thickness and fabric distortion. – Include safe build lines to help hold shapes. – Test on scrap fabric before final piece. |
| Troubleshooting common issues | – Puckering or distortion: adjust stabilizer type/tension, or use a backing. – Uneven height: reassess padding placement and stitch density. – Padding shift: use low-tack tape or temporary spray to hold padding in place. – Thread breakage/fraying: use glide needles and quality threads; adjust tension and match needle size to fabric. |
| Applications: where 3D embroidery techniques shine | – Apparel and accessories: hats, jackets, patches, bags with raised lettering and accents. – Home decor: cushions, wall hangings, table runners with dimensional elements. – Kids’ wear and toys: puff and foam padding add playful forms and tactile texture. – Branding and logos: elevated logos with a premium look. |
| Design ideas to inspire your next project | – Floral clusters: layered petals with foam padding for a garden-like bouquet. – Whimsical creatures: 3D eyes, noses, and features with varying padding. – Lettering with dimension: puff embroidery for bold initials or names with flat outlines for contrast. – Texture-rich geometrics: combine satin, fill, and chain stitches with padding for sculptural shapes. |
| Final thoughts: embracing the craft of dimensional embroidery | 3D embroidery techniques offer a powerful way to elevate stitching beyond flat surfaces. By combining puff embroidery, foam padding embroidery, and layered dimensional stitches, you can achieve designs that are visually striking and delightfully tactile. Success comes from planning, testing, and layering deliberately: padding here, layering there, and a thoughtful digitized layout guiding your stitches. Whether decorating apparel, home textiles, or personal accessories, the move from flat to dimensional is a creative journey worth pursuing. |