
This 3D embroidery tutorial invites you to move beyond flat stitches and explore depth, dimension, and tactile appeal on fabric. By focusing on texture and layered stitches, you can elevate your craft and make designs pop from the surface. You’ll learn to build height with padding, use wrapped stitches, and mix thread weights for shading as part of 3D embroidery techniques. From garments to home decor and wall hangings, the guide shows practical steps, texture embroidery stitches, and a step-by-step embroidery guide to bring ideas to life. As you practice, you’ll discover how to create texture in embroidery and texture embroidery ideas translate into tangible, light-catching pieces.
Viewed through the lens of dimensional stitching, this craft becomes a method for turning fabric into a tactile landscape. Padding, layering, and raised motifs allow you to sculpt light and form, creating depth beyond ordinary embroidery. Techniques such as wrapped stitches, knots, and textured threads offer a palette of textures that mimic natural surfaces. Whether it’s a wearable accent, a decorative panel, or a wall piece, the core ideas stay the same: plan, practice, and build texture over time. This approach blends traditional hand stitching with contemporary texture ideas to deliver durable, eye-catching textile art.
A Practical 3D embroidery tutorial: depth, texture, and touch
This 3D embroidery tutorial invites you to move beyond flat stitches, focusing on how depth and light interact with layered threads. You’ll explore using padding, wrapped stitches, and varied thread weights to create tactile forms that stand off the fabric. As you proceed, you’ll see how the concept of 3D embroidery techniques merges with texture embroidery stitches to craft silhouettes that catch the eye and invite touch.
Begin with a practical plan: map out padding thickness, select base fabrics, and choose color shading to simulate natural light. This approach aligns with a step-by-step embroidery guide, giving you clear milestones from planning to finishing. By the end, your piece should display a noticeable dimensional quality that distinguishes it from traditional flat embroidery.
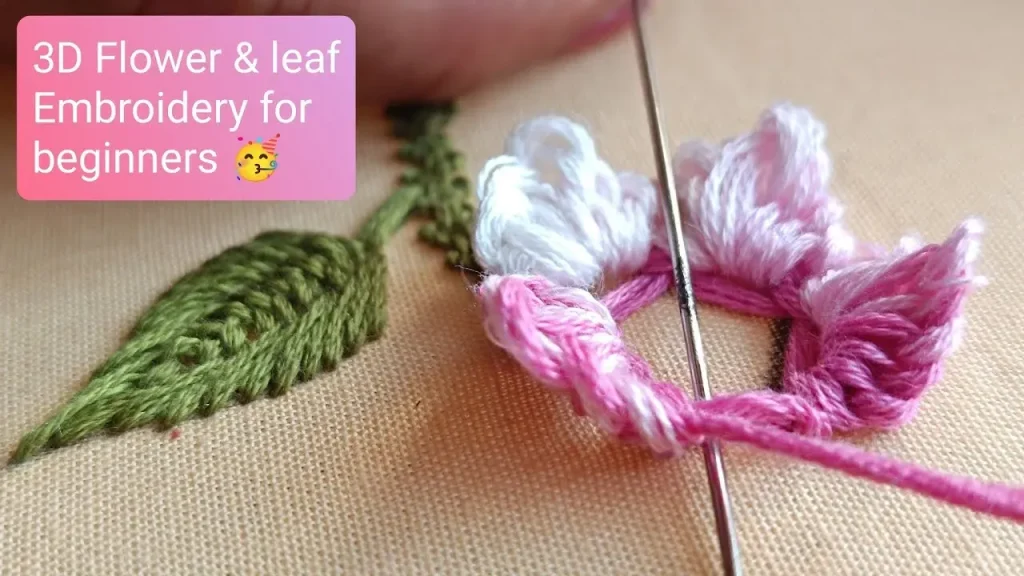
3D embroidery techniques for layered texture and dimension
Delve into specific techniques: padded satin stitches to build cushions, French knots for centers, and bullion knots for starbursts. Wrapping stitches create elongated forms, and couching anchors decorative threads to add outline definition. The combination yields texture embroidery stitches that appear sculpted.
Experiment with layering and color blending to simulate shadows and highlights. Layer threads of different thicknesses and hues, starting with a light base and adding darker accents. This exploration of depth is central to how to create texture in embroidery with deliberate decisions about tension and padding.
Step-by-step embroidery guide to building texture with padding
This section outlines how to translate an idea into a tactile motif using a step-by-step embroidery guide. Begin with design planning, then prepare a padded base, and finally build texture with carefully spaced stitches. Each step reinforces how padding supports raised elements and prevents distortion.
Keep notes or photos as you progress to create textured embroidery ideas you can reuse. The guide emphasizes consistency in padding and stitch length, so your final piece remains durable and cohesive. By following this approach, you practice a practical method that can be applied to flowers, leaves, or geometric shapes.
Texture embroidery stitches: essential stitches and how they work together
Explore a toolkit of texture embroidery stitches, from padded satin to French knots, long-and-short, and couching. Each stitch adds a different surface quality, allowing you to model form and shading. The interplay among stitches helps you achieve the tactile richness that defines textured embroidery ideas.
Combine stitches strategically in clusters to create raised petals or seed pods. Layer lighter and heavier threads to add dimension, and use tiny satin stitches to finish edges. The result is a surface that visually reads as sculpted fabric rather than flat threadwork.
How to create texture in embroidery: shading, padding, and color strategy
Texture in embroidery arises from deliberate shading, strategic padding, and thoughtful color choices. Start with a light base and progressively add darker threads to emphasize depth. This technique mirrors how artists build volume with light, making your pieces more lifelike and dynamic.
Consider color transitions as you add padding: edges receive slightly brighter highlights, while recessed areas stay darker. Adjust thread weights and stitch spacing to refine the sense of form. Understanding how to create texture in embroidery gives you control over the final look and feel of your project.
Textured embroidery ideas: projects that pop on garments and home decor
Textured embroidery ideas span garments, home accents, and art pieces. Imagine a denim jacket patch with padded petals, or a wall hanging with layered leaves and seed pods. These concepts translate well to both wearable and decorative items, leveraging 3D embroidery techniques to elevate style.
Experiment with surfaces such as cushions and pillows, where raised motifs catch light differently as you move. Use contrast stitching and metallic threads to add sparkle without overwhelming the texture. With a handful of textured embroidery ideas, you can craft signature pieces for your portfolio and gifts.
Frequently Asked Questions
What is a 3D embroidery tutorial and how does it differ from traditional stitching?
A 3D embroidery tutorial teaches building height with padding, knots, and layered stitches to create dimension and tactile texture. It uses 3D embroidery techniques to achieve raised elements that catch light and invite touch, unlike flat traditional embroidery. This approach emphasizes texture embroidery stitches as a core method.
Which 3D embroidery techniques are most effective for adding texture in fabric projects?
Key 3D embroidery techniques include padded satin stitches, French and bullion knots, wrapped stitches, and couching. These texture embroidery stitches create raised elements and depth; practice on a scrap and plan your textured embroidery ideas to realize them.
What is a step-by-step embroidery guide for building texture in a 3D embroidery tutorial?
Follow a practical step-by-step embroidery guide: plan your design, prepare the base, build the first texture layer with padding, add volume with knots, layer for shading, refine edges, and finish securely. This mirrors a 3D embroidery tutorial and demonstrates how to create texture in embroidery.
What supplies are recommended for a 3D embroidery tutorial focused on texture and texture embroidery stitches?
Use fabric with stable weave, appropriate stabilizer, hoop/frame, threads in multiple weights, needles, scissors, backing fabric, and a plan. Choose fibers that support padding and shading, aligning with 3D embroidery techniques and texture embroidery stitches.
Can you suggest textured embroidery ideas for garments using a 3D embroidery tutorial approach?
Yes: a floral patch on a denim jacket with padded petals and raised centers; layered leaves on a cardigan; a decorative pin with raised elements. These fall under textured embroidery ideas and show how a 3D embroidery tutorial approach can add depth to garments.
What common mistakes should be avoided in a 3D embroidery tutorial when focusing on texture?
Avoid uneven padding, crowding stitches, mismatched color transitions, and unsecured threads. Maintain even tension, plan padding per element, and keep the back neat to preserve the dimensional quality of 3D embroidery techniques and texture embroidery stitches.
| Aspect | Key Points | Notes/Details |
|---|---|---|
| Purpose | Adds depth, dimension, and tactile appeal to fabric projects. | Texture and layered stitches elevate designs beyond flat embroidery; suitable for garments, home decor, and wall pieces. |
| Distinctive features | Goes beyond flat decoration by building height with padding and using wrapped/knot stitches for volume. | Layering threads of different thicknesses and colors creates shading and a realistic, light-catching surface. |
| Tools, materials, and mindset | Stable-weave fabric, compatible stabilizer, hoop/frame, multiple thread weights, metallic/rayon for shine, appropriate needles, scissors, needle threader, backing fabric, and a design plan. | Start with a solid structure; plan where padding and texture will live; reference 3D embroidery techniques and texture embroidery stitches as guides. |
| Step-by-Step Path to Texture | Step 1: Plan design; Step 2: Prepare base; Step 3: Build first texture layer; Step 4: Add volume with knots/loops; Step 5: Layer for depth/shading; Step 6: Refine edges/highlights; Step 7: Secure and finish | A reusable guide to create textured embroidery adaptable to motifs; emphasizes padding, layering, and controlled tension. |
| Core Techniques | Padded satin stitch; French and bullion knots; Wrapped stitches and couching; Layering and color blending; Texture-variety stitches | These techniques form a toolkit to turn flat fabric into dimensional art; practice on scrap first to refine tension and padding. |
| Design ideas | Floral patch on denim; botanical wall hanging; decorative pin/brooch; textured cushion; narrative textile art with built-up backgrounds | Use texture-forward concepts to apply techniques to garments and home decor. |
| Tips for success | Start simple; map padding with bright thread on scrap; control tension; keep back neat; practice color shading with 3–5 shades; document progress with photos | These practices help achieve consistent padding, realistic shading, and durable finishes. |
| Common Mistakes | Uneven padding; crowding stitches; mismatched color transitions; unsecured threads | Test on scrap, plan shading, and secure knots to prevent unraveling during washing or wear. |
| Mini Project Template | Design a small 3D floral motif using padded satin petals, French knots for centers, stem stitches with elevation, and wrapped leaves; finish with texture stitches toward edges. | Provides a hands-on example of step-by-step embroidery with clear texture buildup. |
Summary
3D embroidery tutorial takes you beyond flat stitches to depth, dimension, and tactile artistry on fabric. This descriptive journey emphasizes height through padding, wrapped and knot stitches, and layered threads of different thicknesses and colors to create realistic shading and surface interest. From planning and preparing a sturdy base to building up textures, layering, refining edges, and securing threads, the approach helps you turn ideas into dimensional fabric art. Whether embellishing garments, home decor, or wall pieces, a well-executed 3D embroidery tutorial yields pieces that catch light, invite touch, and tell a story through texture. With practice and mindful material choices, you can expand your repertoire of textured embroidery ideas and craft memorable, tactile works of art.