
This 3D embroidered tutorial opens a world of texture and dimension, turning simple fabric into tactile art you can feel. By combining puffy embroidery techniques with batting for embroidery, you’ll create raised features that catch light and invite touch. Follow this step-by-step embroidery tutorial to build layers of color and volume while keeping the surface crisp and smooth. As you work, you’ll discover how textured embroidery adds depth to any project, from small motifs to wearable designs. Whether you’re new to sewing or seeking a richer surface for quilting and garments, this guide equips you with practical tips and starter ideas.
Exploring dimensional stitching, this guide reveals how raised applique and sculpted stitches can add tactile interest to fabrics. You’ll learn to create puffed elements using padding, stabilizers, and careful thread work, translating ideas from puffed motifs into wearable art. From lightweight fabrics to heavier textiles, the techniques cover different padding options and finishing methods for durable, textural effects. This approach ties together craft terms like 3D stitch techniques, raised texture, and layered color, offering a flexible path for designers seeking depth in embroidery.
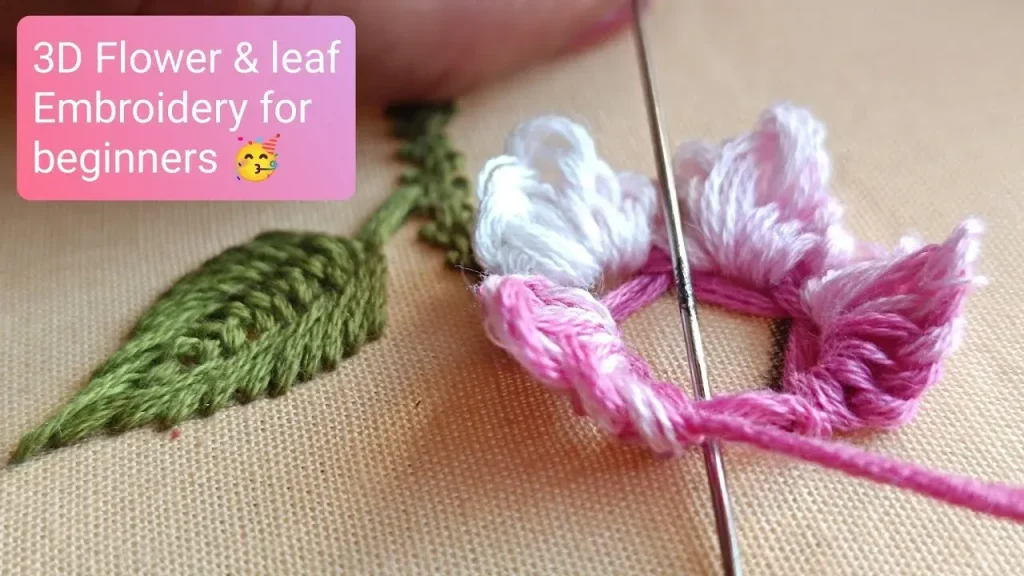
Mastering the Puffy Embroidery Foundation: A Step-by-Step Guide to Texture
Starting with Puffy embroidery foundations helps you create textured embroidery that visually and tactilely pops from fabric. This guide presents a clear, step-by-step embroidery tutorial approach to Puffy embroidery, emphasizing raised surfaces that catch light and add dimension.
Before stitching, gather a fabric base, stabilizers, padding, appropriate needles, and a selection of threads. Maintain even tension and a clean outline, because the padding amplifies any irregularities and makes the puff more pronounced.
3D Embroidery Techniques: Elevating Textures with Layered Padding
3D embroidery techniques rely on layering padding beneath satin or decorative stitches to lift the surface and create tangible depth.
Try different padding materials—felt, cotton batting, or lightweight foam—and adjust puff level. The choice of padding ties directly to how you handle batting for embroidery in your projects.
Choosing the Right Batting for Embroidery to Craft Consistent Puff
Choosing the right batting for embroidery influences puff, edge crispness, and fabric drape. Test padding thickness on scrap fabric to dial in the amount needed for your design.
Consider the fabric weight and stitch density: heavier fabrics may require thinner padding and gentler curves to avoid bulk, while lighter fabrics can handle more padding for a pronounced puff.
Layering and Shading for Rich Textured Embroidery Effects
Layering colors and shading is a hallmark of textured embroidery. Build your puff in stages, starting with a light base color, adding padding, and finishing with deeper hues to define form.
Experiment with stitch variety—satin stitches for smooth surfaces and tiny seed stitches for subtle texture—to emphasize dimension without flattening the raised areas.
A Beginner-Friendly 3D Embroidered Tutorial: Simple Motifs to Start
This beginner-friendly 3D embroidered tutorial guides beginners through a simple motif like a blossom, teaching you padding, outline, and stitching sequence.
Step-by-step, transfer the design, set a stabilizer, cut padding, anchor it, and fill with satin stitches, then add a second lighter layer or shallow shading for depth.
Care, Maintenance, and Finishing Touches for Puffy Embroidery Art
To keep textured pieces vibrant, wash with care, remove water-soluble stabilizers, and avoid harsh heat; padded embroidery may require gentler care.
Finish with crisp edges, optional backing, and display considerations; store flat or rolled to protect the puff. Proper care extends the life of your textured embroidery and keeps the dimension intact.
Frequently Asked Questions
What is a 3D embroidered tutorial and how can it help me learn puffy embroidery?
A 3D embroidered tutorial is a guided technique-focused guide that teaches you to create raised, dimensional embroidery using padding. It blends puffy embroidery with step-by-step instructions to build texture, depth, and tactile interest on fabric. Following the plan helps beginners master 3D embroidery techniques and gain confidence to adapt designs.
Which materials are essential for a 3D embroidered tutorial focusing on puffy embroidery and batting for embroidery?
For a basic Puffy embroidery project, choose a stable fabric base, an appropriate stabilizer, and padding such as batting or felt. Include an embroidery hoop, sharp needles, colored threads, a water-soluble marker, scissors, and a way to secure the padding. Padding and stabilizer choices are key to achieving a clean puff and durable textured embroidery.
How do padding and layering affect the texture in 3D embroidery techniques shown in a step-by-step embroidery tutorial?
Padding lifts the surface, and layering multiple passes creates depth and dimension in textured embroidery. Place padding inside the outline and add successive stitches to control puff level and shading. This layering approach is central to the 3D embroidery techniques demonstrated in many step-by-step embroidery tutorials.
Is a beginner able to follow a step-by-step embroidery tutorial to create a simple Puffy motif in a 3D embroidered tutorial?
Yes. Start with a simple shape, transfer the design, place and secure padding, and anchor the edge with a light stitch. Then fill with satin or dense stitches, add layers for texture, trim excess padding, and secure the finish. This approach makes Puffy embroidery accessible to beginners within a 3D embroidered tutorial.
What common mistakes should I avoid in 3D embroidered tutorials to ensure crisp edges and proper puff?
Avoid uneven tension, over- or under-padding, and gaps that reveal padding through the surface. Don’t skip stabilizers or misalign the outline, which can distort the puff. Practice on scraps to dial in padding amount and stitch density before working on your main piece.
How should I care for textured embroidery pieces, including puffy embroidery, made with a 3D embroidered tutorial?
Care for textured embroidery by following fabric-specific washing instructions, removing water-soluble stabilizers before washing, and avoiding harsh agitation. For garments, spot clean and air dry to preserve the puff, and iron on low heat with a pressing cloth to prevent flattening the raised stitches.
| Aspect | Key Points |
|---|---|
| Introduction to 3D embroidered tutorial | Techniques open texture and dimension; Puffy embroidery creates raised, tactile features you can feel as well as see; It blends traditional stitching with light padding to add depth. |
| What makes the project special | Fabric breathes with each stitch; tiny pillows of color and shape; remains flexible for everyday wear or display. |
| Learning goals | Beginners welcome; steady workflow, the right materials, and a clear plan simplify the process for all skill levels. |
| Materials and tools | Fabric base (cotton/linen); stabilizer (weight appropriate) plus a water-soluble stabilizer; padding (felt, batting, or lightweight foam); embroidery hoop or frame; hand needles; threads; scissors; erasable marker. |
| Starting design | Begin with a simple motif (flower or circle); maintain even tension and clean outlines; padding amplifies irregularities; use colors to suggest depth. |
| Understanding padding | Padding sits beneath satin stitches, lifting the surface; puff level is controlled by padding amount and placement; test on scrap; avoid overfilling; edges stay crisp; center remains raised. |
| Step-by-step guide (summary) | Outline the shape; add padding inside; anchor padding with a stitch; fill area with satin or tight stitches; work from outside toward center; add layers for texture; trim padding; remove stabilizer if needed. |
| Design tips | Color and shade build depth; layering in stages; mix stitches for varied texture; tidy border with backstitch or running stitch; finish with small puffed elements for balance. |
| Variations and advanced techniques | Adapt padding for different fabrics; try alternative padding; use dimensional shading with layered satin stitches; combine Puffy embroidery with other techniques like couching or beads. |
| Care and maintenance | Follow fabric care; remove water-soluble stabilizers; avoid harsh washing; air dry; iron on low heat with a pressing cloth to avoid flattening the puffed areas. |
Summary
3D embroidered tutorial invites you into the tactile world of Puffy embroidery and textured stitching. This descriptive guide introduces padding techniques, material choices, and a step-by-step workflow that helps both beginners and seasoned stitchers build depth and dimension in textiles. By practicing simple motifs, layering colors, and refining tension, you’ll gradually master the three-dimensional look. The core ideas—padding control, careful shaping, and thoughtful color planning—open a personal style for textured art that enhances garments, accessories, and decorative pieces. With patience and practice, the 3D embroidered tutorial becomes a versatile toolkit for transforming fabric into sculptural art. Happy stitching and enjoy creating raised, expressive textures that are both beautiful and wearable.