
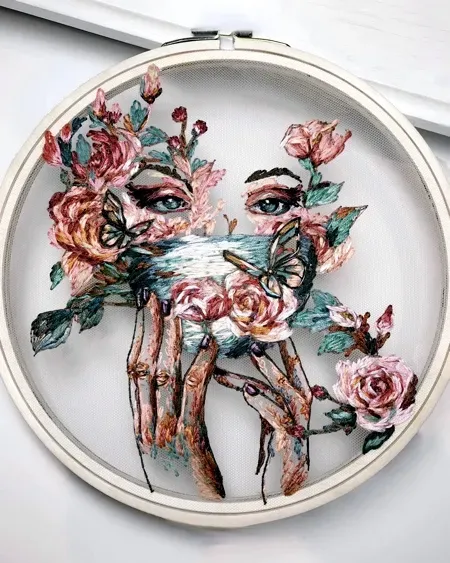
3D embroidered art opens a new chapter in textile storytelling, turning threads into dimensional scenes that breathe on the wall. Unlike traditional flat embroidery, this technique uses padding, layering, and sculptural stitches to create tangible depth you can admire from across the room. For designers seeking texture, 3D embroidery techniques reveal options to craft textured embroidery wall pieces that feel almost sculptural. This approach inspires embroidery wall art ideas that harmonize with modern interiors, offering bold color, nuanced shadow, and a sense of tactile drama through 3D embroidery wall art. By choosing durable materials and thoughtful palettes, you can transform a plain surface into textured textile art that invites touch and changes with the light.
Viewed through an alternative lens, this craft is stitch sculpture—fabric is built up with padding and layered stitches to form raised, tactile relief. It can also be described as textile sculpture or dimensional embroidery, where color and texture interact to animate a wall surface. In design terms, artists explore relief motifs, shadow play, and natural textures such as petals, leaves, and coral to create living surfaces. This LSI-inspired framing helps readers connect related ideas like decorative fiber art, sculptural stitching, and wall-mounted fabric pieces that suit a range of spaces.
1) Exploring 3D Embroidered Art: Texture, Depth, and Wall Presence
3D embroidered art transforms fabric into tactile scenes that seem to breathe on the wall. By layering padding, sculpting stitches, and carefully chosen textures, this approach moves beyond flat embroidery to create real depth and shadow—perfect for textured embroidery wall pieces that invite a closer look. The result is a wearable sculpture of thread that can coexist with other wall art while standing out as a focal point.
As you design, consider how different light angles will reveal contour and sheen across petals, leaves, or geometric forms. This awareness of light and shadow is hallmarked by 3D embroidery techniques that emphasize dimensionality, and it ties naturally into broader textured textile art conversations. Whether you tilt toward botanical serenity or bold abstraction, the aim is to render fiber as a living surface rather than a static motif.
2) Essential Materials for Rich Textured Embroidery Wall Pieces
Starting with a sturdy base—cotton, linen, or light canvas—ensures the fabric accepts padding without warping, enabling durable textured embroidery wall pieces. Stabilizers, felts, and soft batting become the backbone of raised shapes, while a curated set of threads (embroidery floss, perle cotton, and metallic strands) adds color and glint that catch the eye from across the room.
Prepare tools for a smooth workflow: an embroidery hoop or frame, sharp scissors, fabric pens for marking outlines, and a dab of fabric glue to secure padding. As you assemble your kit, think about how each choice supports your embroidery wall art ideas, because the right combination of base, padding, and thread is what makes the texture you’re aiming for truly resonant.
3) Core 3D Embroidery Techniques to Build Layered Dimension
Mastering padding and raised stitches creates dome-like forms that rise from the surface. Layer small pads of batting or felt and stitch around them with a tight edge to achieve soft, three-dimensional petals or rounded leaves. This technique lays the groundwork for the tactile drama characteristic of 3D embroidery wall art.
Other tools in the 3D embroidery techniques toolkit include couching to secure thicker ribbons or floss over padding, needle felting to sculpt wool into soft, protruding shapes, and stumpwork-influenced methods for lifelike textures. Beading, appliqué, and deliberate layering further enhance depth, while careful color and texture pairing ensures the piece reads as a cohesive whole rather than a collection of parts.
4) Designing Embroidery Wall Art Ideas: Motifs, Color, and Composition
When crafting embroidery wall art ideas, start with a mood or story—nature motifs, coral textures, or geometric rhythm—then translate it into raised forms that offer tactile interest. Consider a color story that shifts across petals or leaves, allowing light to reveal subtle gradients and shadows that only textured textiles can deliver.
Composition matters as much as technique. Plan focal points, balance, and the viewer’s eye path, then test scale with small panels before committing to a larger piece. By aligning motif, color, and layering strategy, you’ll create embroidery wall art that feels intentional and resonant, even from a distance.
5) Display, Lighting, and Care for Textured Wall Pieces
Display options can enhance the dimensional feel of textured embroidery wall pieces. A shallow float frame or an exposed backing board creates tiny shadows that emphasize depth, while soft, indirect lighting can bring out the sheen and contour of raised elements. Proper framing helps preserve the integrity of the piece and its 3D quality.
Care is essential for longevity. Dust gently with a soft brush or low-suction vacuum attachment, and avoid harsh scrubbing that could flatten the padding. Keep padding materials away from high humidity or direct moisture, and rotate placement if light exposure risks fading. With thoughtful display and maintenance, your textured textile art can remain vivid for years.
6) From Sketch to Gallery: Advancing Your 3D Embroidered Art Practice
Begin with small studies to refine your technique and texture decisions—short panels are perfect for testing how padding, stitches, and color interact. Sharing progress with craft groups or on social platforms can provide feedback that sharpens your eye for 3D embroidery techniques and helps you evolve toward bolder embroidery wall art ideas.
As you gain confidence, scale up to larger installations and experiment with mixed media for added texture. The recurring practice of layering, color pairing, and sculptural stitching will build a personal vocabulary—your signature approach to 3D embroidered art that showcases textures, light, and fiber in ways that feel both handmade and gallery-ready.
Frequently Asked Questions
What is 3D embroidered art and how does it create depth in embroidery wall art?
3D embroidered art uses padding and sculpted stitches to raise elements from the fabric, adding tangible dimension. This creates textured embroidery wall pieces with depth and shadow, a hallmark of 3D embroidery wall art.
What materials are essential for starting a 3D embroidery wall art project?
Start with a sturdy base fabric (cotton, linen, or light canvas), padding materials (batting or felt), stabilizers, and a selection of threads. Also have needles, fabric glue, and a frame or hoop to support textured textile art while you build layers.
Which techniques are most effective for adding depth to 3D embroidered art?
Core 3D embroidery techniques include padding and raised stitches, couching, needle felting, stumpwork influences, beading, and layering. These strategies create dimensional features that read as texture from a distance.
How can I plan and design embroidery wall art ideas for a room?
Begin with a mood, subject, and color story, choosing nature motifs or abstract forms. Sketch a cohesive set of embroidery wall art ideas that complements your space, and plan padding and color to guide the viewer’s eye across the piece.
How should I display and care for textured embroidery wall pieces to maintain their depth?
Display options that allow light to interact with the surface, such as floating frames or shallow mounts, to enhance depth. Dust gently, avoid excessive humidity, and store away from damp areas to preserve the textured embroidery wall pieces.
Should beginners start with small projects to learn 3D embroidery techniques?
Yes. Start with small motifs (for example, an 8×10 inch panel) to practice 3D embroidery techniques, then gradually scale up. Sharing progress with craft communities can provide feedback and inspiration.
| Topic | Key Points |
|---|---|
| What is 3D Embroidered Art? | Built up with padding or sculpted stitches to create raised elements; blends traditional embroidery with textile sculpture; yields dimension, texture, and opportunities for light and shadow. |
| Planning Your 3D Embroidered Art Project | Plan mood, subject, and color story. Nature motifs (flowers, leaves, coral) provide natural texture; abstract works express rhythm and movement. Create a cohesive body of work to share with friends, clients, or galleries. Plan materials and tools: sturdy base fabric, hoop/frame, stabilizers, padding, threads, needles, chalk or fabric pen, scissors, and fabric glue. |
| Materials & Tools | Base fabric (cotton, linen, light canvas); embroidery hoop or frame; stabilizers; padding (soft batting, felt, small foam); threads (embroidery floss, perle cotton, metallic); needles; fabric pen or tailor’s chalk; scissors; fabric glue. |
| Materials for Rich Texture | Layer paddings and stitches to build raised forms; add beads or sequins to catch light; start with a simple base and build up elements gradually to keep cohesion. |
| Techniques That Build the 3D Effect | Padding and raised stitches; couching; needle felting; stumpwork influences; beading and appliqué; layering; color and texture play. |
| From Idea to Canvas: Step-by-Step Guide to 3D Embroidered Artwork | Plan the design; choose a color palette; prepare the base; apply padding; establish the background; begin base stitching; build dimensional features; add texture; fine-tune composition; finish and mount. |
| Design Ideas to Inspire Your Embroidery Wall Art | Nature and botanicals; abstract and geometric; mixed media; color stories with gradients. |
| Displaying and Caring for Textured Wall Pieces | Display options that interact with light; shallow float frames or exposed boards; clean with soft brush; avoid aggressive scrubbing; manage humidity; store away from damp areas. |
| Where 3D Embroidered Art Meets Interior Design | Fits living rooms, bedrooms, hallways, and commercial spaces; pairs with natural textures like wood and stone; anchors a color palette inspired by nature or urban minimalism. |
| Advancing Your Practice | Practice with small motifs; share progress with craft groups or on social media; imperfection adds charm; develop a personal vocabulary of stitches, paddings, and color combinations. |
Summary
3D embroidered art transforms flat textiles into dimensional, sculptural wall pieces that invite touch and reveal subtle shadows as light moves. This approach blends traditional embroidery with textile sculpture, using padding, layering, and sculpted stitches to build raised elements and real depth. Planning the project, selecting materials, practicing core techniques, and following a step-by-step process can help you create embroidery wall art that stands out in any room. With nature motifs, abstract forms, and mixed-media ideas, you can tailor 3D embroidered art to your space and style. Proper care and thoughtful display enhance longevity, letting the texture, color, and light interacting with the piece define the atmosphere of your home.