
3D embroidered fabrics invite you to feel the tactile depth that thoughtful stitching can bring to textiles. In textured fabric art, raised motifs and layered fibers transform everyday cloth into something sculptural. This guide explores practical techniques, materials, and ideas for creating dimensional surfaces with 3D embroidery techniques. From choosing fabric textures to pairing padding with contrasting threads, you will learn to balance form and function in your work. Whether you are decorating a wall panel or a wearable piece, these embroidery on fabric ideas will help you engage viewers with tactile detail.
Three-dimensional stitching on textiles reveals how height and surface variation can elevate a simple fabric. Exploring fabric textures through raised motifs and padding opens new avenues for tactile storytelling. Techniques like layered stitching, trapunto-inspired padding, and dimensional appliqué echo the language of 3D embroidery techniques. Together with mixed media textile art with embroidery, you can push beyond traditional embroidery on fabric ideas to create immersive, gallery-worthy works.
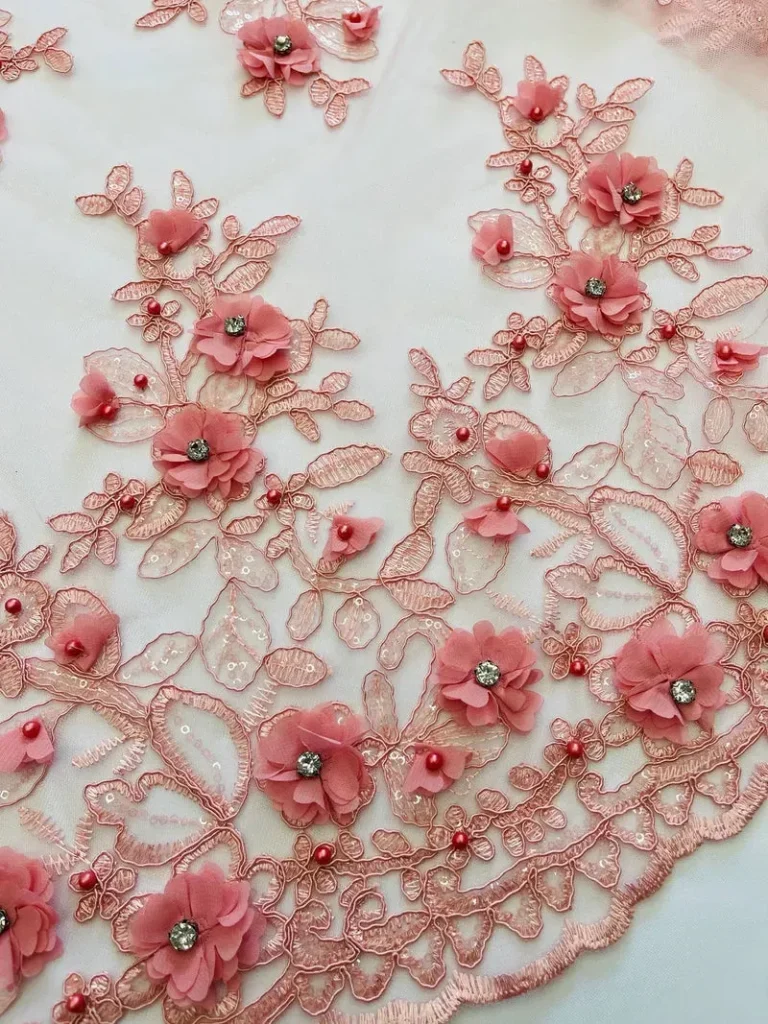
Exploring 3D Embroidered Fabrics: Techniques to Add Depth to Textured Art
3D embroidered fabrics extend traditional stitching into tactile sculpture. By combining padding, layering, and varied stitch height, you create a surface that invites touch and exploration. This approach sits at the intersection of traditional embroidery and textured fabric art, leveraging 3D embroidery techniques to sculpt fabric textures and to play with how light interacts with raised surfaces.
Begin with a depth map: decide which shapes will rise, what materials will support them, and how the background fabric will frame the relief. Select padding behind selected areas—felt, soft batting, or foam—along with threads and ribbons of differing thickness to build contrast. The result is a piece where fabric textures and structural planning work together to convey form.
Textured Fabric Art for Spaces: Elevating Interiors with Raised Embroidery
Textured fabric art has the power to transform walls, cushions, and textiles into focal points. Through careful layering and height, you create tactile surfaces that shimmer with each viewing angle. This approach leverages fabric textures to add depth that color alone cannot achieve, linking your work to the broader world of textured art.
For interiors, plan scale and repetition to avoid overpowering a room. Use embroidery on fabric ideas like leaf motifs or geometric panels that read as mixed media textile art with embroidery when you pair fabric scraps, felt, or upcycled materials with raised stitches. This expands the practical decor possibilities while enhancing sensory texture.
Layering and Padding: Core Techniques for Rich 3D Surfaces
Layering is the heartbeat of 3D embroidery. Start with a flat base, then add pockets of padding behind shapes to lift them from the surface. Couching around the edges helps define the silhouette and prevents distortion, while multiple color families create depth through overlapping layers in 3D embroidery techniques.
Experiment with trapunto-like padding to emphasize focal forms. Use felts, foam cores, or soft batting to create varying heights, then finish with dimensional edges and subtle stitching that ties the layers together. This is where fabric textures emerge as a deliberate element, not just a background.
Materials Spotlight: Choosing Fabrics, Threads, and Stabilizers for Rich Texture
Selecting the base fabric sets the stage for texture. Sturdy cotton, linen, denim, felt, and wool blends support height, while lighter options like canvas can offer a different silhouette. Pair with threads—vary thicknesses, variegated skeins, and ribbons—to create tactile contrast that complements the surface.
Incorporate padding and stabilizers to keep the sculpture stable over time. Wool felt, soft batting, and foam sheets create volume, while tear-away or cut-away stabilizers prevent distortion during stitching. The right combination of materials helps you achieve nuanced fabric textures that define a strong 3D piece.
Color, Light, and Shadow: Enhancing 3D Textures on Fabric
Color can push or pull depth when combined with texture. Dark backing hues make raised elements recede or come forward, while lighter threads highlight details. Consider how different fiber surfaces reflect light—satins, velvets, and matte wools each offer distinct shadowing that interacts with the relief.
Plan value shifts across the piece to guide the eye along the raised forms. Subtle transitions in color and texture invite tactile reading, while the play of light on layered stitches amplifies the sense of volume. This approach aligns with textured fabric art where shade, sheen, and stitch height work together.
Project Ideas: Embroidery on Fabric Ideas for Walls, Wearables, and More
Wall panels with botanical textures or abstract landscapes provide ready canvases for 3D embroidery. Build leaves, petals, or topographic shapes with varying heights using felt or foam behind the motifs and secure with tight edge stitching. This is a practical way to explore 3D embroidered fabrics in a gallery-worthy format.
Beyond walls, apply embroidery on fabric ideas to cushions, bags, or wearable art. Raised motifs can form decorative silhouettes on sturdy bases like denim or heavy cotton, turning everyday textiles into mixed media textile art with embroidery. Let your imagination roam across fabrics, threads, and found materials to push texture and form further.
Frequently Asked Questions
What are 3D embroidered fabrics and how do they enhance textured fabric art?
3D embroidered fabrics are textiles that gain height and dimension through stitching, padding, and layering, turning flat cloth into textured fabric art. They rely on 3D embroidery techniques to create raised elements and varied fiber textures that catch light and invite touch.
Which 3D embroidery techniques most effectively add depth to fabric textures in 3D embroidered fabrics?
Key techniques include padding behind shapes, layered stitching, trapunto-like padding, and dimensional appliqué. Used together, they build fabric textures with height and shadow, elevating the piece beyond flat embroidery.
What materials and tools are best for starting a 3D embroidered fabrics project, and how do they influence the textured fabric art?
Choose sturdy base fabrics (cotton, linen, denim, felt, wool blends). Add padding (felt, batting), stabilizers, and a mix of threads/yarns. Use appropriate needles and tools to support height and secure edges, shaping a durable textured fabric art piece.
How can I plan an embroidery on fabric ideas project using 3D embroidered fabrics for home decor or fashion?
Start with a concept and layout, plan padding locations, and build layers from base to raised motifs. Consider how texture interacts with light and space; this approach fits textured 3D embroidered fabrics within mixed media textile art with embroidery and embroidery on fabric ideas.
How should I care for and display 3D embroidered fabrics to preserve fabric textures?
Display away from direct sunlight and provide stable backing to prevent sag. Hand wash or use a gentle cold-cycle, and lay flat to dry. Gentle handling helps maintain 3D texture and fabric textures over time.
What are common challenges when creating 3D embroidered fabrics and how can I solve them while keeping a balance with mixed media textile art with embroidery?
Common challenges include base fabric distortion, excess bulk, and fraying. Solve with stabilizers and backings, reduce padding, reinforce edges, and use templates to keep shapes consistent; these steps help maintain texture and align with mixed media textile art with embroidery.
| Topic | Key Points |
|---|---|
| What Are 3D Embroidered Fabrics? |
|
| Why Textured Art Matters |
|
| Starting with the Right Mindset |
|
| Materials and Tools for 3D Embroidered Fabrics |
|
| Designing with Texture: Techniques to Build 3D Embroidery |
|
| Step-by-Step Project Path: From Concept to Finished Piece |
|
| Design Ideas and Project Concepts |
|
| Fabric Textures, Color, and Light Considerations |
|
| Practical Tips for Success |
|
| Common Challenges and How to Solve Them |
|
| Maintenance, Display, and Longevity |
|
| Conclusion |
|