
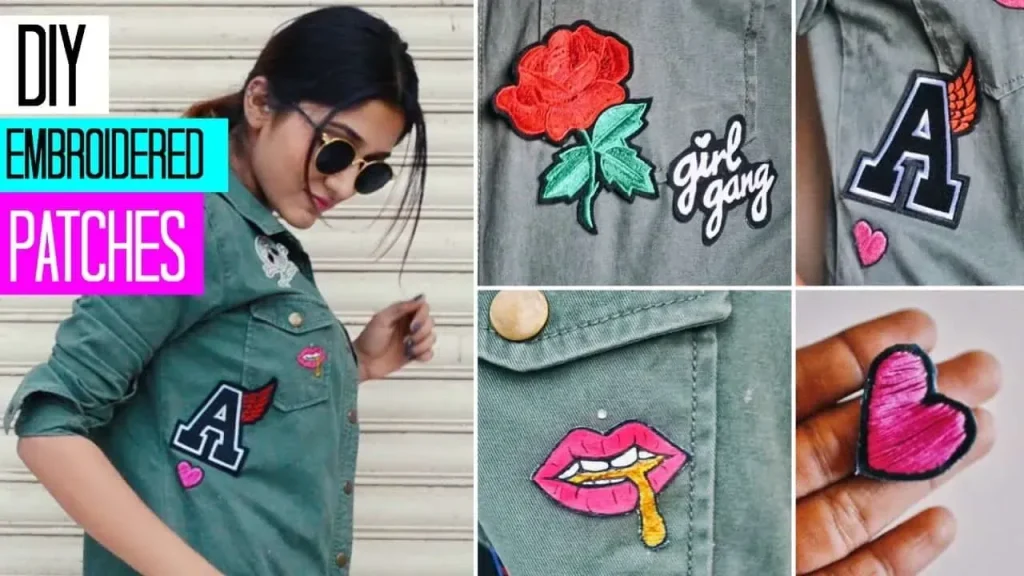
DIY embroidered patches let you personalize jackets, backpacks, hats, and jeans with character you can wear proudly. From a simple idea to a finished accessory, this guide blends creativity with practical sewing skills and an embroidered patches tutorial that covers supplies, stitches, and backing. Learn how to make patches at home and transform fabric scraps into bold, durable sew-on patches that look polished. You’ll discover how to pair a patch design ideas with color plans and simple stitches to create something truly personal. Whether you’re aiming for a bold statement or a subtle touch of custom patches embroidery, the approach stays flexible.
Think of these creations as fabric badges or stitched emblems that personalize gear and tell a story through color and texture. They can be described as applique patches, textile adornments, or sew-on insignias that fuse craft skills with personal style. The process flows from a concept sketch to a finished patch, with backing choices and placement strategies that echo traditional embroidery. Using related terms like fabric patches, embroidered badges, and custom embroidery motifs helps search engines connect the idea with helpful tutorials and design ideas. Whether you sketch on paper or design on a computer, the goal remains the same: create durable, wearable art that enhances everyday outfits.
Frequently Asked Questions
How do I start with DIY embroidered patches and follow an embroidered patches tutorial for beginners?
Getting started with DIY embroidered patches is simple. Start with a small, clear idea and follow an embroidered patches tutorial to learn basic stitches, transfer methods, and backings. Gather a few supplies, sketch your design, and practice on scrap fabric before moving to a real patch.
What supplies do I need to make patches at home and create sew-on patches that last?
For patches at home, assemble a stable base fabric, stabilizer, hoop or frame-free options, embroidery floss, appropriate needles, sharp scissors, fabric markers, and a backing choice (sew-on for durability). A heat-safe backing or iron-on can speed up placement, but sew-on patches tend to last longer with washing.
Which backing options are best for DIY embroidered patches and how do I apply sew-on patches?
Backing choices include sew-on, iron-on, and detachable options. For durability, sew-on backing is often preferred; stitch around the edge to attach. Iron-on patches offer quick placement but require care with heat-sensitive fabrics and may loosen over time.
How can I design patch design ideas for custom patches embroidery that fit my jacket or bag?
Start with patch design ideas that suit your item and audience. Choose a theme, personalize with initials, pick 2–4 colors for cohesion, and decide on size and shape. Sketch your concept, test on scrap fabric, then translate it to fabric with your chosen stitches for a polished patch.
What embroidery stitches should I learn for DIY embroidered patches to achieve a professional look?
Learn a core set: backstitch for outlines, satin stitch for fills, running or split stitch for texture, and French knots or seed stitches for details. If using a machine, you can mimic these with satin or zigzag settings and then finish by trimming edges.
What care tips will keep my DIY embroidered patches looking bold and durable over time?
To care for DIY embroidered patches, wash in cold water on a gentle cycle and air-dry when possible. Avoid high heat that can fade colors or distort edges, and store patches flat or rolled to prevent distortion. If you used iron-on backing, keep heat exposure to a minimum on delicate fabrics.
| Topic | Key Points | Notes / Examples |
|---|---|---|
| Materials and Tools |
|
Select items based on your project and fabric to ensure compatibility with backing and finish. |
| Designing Your Patch: From Idea to Patch Concept |
|
Sketch the design on paper first; transfer to fabric with tracing paper or water-soluble pen to keep lines visible until stitching. |
| Stitches and Techniques |
|
Plan which stitches to use for each color area and test on scrap fabric before final stitching. |
| Finishing the Embroidery |
|
Keep stitch density balanced, especially on dense fabrics like denim. |
| Backing and Attaching Your Patch |
|
Consider where the patch will be worn and test placement before final stitching. |
| Care and Durability |
|
Inspect patches after washing; reseal or re-stitch if needed. |
| Patch Design Ideas |
|
Use design ideas to inspire a cohesive set of patches. |
| Practical Tips for Beginners |
|
Patience and practice help you steadily improve. |
| Creative Uses for Your Patch |
|
Explore creative display and gifting ideas with patches. |
| Sizing, Placement, and Assembly Considerations |
|
Test placements on scrap garments before final sewing. |
Summary
DIY embroidered patches are a gateway to personalized fashion and creative expression. This guide walks you through materials, design, stitches, backing, care, and practical ideas, enabling you to design and apply patches at home with confidence and polish. By following these steps, you can turn simple ideas into durable, professional-looking sew-on accessories that celebrate your style and craftsmanship.