
3D Embroidered textures add depth and life to fabric projects. This guide dives into layered stitch designs and explains how to build rich, dimensional embroidery that stands out. Whether you are a hobbyist or a professional designer, understanding the principles behind dimensional, raised stitching can elevate your work from flat to tactile. You will learn how layering techniques create depth, and how to plan and execute projects that showcase shading and micro detail. By the end of this guide, you will be equipped with practical techniques and inspiration to begin your own dimensional embroidery journey for ongoing practice and growth.
From a different angle, this craft embraces three-dimensional stitching that lifts motifs off the fabric through padding and strategic thread placement. It’s about raised elements, layered textures, and careful shadowing that create a tactile impression as light shifts. Practitioners think in terms of sculptural techniques, using stacking, on-surface couching, and edge finishing to build depth. As you explore these dimensional approaches, you’ll discover how to plan for layering, color shifts, and durable construction from beginner-friendly exercises.
Understanding 3D Embroidered Textures: Layered Stitch Designs and Depth
3D Embroidered textures add depth and life to fabric projects. This guide introduces layered stitch designs and explains how thoughtful texture can elevate embroidery from flat to tactile. Textured embroidery benefits from careful planning that considers light, touch, and how individual threads catch the fabric.
By understanding how layered stitch designs work, you can plan depth from the first sketch. Vary stitch types, thread weights, and color shifts across planes to create shadows, highlights, and subtle gradients that make the subject feel dimensional rather than decorative.
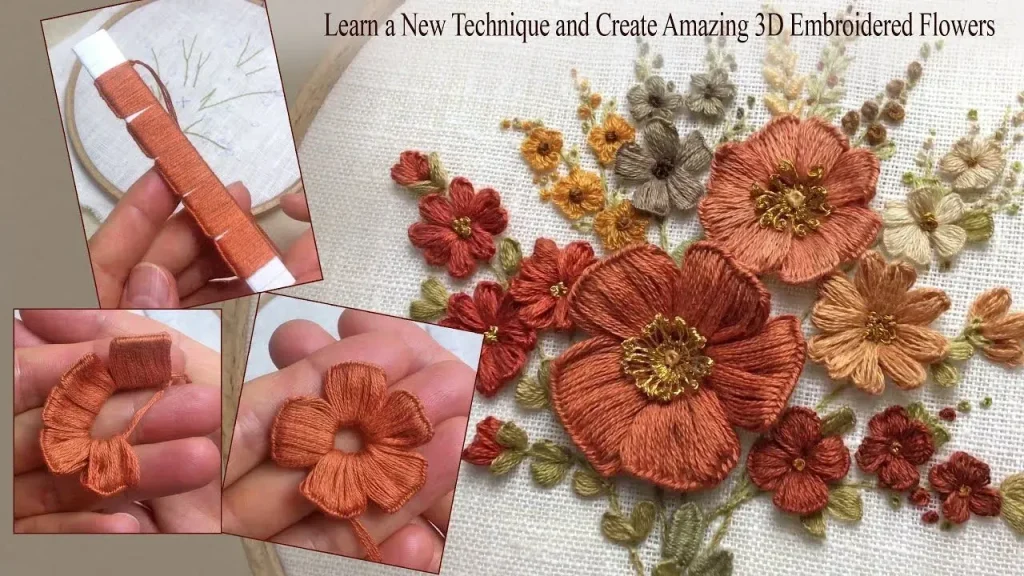
Core Techniques for 3D Embroidery: Padded Stitches, Satin Layers, and Stitch Layering Methods
The core techniques that drive 3D Embroidered effects include padded stitches to build volume, stacked satin or long-and-short stitches for smooth transitions, and couching to secure decorative threads away from the surface. These are foundational 3D embroidery techniques that let you model form with fabric and thread.
As you combine these methods, consider height control, edge finish, and how layers interact with light. Practicing layered stitches on a test swatch helps you see where a plane should rise and how much contrast is needed to read clearly from a distance or up close.
Choosing Materials for Layered Stitch Designs and Textured Embroidery
Choosing materials sets the foundation for success in layered stitch designs and textured embroidery. Start with a stable fabric, a quality hoop or frame, and a stabilizer to prevent puckering as you layer in multiple passes. Mix thread types—cotton embroidery floss, rayon, and metallics—to gain varied texture and sheen.
Padding materials such as felt or thin foam can create raised elements, while a snips set and fine-tipped needle keep your thread management precise. For embroidery tips for beginners, experiment with a simple sample first to understand layering, padding, and how thickness affects the surface.
Design Planning: From Sketch to Layered Depth in 3D Embroidered Projects
Design planning for 3D Embroidered projects begins with sketching and translating the motif into layers. Decide which parts sit in the foreground and which recede, and choose a palette that supports depth with controlled contrast.
Create a detailed plan that lists the stitch type for each layer, the order of layering, and a rough map of thread colors. A clear plan helps you execute layered stitch designs consistently and prevents muddiness in more complex compositions.
Step-by-Step Guide to Building Layered Stitch Designs with 3D Effect
Step-by-step guide to building layered stitch designs with a 3D effect starts with preparing fabric, stabilizer, and foundation. Secure the fabric in a hoop, outline the design with a water-soluble pen, and establish a light base layer as a guide for subsequent layers. Build the first raised element with padded stitches to create volume.
Add a second layer using a different stitch, vary thread color to suggest shading, and then introduce a final accent layer with a textured stitch such as couching. Secure threads, remove stabilizer, and press gently. This process aligns with embroidery tips for beginners and seasoned makers alike, reinforcing good habits as you work.
Finishing, Care, and Display for 3D Embroidered Works
Finishing brings the layered structure together: secure ends, trim excess threads, and remove stabilizer according to its type. Press from the reverse side to protect raised areas and avoid crushing the texture.
Care and display options range from framing to fabric collage. Protect the finished piece with a light fabric finisher if needed, and plan for long-term display by avoiding high heat and direct sunlight. Proper finishing and maintenance keep the 3D Embroidered textures vibrant for years.
Frequently Asked Questions
What is 3D Embroidered and how does it differ from traditional embroidery?
3D Embroidered describes embroidery that creates raised elements above the fabric using layering and padding to add volume. It relies on layered stitch designs and textured embroidery to achieve depth, making pieces that catch light and invite touch, unlike traditional flat embroidery which stays on a single plane.
How do layered stitch designs create depth in 3D Embroidered projects?
Layered stitch designs divide a motif into planes and build each layer with different stitches, thread weights, and color shifts. This sequencing creates shadows and highlights that mimic natural form, producing a convincing 3D effect in textured embroidery.
What materials and tools are essential for starting 3D Embroidered projects?
For 3D Embroidered work, choose a stable fabric, a quality hoop or frame, a fat needle for your fabric, and a range of threads (cotton embroidery floss, rayon, metallics). Add a sturdy stabilizer, padding materials (felt or thin foam), sharp scissors, and a fine-tipped needle for precision.
Which stitches and stitching methods best achieve depth in 3D Embroidered work?
Key techniques include padded stitches to build volume, layered satin or long-and-short stitches for smooth elevation, and couching to anchor decorative threads. These stitch layering methods drive depth in 3D Embroidered pieces while leveraging 3D embroidery techniques.
What are practical embroidery tips for beginners when working with 3D Embroidered?
Embroidery tips for beginners include practicing padding and layering on scrap fabric, starting with simple guides, keeping threads organized, and maintaining balanced tension. Gradually add layers and textures, and consider experimenting with different thread weights as you gain confidence.
How should I plan and finish a 3D Embroidered piece to maximize depth and texture?
Plan by sketching the motif and translating it into layers, choosing a palette that supports depth, and mapping each layer and stitch type. Finish by securing ends, removing the stabilizer, pressing from the reverse, and applying a light fabric finisher if needed to preserve the raised texture.
| Aspect | Key Points |
|---|---|
| Understanding 3D Embroidered Basics | 3D Embroidered creates raised elements on fabric, adding volume through padding and layered stitches; texture reads differently with light and touch. |
| Layered Stitch Designs | Motifs are built in planes or layers; different stitches, thread weights, and color shifts heighten each plane to suggest depth and form. |
| Materials & Tools | Stable fabric, hoop/frame, appropriate needle, range of threads, stabilizer to prevent puckering, padding materials (felt/foam), snips, and a fine-tipped needle; experiment with thread weights. |
| Core Techniques | Padded stitches, stacked satin or long-and-short stitches, and couching anchor threads to create and hold volume and texture. |
| Planning & Design | Sketch the motif, plan layers, distinguish foreground/background, choose a depth-friendly palette, and map stitch types and thread colors per layer. |
| Step-by-Step Creation | Prepare fabric and stabilizer, outline design, build base layer, add subsequent layers with varied stitches and colors, apply final texture, secure and press. |
| Stitches for Depth | Use padded stitches for volume; satin/long-and-short stitches for smooth planes; add detailing stitches for micro texture; plan each stitch’s contribution to depth. |
| Color & Shading | Cool colors recede and warm colors advance; employ a limited palette and let layering provide shading through subtle color shifts. |
| Tips for Beginners & Pros | Beginners: practice on scraps, keep tension balanced, stay organized. Pros: experiment with metallics, beads, and fiber blends while maintaining overall cohesion. |
| Stitch Layering Methods | Start with a solid base, build subsequent layers with clean edges, use lighter top layers to simulate light, and practice on small samples first. |
| Finishing & Display | Secure ends, remove stabilizer per instructions, press from the reverse, optionally seal with a light stiffener, and choose display options suited to the piece. |
| Inspiration & Projects | Collect reference images, start with small motifs (leaves, flowers), gradually increase complexity, and reinterpret familiar objects as layered 3D Embroidered designs. |
Summary
Conclusion