
3D embroidered flowers and botanicals bring nature to life on fabric with tactile depth and airy movement, inviting you to explore the texture of petals against soft fibers. By combining drawing, stabilizers, padding, and an array of 3D embroidery techniques, you can transform a simple sketch into a dimensional, lifelike bloom that reads like sculpture as art. The approach relies on careful planning, the right materials, and a handful of techniques that optimize texture, light reflection, and color layering to create believable form on fabric. This process emphasizes texture and shading so the blooms interact with light as the fabric moves, ensuring the piece remains flexible for display or wearable use. From textured embroidery stitches to layered color, you can tailor projects for walls, garments, or decorative accessories by choosing stitches and padding that suit your chosen scale.
Think of this as dimensional textile art in which flat sketches are transformed into sculpted fabric forms that catch light and cast gentle shadows. Instead of traditional embroidery, crafters build up layers of padding, stitching, and texture to create lifelike blossoms and leafy clusters. This approach is often described as textile sculpture or elevated botanical stitchwork, appealing to makers who want tactile, gallery-ready pieces. Common methods include padding, layering, veining, and matting that add depth without sacrificing flexibility, making it suitable for both wall art and wearable accents. Whether you call it sculpted florals or raised botanical motifs, the aim is a natural, vibrant result that drapes, glows, and moves with the fabric.
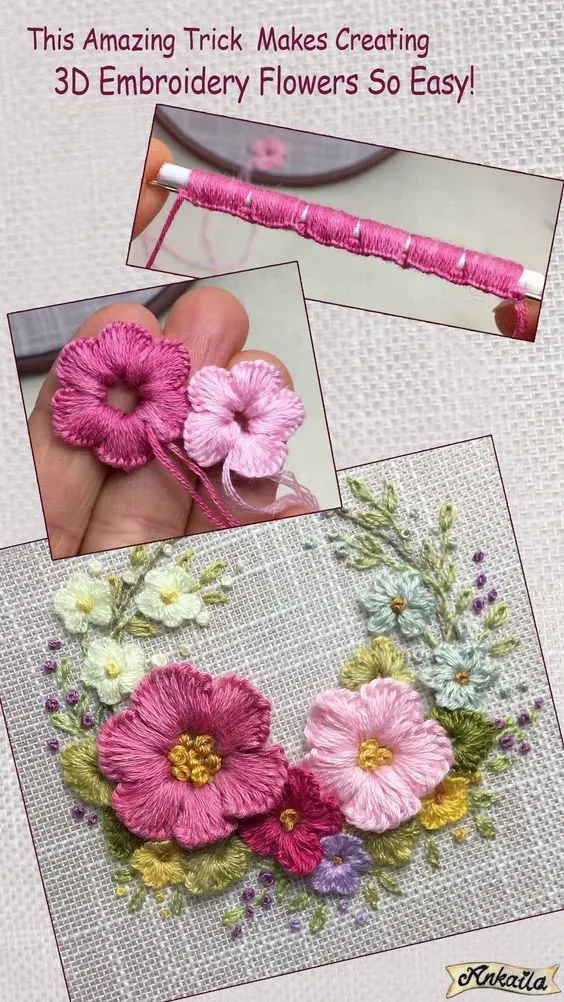
3D embroidered flowers and botanicals: From Sketch to Lifelike Layering
3D embroidered flowers and botanicals invite touch and movement into fabric art. Begin with a clear sketch and plan multiple layers that will become petals, leaves, and centers. This approach hinges on depth, careful placement, and a thoughtful sequence of stitches to transform flat line art into a dimensional textile sculpture. As you map out the design, consider how light will hit each layer and where shadows will form, so your final piece feels alive rather than flat.
To execute this transition, employ a combination of 3D embroidery techniques, padding, and strategic stabilizers. Selecting fabrics with a bit of body—like cotton, linen, or silk organza—helps the layers hold their shape. Use textured embroidery stitches to add surface interest, and plan how hand embroidery for flowers will interact with the surrounding leaves. With patience and a bit of experimentation, you’ll create a botanical composition that breathes with movement as the wearer or viewer shifts position.
Choosing the Right Materials for 3D Embroidery: Stabilizers, Threads, and Padding
The foundation of successful 3D embroidery lies in choosing the right materials. You’ll want stabilizers that provide support without dulling stitch definition, along with threads that offer durability and subtle sheen for dimension. A blend of flat embroidery floss for petals and thicker strands for texture helps you build raised elements that read clearly from a distance and up close.
Padding compounds the three-dimensional effect. Small scraps of felt or cotton batting layered under petal shapes create lift, while delicate silicone or soft stabilizers can help maintain form on linen or cotton blends. Tools matter too: sharp embroidery needles, curved beading needles for precise placement, and a light, adjustable hoop enable you to maintain consistent tension as layers accumulate.
Core Techniques for 3D Embroidery: Padded Satin, Layering, and Center Detailing
Mastery of 3D embroidery techniques begins with padding under satin stitches to lift petal edges from the fabric. Build volume by layering petals in stages, working from background to foreground and slightly offsetting each layer to mimic natural growth. Raised satin and long-and-short stitches introduce gentle shading that enhances realism, echoing the subtle curves found in nature.
Center detailing anchors the composition. Use bullion knots, French knots, or tiny seed stitches to create pollen-rich centers, then extend texture outward with veining on leaves and fine stippling along petal edges. This combination of textures—padded areas, raised stitches, and strategic knot work—gives your piece depth and a tactile presence that invites a closer look.
From Sketch to Stitch: Planning Depth with Floral Embroidery Patterns
Planning depth begins with selecting floral embroidery patterns that translate well into 3D form. Break the motif into layers—background leaves, mid-ground petals, foreground accents, and a detailed center. Digital or hand-drawn sketches both work; print a scaled design and trace it onto temporary transfer paper to guide each layer as you stitch.
As you map layers, consider overlap, light direction, and color variation. Using subtle shifts in hue across petals and leaves can imply curvature and distance, while maintaining cohesive color harmony. The right combination of veining, padding, and layered petals creates a sense of movement that makes the final piece appear more lifelike and natural.
Creating Realistic Texture: Veins, Centers, and Textured Stitches
Texture is the heart of realism in 3D embroidery. Veins on leaves benefit from a thicker thread running along a central line, with thinner threads or fine stitching adding secondary veins for depth. For petals, textured embroidery stitches—such as satin, split, and running stitches laid over a light padding—give curvature and tactile interest that catches light at different angles.
Centers and pollen details come to life with a combination of French knots, bullion knots, and tiny seed stitches. These techniques, along with a careful mix of textures, create a believable focal point that draws the eye. When you layer the petals and leaves, reserve the most textured areas for the center to anchor the composition and prevent a flat appearance.
Finishing, Display, and Care: Preserving 3D Flowers in Textiles
Finishing touches complete the transformation from sketch to stitched sculpture. Gently press between layers with a pressing cloth to set the shape, then trim loose threads and secure all edges with subtle backstitching. If you plan to frame or mount the piece, ensure there is space behind the display surface to avoid compression of raised elements.
Care and maintenance are essential for longevity. Avoid harsh washing; dust gently with a soft brush, and store away from direct sunlight to prevent fading. When framing, consider UV-protective glass and a breathable mat to preserve the texture and depth of your 3D embroidered flowers and botanicals, while a light, periodic check keeps the padding and stitches in good condition for years of display.
Frequently Asked Questions
What are the core 3D embroidery techniques used to create raised petals and layered leaves in 3D embroidered flowers and botanicals?
Core 3D embroidery techniques include padded satin stitch to add gentle padding under petals; raised satin and long-and-short stitches for volume and shading; bullion knots and French knots for centers and pollen texture; layering petals in stages to build depth; veined leaves with a central vein and secondary veins; couching to secure raised elements; and edge finishing to prevent curling. Start simple with a single blossom, then add layers as your confidence grows.
How should I choose fabric, stabilizers, and threads to support 3D embroidered flowers and botanicals and prevent distortion?
Choose fabrics that take well to layering (lightweight cotton, linen, or silk organza) and stable stabilizers (cutaway or floating) suited to your project. Use padding materials such as felt or light batting to create the raised effect, and select threads that offer texture (flat embroidery floss for petals; stranded floss or ribbon floss for texture). Test tension to avoid bulk, and consider beads or pollen accents sparingly to enhance realism.
What is a simple hand embroidery for flowers project to start with 3D embroidered flowers and botanicals, and how should I plan the design?
Begin with a small motif like a single blossom. Plan the design by sketching or tracing a simple silhouette and divide it into layers (background leaves, mid-ground petals, foreground petals, center). Transfer the design to fabric, stabilize, and outline shapes. Build petals with padding, add shading with long-and-short stitches, and form the center with French knots or bullion knots for texture.
How can I achieve realistic shading and depth in floral embroidery patterns when building 3D embroidered flowers and botanicals?
Use color transitions that mimic natural shading, with lighter highlights on edges and deeper tones in shadows. Layer petals from background to foreground and vary stitch length and direction to create volume. Combine textured embroidery stitches to mimic petal curvature and emphasize centers with raised stitches and subtle color contrasts for depth.
What are the best stitches for the centers and leaves on 3D embroidered flowers and botanicals, and how do I add texture?
For centers, bullion knots or French knots work well, with seed stitches for fine texture. For leaves, use satin or long-and-short stitches for the leaf surface and apply a thick central vein with a heavier thread, then add secondary veins with a finer thread. Layer veins and curves to enhance realism using botanical embroidery stitches that provide dimension.
How do you finish and display a 3D embroidered flowers and botanicals piece to preserve its dimensional look?
Secure all loose ends and trim threads neatly. Gently press with a pressing cloth to reduce distortion without flattening raised elements. Mount the piece with space behind the surface to maintain depth, or place it in a shadow box. Store away from direct sunlight and avoid aggressive washing to preserve color and dimension of the textured embroidery stitches.
| Aspect | Key Points | Notes |
|---|---|---|
| What it is | 3D embroidered flowers and botanicals are textile sculptures created by layering stitches and padding to form dimensional, lifelike shapes. | Transforms sketches into raised forms on fabric; suitable for walls, garments, or decor. |
| Process focus | Translating flat line art into raised petals and layered leaves; planning for depth; using padding, shaping, and layering. | Aim for a natural look rather than stiffness; start simple and build up as confidence grows. |
| Materials & Tools | Stabilizer and fabric; quality threads (cotton, rayon, or silk); a selection of needles; padding materials; beads for centers. | Balance stability, stitch definition, and softness. |
| Techniques | Padded satin stitch; raised satin/long-and-short stitches; bullion and French knots; layering petals; veined leaves; couching; edge finishing. | Combine techniques to build form and texture. |
| Sketch to Stitch planning | Start with a clear sketch that translates to 3D; plan layers (background leaves, mid-ground petals, foreground petals, center details). | Digital or hand-drawn; transfer with lightbox or transfer paper. |
| Step-by-step plan | 9-step guide: select motif, prepare materials, transfer design, create base layer, build padding on petals, add texture and shading, form the center, attach leaves/stems, add final details. | Begin with a single blossom; gradually handle more complex motifs as confidence grows. |
| Design options & Variations | Monochrome 3D florals; multi-species bouquet; garden-inspired wall art; textile fashion accents; home decor. | Experiment with textures and layered depths for visual interest. |
| Tips for realistic 3D effects | Color transitions; layer management; lighting and texture; practice swatches; neat finishing. | Test padding thickness and stitch density before committing to a final piece. |
| Maintenance & display | Protect from direct sunlight; gentle cleaning; careful storage to avoid distortion; display framing with breathing space. | Framed pieces should have space behind display surface to prevent sagging. |
Summary
3D embroidered flowers and botanicals invite readers into a tactile garden of fabric art. By combining thoughtful design, the right materials, and a repertoire of padding, layering, and texture techniques, you can turn a simple sketch into a dimensional, lifelike piece. Planning from concept to finishing ensures depth, balanced composition, and natural movement; whether displayed as wall art, on clothing, or as a decorative accessory, these botanical forms bring nature to life in three dimensions. With patience and practice, the practice of padding, layering petals, veining leaves, and forming centers grows into a versatile craft that blends artistry with technical skill, inviting continued exploration of color, texture, and form.