
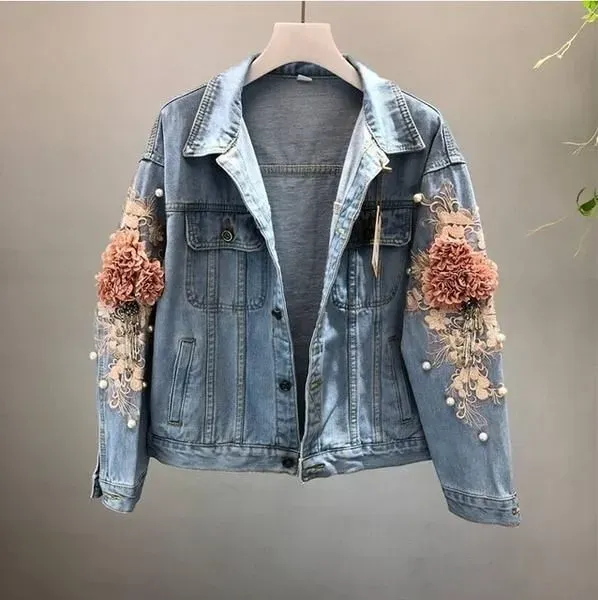
3D embroidery on denim has emerged as a bold way to transform plain jeans into wearable art, adding texture, depth, and personality that ordinary stitching cannot match. This technique blends layered stitches with color to create raised motifs that catch light, making denim feel fresh and expressive when you follow a denim embroidery tutorial. If you’ve explored decorative denim embroidery techniques but felt unsure where to start, this step-by-step denim embroidery guide will walk you through a proven approach that balances texture, color, and design. You’ll learn how to choose designs, prepare fabric, select threads, and use stitches that deliver both durability and drama, turning jeans embroidery ideas into tangible craft projects. By the end, you’ll have a clear plan for applying 3D embroidery on denim to jackets, pockets, and hems, with practical tips you can reuse on future pieces.
Viewed through an LSI lens, this craft becomes raised stitching and dimensional decoration that elevates ordinary jeans into wearable art. Think of it as layered threadwork on sturdy denim, where textured motifs, bead accents, and careful color placement create depth and tactility. Whether you call it raised embroidery on jeans, 3D textile stitching, or decorative denim art, the underlying idea is to add dimension, personality, and durable style.
1. 3D Embroidery on Denim: Transform Jeans into Wearable Art
3D embroidery on denim offers texture and height that standard stitching can’t match, turning plain jeans into wearable art. This approach creates raised motifs that catch light and invite touch, making your denim stand out with personality. By exploring jeans embroidery ideas and decorative denim embroidery techniques, you’ll discover how dimension and color interact to elevate everyday fabric into a statement piece.
This guide uses a denim embroidery tutorial mindset, presenting a practical, step-by-step path to a finished pair of jeans you’ll reach for again and again. Whether you’re new to 3D embroidery on denim or you’ve tried other online tutorials, the focus here is on reliable workflow, steady textures, and durable results that pair beauty with everyday wear.
2. Denim Embroidery Tutorial: Materials, Stabilizers, and Setup
Selecting the right materials is the foundation of any successful decorative denim embroidery technique. You’ll want a smooth denim surface, tear-away or cut-away stabilizers, and a frame or hoop to keep stitches even. Choose embroidery threads with enough thickness to build height, such as variegated floss, pearl cotton, or sturdy cotton threads, and pick a needle suited to your thread weight and denim density.
A careful setup matters just as much as the thread choice. Prepare the jeans by cleaning and ironing, then place stabilizers on the appropriate side to prevent distortion. When you’re ready to stitch, secure the area to minimize movement, so your 3D elements stay crisp. This stage echoes the precision you’d expect from any step-by-step denim embroidery workflow and sets the stage for durable, eye-catching results.
3. Design and Transfer: From Concept to Accurate Motifs
Good design planning shapes the impact of your embroidery. Think about placement, scale, and color harmony, whether you’re imagining a bold floral trail along the thigh or a delicate motif on a pocket. Use jeans embroidery ideas as a starting point, then tailor them to your garment’s seams and curves for a natural flow.
Transferring the design accurately is essential for a clean finish. If you’re working from a digital pattern, print to size and use a lightbox for precise tracing. Alternatives like heat-erasable markers or water-soluble pens work well too. After transferring, test a small area to confirm visibility before you commit to stitching in a real session.
4. Stitch Techniques for Height: How to Build 3D Texture on Denim
Dense, dimensional embroidery on denim relies on a mix of stitches that build height without excessive bulk. Satin stitches create smooth raised fills, while long-and-short stitches add shading and depth. Pair these with couching to secure thicker threads and add texture, and consider padded stitches or bullions for pronounced, sculptural elements.
Layering stitches gradually is key to a convincing 3D look. Start with a clean outline, then methodically build up the base, add 3D elements, and finish with highlight points. French knots, tiny beads, and specialty stitches can serve as focal accents that catch light and invite a touch, aligning with decorative denim embroidery techniques while keeping the design wearable.
5. Step-by-Step Denim Embroidery: A Practical Workflow
A practical workflow keeps you on track from concept to completed piece. Begin by selecting a bold motif and testing your chosen thread on scrap denim. Move to fabric preparation, stabilization, and a careful transfer of the design to your jeans. These early steps mirror the logic of a step-by-step denim embroidery guide and help you build confidence.
Then secure the stitching area and start with a clean outline. Fill in the base with a satin or long-and-short stitch, gradually add 3D layers, and finish with detailing that highlights texture. By following a repeatable process, you can create different jeans embroidery ideas across pockets, seams, or patches, while maintaining a professional, durable result.
6. Color, Pattern, and Care: Finishing Touches for Lasting Wear
Color planning is the silent driver of a successful denim embroidery project. Denim’s blue backdrop accepts bright primaries or metallics, and a limited palette can become a powerful focal point. When choosing colors, consider lighting and the garment’s shade to ensure your design pops and remains versatile for daily wear—a core consideration in jeans embroidery ideas.
Care and maintenance protect your 3D embroidery on denim. Turn jeans inside out, wash gently, and avoid high heat to preserve height and texture. Air-drying or garment bags on delicate cycles help keep your raised stitches intact, aligning with general guidance from decorative denim embroidery techniques and ensuring your design continues to look fresh after many wears.
Frequently Asked Questions
What is 3D embroidery on denim and how does it enhance jeans compared to traditional stitching?
3D embroidery on denim creates raised, textured motifs by layering stitches and using stabilizers, thicker threads, and padding. It adds depth and tactile interest that flat stitching can’t achieve. Start with a simple design on a stable denim base and build height gradually for best results.
Which stitches and techniques are recommended in a denim embroidery tutorial to achieve a dimensional look?
In a denim embroidery tutorial, use stitches that build height: satin stitch for fills, long-and-short for shading, and padded stitches for dimension. Add couching to secure thicker threads or metallics, and consider beads for extra texture. Use tear-away stabilizer for light designs or cut-away for dense layers, and always transfer and secure your work.
What is a step-by-step denim embroidery approach for beginners to learn 3D effects?
Step-by-step denim embroidery approach: plan a bold motif, prepare a wrinkle-free base, transfer the design, secure the stitching area with a hoop or stabilizer, outline with a backstitch or split stitch, fill with satin or long-and-short stitches, create 3D layers with padding or couching, add highlights with French knots or beads, and finish with secure knots and stabilizer removal.
Which jeans embroidery ideas work best with 3D embroidery on denim for a bold, wearable look?
Jeans embroidery ideas that work well with 3D embroidery on denim include a large floral motif along the calf, a geometric line or pocket design with metallic threads, and nature-inspired leaves with raised accents. Use a limited palette for cohesion, then layer more colors or thickness for depth.
What decorative denim embroidery techniques add texture while remaining durable on jeans?
Decorative denim embroidery techniques to add texture without sacrificing durability include padding (padded satin), couching thicker threads, French knots, bullions, beads, and metallics. Combine these with careful color choices, appropriate stabilizers, and measured layering to keep the design stable through wear and washing.
How should I care for 3D embroidery on denim to maintain height and color after washing?
Care tips: turn jeans inside out, use mild detergent, and air-dry or use a delicate cycle with a garment bag. Avoid high heat that can crush raised stitches. Remove stabilizers if possible, and test washing on a scrap area first. Press with a cloth to protect the embroidery and minimize abrasion.
| Aspect | Summary |
|---|---|
| What it is | 3D embroidery on denim uses layered stitches to build up raised motifs, adding texture, depth, and personality beyond flat stitching. |
| Benefits | Creates texture and dimension, adds character, and yields standout jeans that look professional and are durable for daily wear. |
| Materials & Planning | Denim base, stabilizers (tear-away or cut-away), hoop/frame, suitable embroidery threads, needles, scissors, markers, and a scalable design; plan placement and size. |
| Stabilizers | Tear-away stabilizers for simple designs; cut-away for denser/longer projects; consider stabilizer on the inside for protection and stability. |
| Design Planning | Think placement, scale, and color; small motifs on pockets or cuffs; larger designs along legs; start with a modest palette and build layers gradually. |
| Transferring Design | Scan/print to size, use lightbox or heat-erasable markers, water-soluble pens, or carbon transfer; test area before stitching. |
| Stitch Options for 3D | Mix of stitches to add height: satin, long-and-short, satin plus couching, padded stitches, French knots, bullions; layer gradually to build 3D. |
| Step-by-Step Workflow | Outline motif; prepare fabric; transfer design; secure area; outline; base fill; add 3D layers; detailing; secure and trim. |
| Color & Design Ideas | Use denim as backdrop with bright primaries or metallics; limited palettes (2–4 colors) often work; ideas include floral, geometric, minimalist line art, nature motifs with 3D accents. |
| Care & Maintenance | Turn jeans inside out; use mild detergent; low heat or air dry; hand wash or garment bag for delicate areas; minimize abrasion to preserve height. |
| Why This Approach Works | Combines planning, stabilization, and staged stitching to achieve a durable, professional-looking 3D embroidery on denim that can be scaled or adapted to other pieces. |
Summary
3D embroidery on denim transforms ordinary jeans into wearable art by creating dimensional texture and raised motifs that catch light and invite touch. This approach blends careful planning, stabilization, and layered stitching to produce durable, expressive results you can wear daily. By selecting suitable stabilizers, threads, and design placement, you can elevate denim to a statement piece—whether on pockets, patches, or full-leg designs. As you gain experience, you’ll explore color harmony, stitch combinations, and pattern ideas that reflect your personal style, turning everyday denim into long-lasting decorative denim embroidery techniques that are uniquely yours.