
Screen Printing Quality is the anchor of successful garment decoration, blending precision with creative expression. Whether you print on T-shirts, hoodies, or promotional items, dependable results from run to run keep colors true and edges crisp. To support this, practice screen printing tips that cover prepress, ink and mesh setup, and careful color management to boost overall performance. Consistency in screen printing across batches reduces waste and rework, helping you build trust with customers when prints stay uniform. This introduction highlights how to improve print quality, troubleshoot common issues before they affect production, and set a durable standard for your shop.
Think of this topic as the science of dependable stencil-based imaging, where ink deposition, substrate interaction, and process control converge to reliable results. From an LSI perspective, the same idea shows up as print fidelity, color accuracy, and batch-to-batch reproducibility. These signals map to the core goals of stable ink transfer, crisp edges, and durable finishes across fabrics and orders. Framing the discussion with terms like stencil reliability, ink transfer consistency, and color matching helps readers connect related concepts and apply improvements across productions.
Screen Printing Quality: Foundations of Crystal-Clear Artwork and Prepress
Quality starts before the ink hits fabric. Begin with clean artwork, proper color separations, and crisp halftones that translate well through the stencil. When you invest in thorough prepress, you minimize edge softness and feathering—common culprits of inconsistent Screen Printing Quality. This stage aligns channels, color blocks, and repeatability across runs, helping you maintain a stable baseline for print outcomes. It also ties directly into screen printing tips that separate top shops from the rest by reducing rework and speeding up press times.
A solid prepress phase strengthens color management so the intended look remains stable across multiple garments and substrates. With meticulous prep, you can reproduce designs with less drift from batch to batch, delivering reliable results to customers. By making prepress a built-in habit, you set the stage for higher Screen Printing Quality and a more predictable production flow.
Choosing the Right Mesh Count, Emulsion, and Ink System for Consistent Output
The mesh count and emulsion you choose shape the level of detail, ink opacity, and stencil durability. A coarser mesh pushes bolder, blocky results, while a finer mesh supports delicate lines and halftones. Getting the ink and mesh setup right is essential for consistent output and aligns with screen printing tips that emphasize proper stencil transfer and color vibrancy.
Test prints and controlled adjustments map design complexity to mesh and emulsion choices, reducing bleed and maintaining color fidelity. When you pair the correct mesh with the appropriate emulsion thickness, you create a stable transfer that yields steadier results across runs and substrates, supporting overall consistency in screen printing.
Exposure, Registration, and Edge Sharpness for Repeatable Precision
Exposure and contact determine edge definition and stencil durability. Underexposure can produce faint edges and poor emulsion adhesion, while overexposure dulls fine lines. Run careful exposure tests with a test print and a step-wedge or calculator, and verify contact between the screen and substrate for reliable registration fidelity. This practice is a core element of screen printing tips that influence Screen Printing Quality over many shifts.
A stable press setup with precise platen alignment minimizes misregistration and ensures repeatable alignment across repeats. Regularly check for stencil lift, underexposure, or overexposure symptoms and adjust accordingly to keep edges crisp and colors aligned, reinforcing consistent results across jobs.
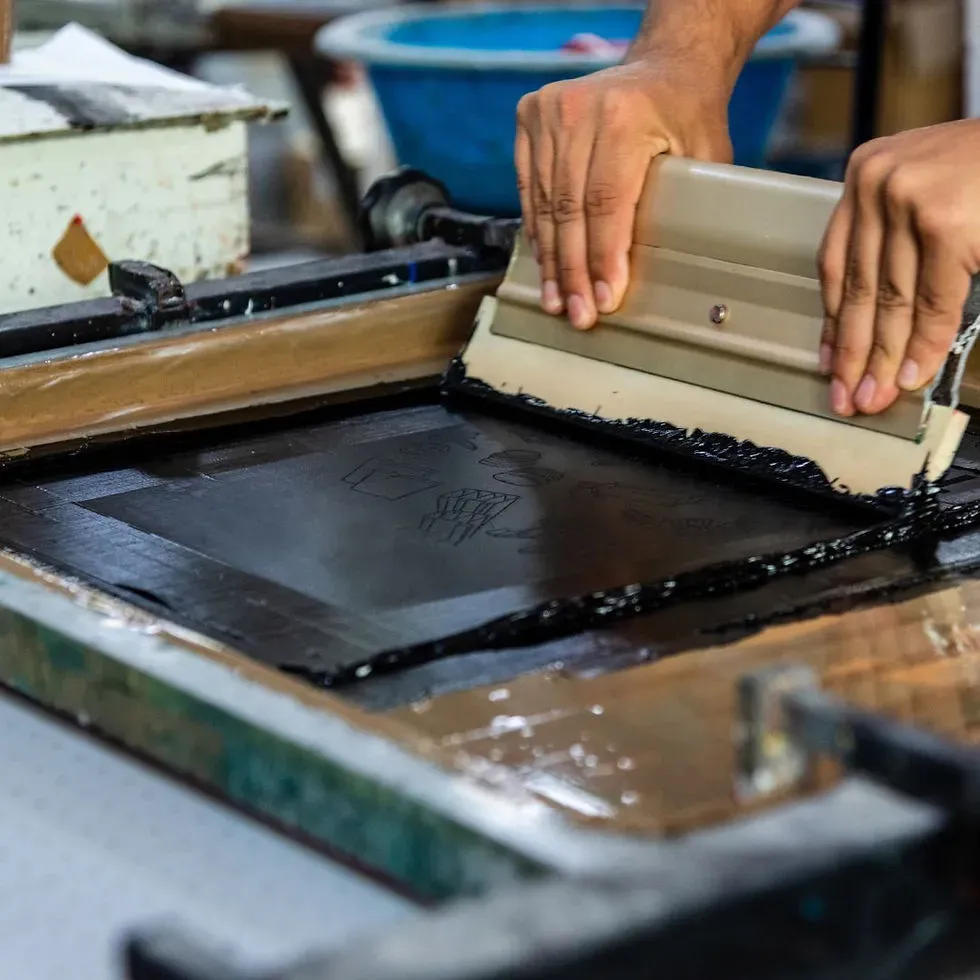
Master the Squeegee Technique for Even Ink Deposit
A confident flood stroke followed by a controlled squeegee pull is the heartbeat of good screen printing. Blade angle, speed, and pressure influence ink deposition, edge sharpness, and coverage. Calibrate your squeegee durometer and hardness to your ink system and substrate to achieve a uniform laydown and reduce ghosting.
A consistent squeegee approach helps you practice color blocks before production, dialing in a method that preserves edge integrity while maintaining color saturation across colors and garments. This repeatable technique supports reliability and strengthens overall Screen Printing Quality.
Fine-Tune Ink Viscosity and Ink and Mesh Setup for Consistent Color
Ink viscosity directly affects print quality. If the ink is too thick, it may trap in the stencil and cause pinholes or dull color; if too thin, colors can wash out and feather. Use a Zahn cup or dynamic viscosity testing during setup and print testing, then adjust pigment load, reducer, or binder to reach a stable viscosity that matches your press speed and substrate. The ink and mesh setup should be in harmony so the stencil releases ink cleanly and the mesh resists sag during the squeegee pass.
Maintain consistent viscosity across runs to support predictable color reproduction and reduce drift. Pair with disciplined color management—document Pantone or CMYK conversions, build a color library, and run standardized test prints to compare density, hue, and contrast after each color change. This approach directly supports screen printing tips aimed at improving print quality.
Drying, Curing, Off-Contact, Tension, and Troubleshooting for Reliability
Drying and curing are the final locks that set the print. Develop a curing protocol based on ink manufacturer guidelines and fabric type, and verify cure with a simple, non-destructive test such as a post-cure wash or a touch test. Under-cured prints can peel or crack, while over-curing may alter color. Consistent drying and curing practices are essential for Screen Printing Quality and color stability across runs.
Routine maintenance and cleanliness reduce variables that affect print reliability. Keep screens clean, manage off-contact height, monitor screen tension, and inspect frames for warping. A structured troubleshooting and QC routine helps you catch issues early, document the problem, and implement corrective actions—ensuring that screen printing troubleshooting remains a proactive part of your workflow and that quality stays high across shifts.
Frequently Asked Questions
How can I improve Screen Printing Quality with proven screen printing tips?
Screen Printing Quality refers to the consistency and durability of prints across runs. To improve print quality, follow proven screen printing tips: start with clean prepress art and color separations, optimize ink viscosity and mesh/emulsion setup, calibrate squeegee technique, and implement a robust curing protocol. Regular test prints, equipment maintenance, and keeping accurate color recipes help sustain high Screen Printing Quality from batch to batch.
What steps help achieve consistency in screen printing to sustain Screen Printing Quality across runs?
Consistency in screen printing comes from stable mechanical and process controls: off-contact height, screen tension, repeatable squeegee strokes, and controlled curing. Document a repeatable workflow, use a shift-change QC checklist, and keep ink and mesh setup stable across jobs. Together these practices protect Screen Printing Quality across batches.
What are the top screen printing troubleshooting steps to protect Screen Printing Quality?
When issues arise, use a structured screen printing troubleshooting approach: inspect for pinholes, misregistration, ghosting, or ink bleed; isolate variables (artwork, screens, ink, squeegee, curing); reproduce the issue on a controlled test, then implement corrective actions. This routine supports ongoing improvements and protects Screen Printing Quality.
How do ink and mesh setup influence Screen Printing Quality, and how should I choose them?
Ink and mesh setup directly affect ink deposition, opacity, and edge detail. Select a mesh count appropriate for design complexity and ink viscosity, choose compatible emulsion, and verify stencil thickness. Matching ink and mesh setup to the design improves consistency in Screen Printing Quality and reduces rework.
Why are exposure and registration critical for Screen Printing Quality and how can I optimize them?
Exposure and registration define edge sharpness and alignment. Run exposure tests with a test print, ensure precise screen-to-substrate contact, and maintain stable platen alignment. Combining good prepress with careful exposure and accurate registration keeps edges crisp and enhances Screen Printing Quality.
What simple quality control (QC) checks can help protect Screen Printing Quality?
Implement a lightweight QC protocol at every shift: baseline prints, color checks, and a quick defect sweep for pinholes, ghosting, or misregistration. Record results, compare to a reference print, and escalate issues to adjust ink, screens, or curing. This practice supports screen printing troubleshooting and continuous improvement of Screen Printing Quality.
| Tip | Focus Area | Key Takeaway |
|---|---|---|
| Tip 1 | Nail Artwork Prep and Prepress | Prepare clean, color-separated artwork with crisp halftones to reduce rework and improve consistency across runs. |
| Tip 2 | Mesh Count & Emulsion Selection | Choose mesh and emulsion to match design detail and ink opacity for steadier results and less bleed. |
| Tip 3 | Exposure & Registration | Run exposure tests and ensure accurate contact for sharp edges and repeatable alignment across colors. |
| Tip 4 | Squeegee Technique | Calibrate flood and squeegee action (angle, speed, pressure) for uniform ink laydown and crisp edges. |
| Tip 5 | Ink Viscosity & Ink-Mesh Setup | Maintain stable viscosity with testing; align ink, reducer, and mesh to prevent pinholes or bleeding. |
| Tip 6 | Off-Contact & Screen Tension | Keep consistent off-contact and tension to ensure even ink transfer and minimize artifacts. |
| Tip 7 | Drying & Curing | Follow a proper curing protocol and verify with simple tests to prevent soft prints and color migration. |
| Tip 8 | Color Management | Build reliable color recipes, document Pantone/CMYK conversions, and verify consistency across batches. |
| Tip 9 | Maintenance & Cleanliness | Keep screens, squeegees, and flood bars clean; store correctly to reduce downtime and carryover. |
| Tip 10 | Troubleshooting, QC & Continuous Improvement | Use a QC checklist, document issues with photos, and apply corrective actions to drive ongoing improvements. |
Summary
Table of key points describing the 10 pro tips for maintaining Screen Printing Quality and consistency.