
The DTF transfer process has transformed how designers and garment makers bring vibrant, durable designs to t-shirts and other fabrics. By combining direct-to-film printing with a straightforward heat-press step, this method delivers bold colors, a soft hand feel, and the flexibility to print on a wide range of fabrics. This guide walks through the DTF printing steps and explains how DTF transfers work to move your artwork from screen to garment. A clear DTF design to tee guide helps you anticipate how the final transfer will look on different fabrics. Whether you’re a hobbyist or a shop owner, understanding the DTF heat press process and practical DTF troubleshooting tips will help you achieve professional results.
A practical way to describe this method is as a digital-to-film workflow that converts artwork into garment-ready graphics. Alternative terms include a film-to-fabric transfer system or a heat-press color-transfer process, both referencing the same sequence from design to finished print. LSI-friendly concepts like color layering, substrate preparation, and post-press care help designers connect this topic to related workflows without overusing a single term. By emphasizing adhesion, alignment, and durability across a range of fabrics, this approach remains relevant to designers, hobbyists, and print shops seeking vibrant, long-lasting apparel.
Understanding the DTF transfer process: what it is and why it matters
The DTF transfer process combines direct-to-film printing with a subsequent heat‑press step to move vibrant designs onto fabrics. This approach yields bold colors, a soft hand feel, and reliable performance across a broad range of materials. By separating the artwork from the garment through the transfer film, designers can opt for detailed color work and complex gradients without sacrificing durability or wash resistance.
Understanding the DTF transfer process helps explain why many studios choose this method for both small runs and larger productions. The workflow emphasizes consistency—from digital design to the finished tee—so misprints are minimized and production times stay predictable. This foundation also frames the rest of the guide, showing how each stage contributes to a professional result.
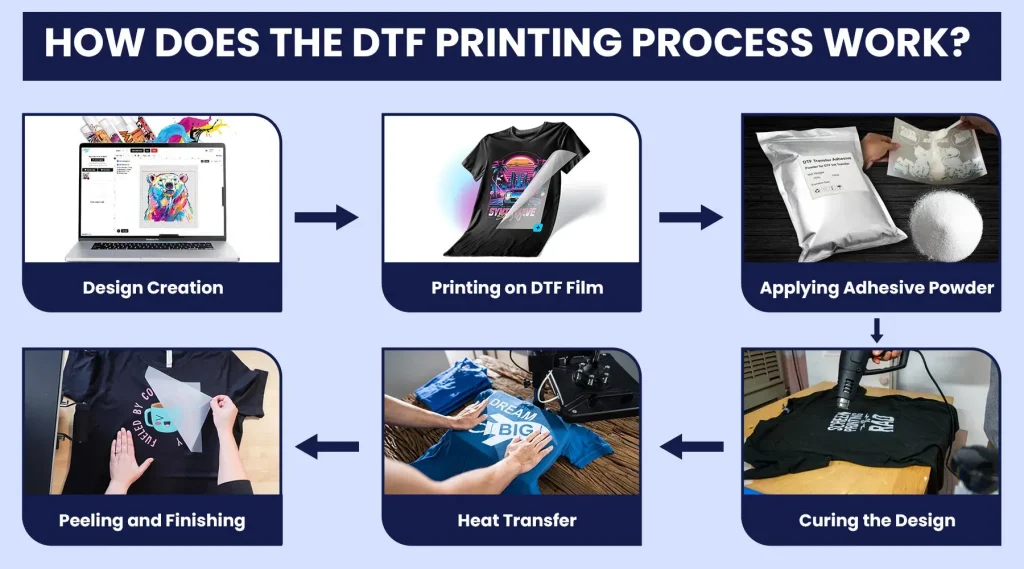
DTF printing steps: a practical workflow from file to film
DTF printing steps describe a repeatable pipeline: prepare the digital file, set up color management, print the color channels onto PET transfer film, and then apply adhesive powder before curing. This sequence is designed to preserve color fidelity and detail, with the white underbase often used on darker fabrics to ensure vibrant top colors show true.
Attention to print settings—resolution, color profiles, and ink density—directly impacts the final transfer. By following a structured set of DTF printing steps, operators can achieve consistent color reproduction and predictable results across multiple garments, reducing waste and rework while speeding up production.
DTF design to tee guide: planning artwork for perfect transfers
DTF design to tee guide starts long before the press is heated. It centers on artwork that’s sized correctly (often high resolution 300 dpi or higher) and prepared for layering. Planning includes selecting the right file formats (PNG with transparency for dark garments, clean vector assets for scalable prints) and ensuring color separations will print cleanly as distinct layers.
Clear mockups and thoughtful color ordering help predict the final result on the chosen fabric. In a well-executed DTF design to tee workflow, designers anticipate how white underbase and subsequent color layers will interact on the garment, enabling more accurate alignment and a truer replication of the original concept.
How the DTF transfers work: color layering, underbase, and adhesion
In DTF transfers, a white underbase is typically printed first on dark fabrics, followed by the top color layers. This layering technique ensures color brightness and accuracy, while the adhesive powder prepares the ink for bonding to the fabric during heat application. The result is a durable graphic with crisp edges and smooth gradients.
The transfer operation relies on precise powder application and curing, which enable the adhesive to melt and fuse the ink to the garment during heat pressing. Understanding how DTF transfers work helps troubleshoot issues related to color vibrancy, texture, and edge sharpness, and it informs adjustments to print sequencing, powder coverage, and curing times.
DTF heat press process: optimizing temperature, pressure, and timing
The DTF heat press process centers on tuning temperature, time, and pressure to suit the fabric and transfer film. Pre‑pressing helps remove moisture and creates a smooth surface, while specific temperature ranges (for example around 180–190°C) and durations (roughly 10–20 seconds) ensure a strong bond without scorching. Following manufacturer guidelines for both the film and the machine is essential to consistent results.
Application of the transfer requires careful alignment and steady pressure, with many operators testing parameters on scrap fabric before committing a final tee. After pressing, some workflows use a brief cooldown or a post‑press cure to set the print and stabilize color, contributing to a reliable DTF heat press process across batches.
DTF troubleshooting and quality checks: diagnosing and fixing common issues
DTF troubleshooting addresses common symptoms like color shifts, white specks, or a soft hand feel. Start by verifying printer nozzle alignment, color profiles, and powder coverage, then inspect the curing step to ensure the film and adhesive have bonded correctly. Systematic checks at printing, curing, and pressing help pinpoint where issues originate.
Quality checks should be integrated into every stage: after printing, after powder curing, and after transfer. A tactile test can reveal whether the surface is fully bonded, while edge checks help detect misalignment or uneven transfer. With ongoing troubleshooting and careful parameter tracking, you can achieve consistent, repeatable results that stand up to repeated washing.
Frequently Asked Questions
How does the DTF transfer process work, and what are its main advantages over other methods?
The DTF transfer process combines direct-to-film printing with a heat press to move inks onto fabric. After printing on a PET film, a white underbase and color layers are bonded to the garment using an adhesive powder that is cured before transfer. This approach yields vibrant colors, a soft hand feel, and broad fabric compatibility, including many dark garments, with reliable underbase behavior when done correctly.
What are the essential DTF printing steps to ensure reliable transfers?
Key DTF printing steps include planning the design, preparing the substrate, printing the color channels (often starting with white on dark fabrics), applying and curing adhesive powder, trimming and aligning the film, and performing the transfer with proper heat and pressure. Each step affects color fidelity, adhesion, and durability, so following a consistent workflow minimizes misprints.
In the DTF design to tee guide, how should I prepare artwork for optimal transfer onto different fabrics?
In the DTF design to tee guide, start with high-resolution artwork (300 dpi or higher) and manage color with proper profiles. Use PNGs with transparency for dark garments to control the white underbase, or clean vector art for scalable prints. Plan color separations and mockups to predict the final look on your chosen fabric.
What heat press settings are typical in the DTF heat press process, and how can I adapt them for various fabrics?
Typical DTF heat press process settings involve around 180–190°C (350–375°F) for 10–20 seconds with even, firm pressure, plus a short pre‑press to remove moisture. Always consult film and fabric guidelines and perform a test on a scrap garment before applying the transfer to final pieces.
What are common DTF troubleshooting tips for issues like white specks, color shifts, or misalignment?
DTF troubleshooting tips include verifying printer nozzle alignment and color profiles, ensuring proper adhesive powder adhesion and curing, and checking alignment and tape masking during transfer. Quality checks should occur after printing, after powder curing, and after pressing to catch issues early and adjust parameters.
How can I maximize durability in the DTF transfer process and ensure long-lasting washes?
To maximize durability in the DTF transfer process, confirm solid powder adhesion, correct curing, and appropriate heat/pressure timing during transfer. Follow with proper post‑care: turn the garment inside out for washing, use cold water, and avoid high heat drying during the first washes to preserve the print.
| Aspect | Key Points |
|---|---|
| What is the DTF transfer process? | A method that combines direct-to-film printing with a heat‑press step to transfer bold designs onto fabrics, delivering vibrant colors and durable results. |
| Benefits | Vibrant color, soft hand feel, wide fabric compatibility, reliable underbase behavior, strong wash durability, and a flexible workflow from design to finished tee. |
| High-level workflow | From design to tee: plan and prepare the design, prepare substrate and transfer film, apply powder and cure, cut/mask/align, pre-press and set parameters, apply transfer, post-press care, and perform troubleshooting. |
| Step 1 – Plan and design | Use high-resolution artwork (300 dpi+), manage colors, save in appropriate formats (PNG with transparency for dark fabrics; clean vectors). Plan color order and separations to help predict the final result. |
| Step 2 – Substrate and film prep | Ensure fabric is clean; pre-press to remove moisture and wrinkles. Prepare the PET transfer film and print with appropriate settings; print white underbase first on dark fabrics. |
| Step 3 – Powdering and curing | Apply adhesive powder evenly, cure/dry properly to fix the powder for clean transfer and bonding. |
| Step 4 – Prepare for application | Trim excess film, optionally leave a small border, align accurately using marks, tape, or a jig to ensure a clean transfer. |
| Step 5 – Pre-press and set parameters | Pre-press to remove moisture and create a smooth surface. Typical temps/times: around 180–190°C (350–375°F) for 10–20 seconds. Test on scrap before final use. |
| Step 6 – Transfer application | Place transfer, apply consistent pressure, and follow recommended duration. Peel can be warm or cold depending on film. Allow cooldown when appropriate. |
| Step 7 – Post-press care | Cool and finish: remove residue, and follow garment care guidelines (wash inside out, cold water, avoid high heat initially) to protect durability. |
| Step 8 – Troubleshooting | Check printer nozzle alignment, color profiles, powder adhesion, and curing. Perform quality checks after printing, powder cure, and pressing to ensure consistent results. |
| DTF vs other methods | DTF offers flexibility, robust color fidelity, and broad fabric compatibility (including dark fabrics) compared with some alternatives, supporting scalable, repeatable results. |
Summary
Conclusion: The Step-by-Step DTF Transfer Process—from design to tee—offers a practical, scalable path to vibrant, durable apparel. By carefully planning artwork, preparing transfer film, applying heat and pressure properly, and finishing with care, you can achieve reliable results across orders. The DTF transfer process provides a versatile workflow for small businesses, hobbyists, and print shops, helping you reproduce high‑quality tees with confidence. Remember to document parameters, run tests, and refine your setup to maintain consistency and quality over time.