
A custom shirt with UV DTF transfer opens a universe of vibrant, durable imagery that can turn everyday tees into wearable art, inviting designers, crafters, and small brands to experiment with bold color, crisp edges, subtle textures, and tactile finishes that feel as good as they look under real-world lighting, while also signaling to potential customers that their garments are built for longevity and repeated wear. By following a structured approach—starting with UV DTF transfer steps, proper garment prep, film handling, and a careful alignment plan—creators can achieve sharp detail, a wide color gamut, and a soft hand that remains comfortable after washing, all while navigating how to make a custom shirt with DTF and embracing the broader UV-enabled workflow that speeds up production without compromising fidelity. A well-executed project also aligns with a DTF transfer tutorial UV, which lays out printing, curing, and bonding routines, material compatibility notes, plus troubleshooting tips, so that durable fabric transfer results emerge consistently regardless of fabric type, substrate color, or project scale, whether you are branding a single design or launching a small collection destined for online storefronts or local markets. Adhering to a thoughtful DIY shirt transfer technique means selecting the right film, adhesive powders, heat press parameters, and protective layers, while conducting swatch testing to verify adhesion, hand feel, and color fidelity, because the best outcomes rely on data gathered from trial runs that inform adjustments to pressure, temperature, dwell time, and post-press care recommendations for garments that must endure repeated washes. When executed with patience and attention to detail, this workflow delivers a cohesive, gallery-ready finish that preserves color richness, guarantees resilience against cracking or peeling, and offers repeatable results across batches, making UV-activated DTF processes an ideal choice for hobbyists and small businesses looking to compete with professional transfers while keeping the process approachable, adaptable to different fabrics, and scalable for future expansions.
In other terms, this is a film-assisted garment printing technique powered by UV-curable inks that bonds artwork to fabrics ranging from cotton blends to synthetics. It emphasizes crisp lines, strong adhesion, and wash-fast results, which appeal to hobbyists and small brands seeking scalable methods. A related concept is a print-on-textile workflow optimized for vibrant graphics, with an emphasis on color management, substrate testing, and proper post-press handling. Practitioners often compare this pathway with other DIY apparel printing routes such as heat-transfer vinyl or traditional screen printing, noting speed, flexibility, and reduced upfront investment that UV-led transfers offer. Whether you’re prototyping a single design or launching a small line, this approach delivers durable visuals with consistent texture and color that stand up to wear.
Understanding UV DTF Transfer: What It Is and Why It Matters
UV DTF transfer uses a printable film that carries the design and adhesive powder to bond it to fabric during heat pressing. When UV-curing inks or UV-assisted processes are employed, the result is sharper detail, a wider color gamut, and faster handling time. This makes it especially appealing for people exploring how to make a custom shirt with DTF and aiming for vibrant, durable results.
In practical terms, the UV variant changes how inks cure and how quickly you can move from print to finished garment. The outcome is a soft-feel print with strong adhesion that holds up across washes and wear. Whether you’re crafting for a school club, a sports team, or a small business, understanding UV DTF transfer steps helps you plan a reliable workflow from design to final garment.
Essential Tools and Workspace Setup for a Reliable UV DTF Transfer
A successful custom shirt with UV DTF transfer starts with the right tools and a clean, controlled workspace. Key items include a UV DTF printer or a standard DTF setup with UV-curing inks, dedicated transfer film and adhesive powder, a heat press with accurate temperature control, and protective coverings like a teflon sheet. These elements reduce variables and improve consistency across runs, aligning with durable fabric transfer results.
Organization matters as much as equipment: a pre-press cloth, scissors or a cutter, rulers for alignment, proper design software, and a lint-free surface all contribute to a clean transfer. When the workspace is set up for efficiency, you’ll minimize errors and speed up the process, helping you achieve repeatable, high-quality outcomes.
Artwork Preparation for UV DTF: Design, Resolution, and Color Management
Before printing, prepare artwork at 300 dpi or higher to ensure crisp edges and accurate color reproduction. If you’re working with dark garments, consider adding a white underlayer to preserve brightness through the transfer. Mirroring the design may be necessary depending on your printer and transfer workflow, and saving files in PNG or TIFF formats helps maintain color fidelity.
Color management is a critical part of the process. Calibrate your monitor to match the printer’s output, and run a color proof or test print to verify fidelity. For those curious about practical steps, this aligns with the idea behind the DTF transfer tutorial UV—ensuring that color density, saturation, and contrast translate well from screen to fabric.
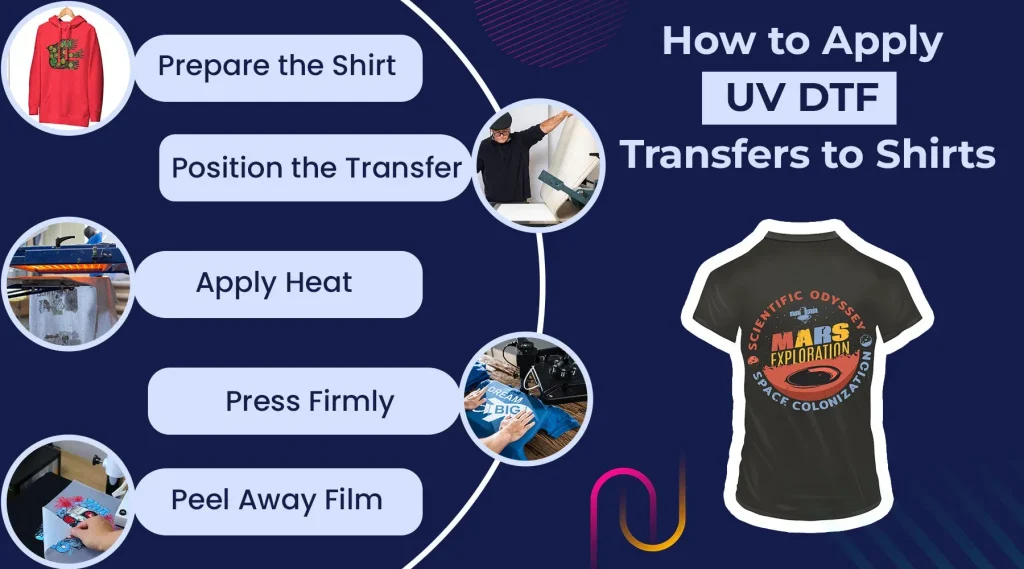
Step-by-Step Workflow: From Print to Post-Press for Peak Results
This section follows the core workflow, from artwork preparation to the final post-press step. Print the design on UV inks onto the DTF film, handling white layers for opacity if needed, and let the print surface cure briefly to reduce smudging. The steps emphasize staying aligned with UV DTF transfer steps to maintain color integrity and bond strength.
Then apply the adhesive powder, cure it per your system’s guidelines, trim the transfer with careful margins, and align it on the garment using center marks. Heat-press at approximately 180–190°C (356–374°F) for 12–15 seconds, using a teflon sheet to protect the print. A steady press and a non-movable transfer help achieve durable fabric transfer results with minimal ghosting.
Troubleshooting Common UV DTF Issues and Quick Fixes
Even with a careful setup, issues like ghosting, color misalignment, or insufficient adhesion can occur. Recheck alignment marks, ensure the garment was pre-pressed, and confirm that the transfer remained stationary during pressing. These checks address the most common headaches that crop up in UV DTF workflows.
If adhesion is weak or colors look dull, verify adhesive powder application, curing time, and the correct heat settings for your specific film and print. Adjusting pressure and post-press timing can also help. For DIY enthusiasts, these troubleshooting steps tie into the DIY shirt transfer technique, emphasizing repeatable checks and iterative testing.
Care, Longevity, and Testing to Guarantee Durable Fabric Transfer Results
To maximize longevity, wait 24–48 hours before washing to allow the print to settle, then turn the garment inside-out and wash gently in cold water. Avoid high heat in the dryer, opting for air-drying or low-heat cycles. Proper care is a cornerstone of achieving durable fabric transfer results that withstand regular wear.
Perform swatch tests and small production runs to dial in your settings for different fabrics and colors. Regularly reassess curing times, pressure, and garment prep, especially when introducing new media or inks. This cautious, iterative approach mirrors the end goal of producing a reliable, consistent process that beginners can grow into, whether you’re following how to make a custom shirt with DTF or refining your UV DTF technique.
Frequently Asked Questions
What is a custom shirt with UV DTF transfer and why is it used for durable fabric transfer results?
A custom shirt with UV DTF transfer uses UV-curing inks on a DTF transfer film to bond artwork to fabric. It delivers vibrant color, sharp detail, and a soft hand-feel, with reliable bonding for durable fabric transfer results across small runs and personalized designs.
What are the UV DTF transfer steps for producing a custom shirt with UV DTF transfer?
Key steps include: design and prep artwork, print on UV inks onto DTF film, apply adhesive powder if required and cure, trim and align the transfer, heat-press at approximately 180–190°C (356–374°F) for 12–15 seconds with a protective sheet, peel according to guidelines, post-press if needed, and allow curing before washing.
How to make a custom shirt with DTF using UV inks: a quick guide?
To make a custom shirt with DTF using UV inks: design at high resolution, print on UV-enabled DTF film (use a white underbase on dark fabrics if needed), apply powder and cure, trim and align on the garment, heat-press at 180–190°C for 12–15 seconds with consistent pressure, peel while warm or cold as directed, perform a post-press if recommended, and let the print cure before handling.
DTF transfer tutorial UV for beginners: what should you know about DIY shirt transfer technique?
A beginner-friendly UV DTF transfer tutorial covers choosing compatible fabrics and materials, essential equipment (DTF printer or UV inks, heat press, teflon sheet), color management, the use of a white underbase on dark fabrics, testing on swatches, and following each manufacturer’s guidelines for best results.
DIY shirt transfer technique for durable fabric transfer results: what are the best practices?
Best practices include thorough fabric pre-press, selecting appropriate fabric types, maintaining correct temperature and pressing time, minimizing movement during transfer, using a teflon sheet, ensuring proper adhesive powder curing, and allowing adequate post-transfer cure before washing to maximize durable fabric transfer results.
What are common troubleshooting tips for UV DTF transfers to ensure durable results on a custom shirt?
Common issues and fixes: ghosting or misalignment—recheck alignment and pre-press; poor adhesion—verify adhesive powder application and cure; dull colors—check ink density and use of white underbase where needed; difficult peels—follow film-specific warm/cold peel guidelines; always test on swatches and adjust temperature, time, and pressure accordingly.
| Aspect | Key Points |
|---|---|
| What is UV DTF transfer and why it matters |
|
| Tools, materials, and setup |
|
| Step-by-step overview |
|
| Fabric compatibility and care |
|
| Design considerations and best practices |
|
| Troubleshooting tips |
|
| Care and aftercare for longevity |
|
| Conclusion |
|
Summary
custom shirt with UV DTF transfer delivers vibrant graphics, detailed imagery, and durable performance that rivals big-brand transfers. By following the step-by-step workflow—from design and printing to heat pressing and care—you can achieve professional-looking results for personal projects or small runs. Start with a test garment to dial in your settings, and adjust pressure, temperature, and timing based on your equipment and fabric. With practice, the process becomes quicker and your DIY or business projects gain a reliable, repeatable method for creating standout apparel that holds up to wear and washing. Whether you’re exploring UV DTF transfer steps, learning how to make a custom shirt with DTF, or following a DTF transfer tutorial UV, the key is consistency, quality materials, and attention to detail.