
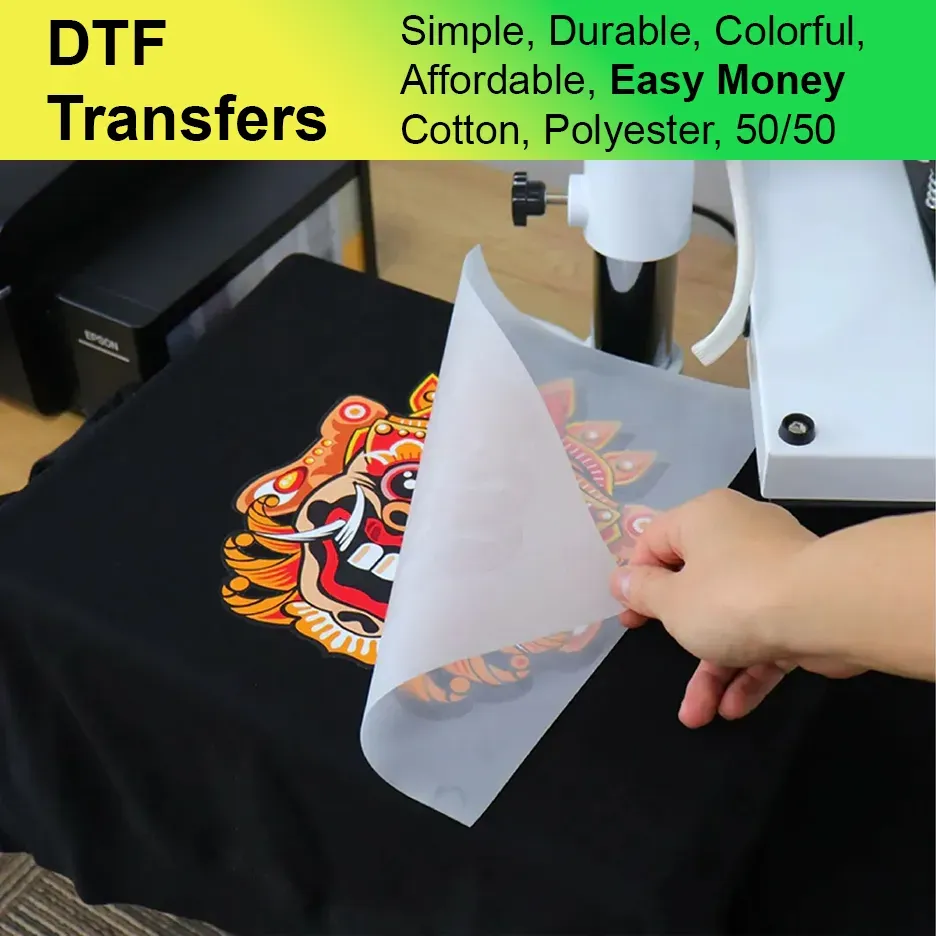
DTF Transfers on Apparel have transformed garment decoration, delivering vibrant, high-quality results for brands of every size while enabling rapid customization, scalable production, and flexible color options that were once out of reach. From local shops printing custom tees to online storefronts, vibrant DTF transfers make color pop, resist fading after washes, and provide a soft hand that customers notice. Getting the best results for DTF printing on apparel starts with smart material choices, precise settings, and a workflow tuned for durability, including ongoing testing across fabrics, inks, and film quality. This guide emphasizes practical steps, including pre-press prep, color-managed design, front-end proofing, and a repeatable process you can document for consistent results. With the right approach, you’ll achieve bold designs that stay vibrant and true after repeated wear, making your apparel stand out in a crowded market.
Think of this as a direct-to-film transfer workflow, a garment-decorating approach that relies on film-based color layers rather than traditional screens. In practical terms, you apply a film with adhesive to fabrics and activate it with heat, a process that scales from single-item orders to broad runs. To refine results, consider DTF printing tips that cover color management, substrate testing, and test presses before committing to production. You’ll also want to prioritize curing DTF transfers correctly, choose durable adhesives, and design for wash durability so the print remains vibrant after washing. In the long run, aligning materials, process discipline, and care instructions helps ensure consistent prints across batches and seasons. Consider testing across several fabric types and keeping detailed records to replicate consistent results in future runs.
DTF Transfers on Apparel: Materials, Setup, and Color Quality
Choosing high-quality materials is the foundation of vibrant DTF transfers on apparel. Start with a reliable DTF printer, film, and adhesive powder, ensuring your colors on screen translate to the final print. The right transfer film provides good translucence and consistent thickness, a powder that melts evenly, and a printer profile that matches your ink set. With quality materials, you’ll notice crisper lines, richer hues, and fewer issues like specks or uneven texture in your vibrant DTF transfers on apparel.
Pair quality materials with a calibrated workflow to preserve color accuracy. Use ICC profiles that match your printer and inks, and run small test prints to verify color density before committing to larger batches. When the materials and settings align, your DTF printing on apparel delivers stable color, sharp edges, and improved wash durability, contributing to lasting vibrancy across many wears.
Fabric Preparation for Vibrant DTF Transfers on Apparel
Pre-washing garments and preparing the fabric surface set the stage for adhesion and color fidelity. Remove sizing and residues, dry completely, and ensure a lint-free surface, especially on dark fabrics where lint can show through the transfer. For most fabrics, cotton and cotton blends are forgiving, but always test on your specific blend to avoid dulling or color shifts that reduce vibrancy in DTF transfers on apparel.
Skipping fabric prep undermines color brightness and durability. A clean surface reduces pigment migration and edge softness that can dull images after washing. By investing in proper fabric prep, you’ll boost color stability, edge sharpness, and the long-term durability of your vibrant DTF transfers on apparel.
Design and Color Management for DTF Printing on Apparel
Design with printability and color accuracy in mind to achieve vibrant DTF transfers on apparel. Start with a high-resolution file (at least 300 dpi at final print size) and use a color-managed workflow with ICC profiles that match your printer and inks. Convert images to the appropriate color space, minimize heavy gradients, and consider layering a white underbase on dark fabrics to improve opacity and brightness, which helps color pop and supports wash durability.
Align artwork with the printer’s capabilities and timing to minimize banding and color drift. Clear design decisions—such as vector shapes for sharp edges and carefully tuned color ramps—enhance DTF printing tips effectiveness, resulting in more consistent vibrant DTF transfers and improved durability across washes.
Print Settings and Color Verification for Consistent DTF Transfers
Print settings are a critical part of the equation for DTF printing on apparel. Ensure mirror settings match your workflow, and confirm that color management aligns with the film and adhesives you’re using. Do test prints to verify color accuracy before running full batches, and adjust color density and ink density to suit each garment. Properly managed print settings can dramatically improve vibrancy and consistency for DTF transfers on apparel.
For reliable results, document the exact settings used for each fabric and design. This practice supports DTF printing tips and helps maintain DTF transfer durability across batches. With careful calibration, you’ll achieve consistent, wash-resistant color fidelity that keeps designs looking bright.
Adhesive Powder Application, Pre-Press, and Peel Strategies
Adhesive powder should be applied evenly to prevent misregistration and edge dulling that harms image vibrancy. Uniform powder coverage ensures consistent transfer quality and long-lasting color retention on apparel. Shake or tumble to remove excess and cure the powder according to supplier guidelines to maximize adhesion and sharpness of the transfer.
Pre-pressing the garment removes moisture and creates a flat surface for transfer. A brief 3–5 second pre-press with moderate pressure works well for most fabrics, followed by a cooling period before placing the film. After transferring, a well-timed peel strategy—warm, hot, or cold—can influence edge sharpness and color brightness, and a short post-press cure helps finalize the bond for durable results in DTF transfer durability.
Curing, Care, and Longevity: Maximizing DTF Transfer Durability
Post-transfer curing is essential to lock in color and improve wash resistance. Allow a recommended cure window per adhesive guidelines, and avoid heavy handling for the first 24 hours. Clear instructions about machine washing—inside-out, cold or warm water, mild detergents—support the longevity of vibrant DTF transfers and protect DTF transfer durability.
Care and maintenance are part of the strategy for long-term vibrancy. Educate customers about proper laundering and avoid chlorine bleach for best results. Ongoing testing across fabrics keeps your process aligned with real-world wear, ensuring DTF printing on apparel stays durable, vibrant, and true over many washes.
Frequently Asked Questions
What factors influence vibrant DTF Transfers on Apparel?
Vibrant DTF transfers on apparel start with quality materials (a reliable DTF printer, high‑quality transfer film with good translucence, and consistent adhesive powder), plus thorough fabric preparation and designs optimized for color accuracy. Then dial in print settings, apply adhesive powder evenly, perform a proper pre‑press, set correct heat‑press parameters, choose the right peel strategy, and complete any recommended curing to maximize color, sharpness, and wash durability.
Why is fabric pre‑treatment crucial for DTF printing on apparel?
Fabric pre‑treatment matters because pre‑washing removes sizing and residues that can hinder adhesion, and a lint‑free surface helps preserve vibrancy on darker fabrics. Proper fabric prep also supports DTF transfer durability and consistent color across batches.
What are DTF printing tips to maximize color accuracy in DTF transfers on apparel?
DTF printing tips include starting with a high‑resolution design (at least 300 dpi) and a color‑managed workflow with ICC profiles that match your printer and inks. Use a white underbase on dark fabrics when needed, perform test prints to verify color density, and optimize for reliable, vibrant transfers on apparel.
What print settings and curing steps maximize DTF printing on apparel?
Ensure correct mirror settings and alignment between printer, film, and adhesive, and run test prints to dial in color density. Typical guidelines suggest around 300–320°F (150–160°C) for 12–15 seconds with moderate pressure; follow your film and adhesive guidelines, and apply curing after pressing if recommended to enhance durability.
How do you apply adhesive powder and pre‑press for best DTF transfers on apparel?
Coat the printed film with adhesive powder evenly, shake off excess, and cure according to your supplier’s instructions. Pre‑press the garment for 3–5 seconds to remove moisture and create a flat surface before applying the transfer for crisper edges and better adhesion.
What care guidelines help extend DTF transfer durability on apparel?
Educate customers to wash inside‑out with cold or warm water, avoid chlorine bleach, and air‑dry when possible; if machine drying is used, choose a low‑heat setting. Following these care guidelines helps maintain DTF transfer durability and vibrant color after many washes.
| Tip | Focus | Key Point |
|---|---|---|
| Tip 1 | Materials quality | Use reliable printer, film, and adhesive powder; match transfer film translucence/thickness; high-quality materials yield crisper lines and richer colors with fewer defects. |
| Tip 2 | Fabric prep | Pre-wash and dry fabrics; ensure a lint-free surface; test on fabric mixes; proper prep preserves vibrancy and durability. |
| Tip 3 | Design for printability & color accuracy | Use high-resolution files (≥300 dpi), color-managed workflow with ICC profiles, convert colors appropriately, and consider white underbases on dark fabrics to boost opacity and wash durability. |
| Tip 4 | Print settings & color management | Mirror settings and ensure color management aligns with film/adhesives; use test prints to confirm color accuracy; adjust color and ink density for the best result. |
| Tip 5 | Adhesive powder application | Apply adhesive powder evenly; uniform coverage prevents misregistration and dull edges; cure according to supplier guidelines to ensure longevity. |
| Tip 6 | Pre-press to remove moisture & create flat surface | Pre-press 3–5 seconds with medium pressure to flatten fabric; reduces wrinkles and moisture-related issues for consistent transfers. |
| Tip 7 | Press settings for vibrancy & durability | Start around 300–320°F (150–160°C) for 12–15 seconds at 15–40 psi; adjust by fabric/film; perform test presses to dial in the right balance. |
| Tip 8 | Peel strategy & post-press curing | Test warm, hot, and cold peels to find the best edge and brightness; a brief post-press helps adhesion and durability. |
| Tip 9 | Cure & handling | Allow a short cure window; avoid heavy handling for 24 hours; provide washing guidance to customers to preserve vibrancy. |
| Tip 10 | Care & longevity | Advise washing inside-out, avoid chlorine bleach, and air-dry when possible; low-heat drying if machine drying is used; ongoing testing improves color longevity. |