
Embroidered patches translate a brand’s story into portable, tactile art that can travel from outfit to moment. From traditional satin-stitched designs to 3D puff and chenille styles, types of embroidered patches showcase a wide visual language. Carefully chosen patch materials and stitch counts balance durability with detail, while iron-on patches and other backing options offer quick, flexible mounting. Whether worn on uniforms, merchandise, or event swag, patches fuse identity with craftsmanship and colorfast performance. This guide breaks down options to help you design patches that look bold, wear well, and stay within budget.
Beyond the name, these stitched emblems—often called fabric appliqués or decorative badges—serve as portable branding. A modern approach blends threadwork, backing, and finishing to create durable insignia for teams, clubs, and retailers. LSI-friendly content uses related terms like stitched patches, fabric patches, and embroidered badges to connect concepts such as materials, backing options, and application methods. Whether you call them sew-on emblems, iron-on appliques, or simply fabric badges, their impact remains the same: identity and craft in a compact form. By exploring synonyms and related phrases, you help readers and search engines understand the topic from multiple angles.
Understanding the Basics of Embroidered Patches: What They Are and Why They Matter
Embroidered patches are decorative fabric pieces created by machine embroidery stitched onto a backing fabric. The design is digitized into a stitch file that guides the embroidery machine to lay down threads in precise patterns, producing a raised, tactile surface. This craftsmanship yields colorfast, durable imagery that carries logos, mascots, slogans, or personal statements with a distinct texture.
These patches matter because they combine visual impact with longevity. Their ability to endure repeated handling and washing—when paired with the right materials and finishing—sets them apart from many other branding options. For teams, clubs, and brands, embroidered patches offer legibility, durability, and a premium feel that remains recognizable over time.
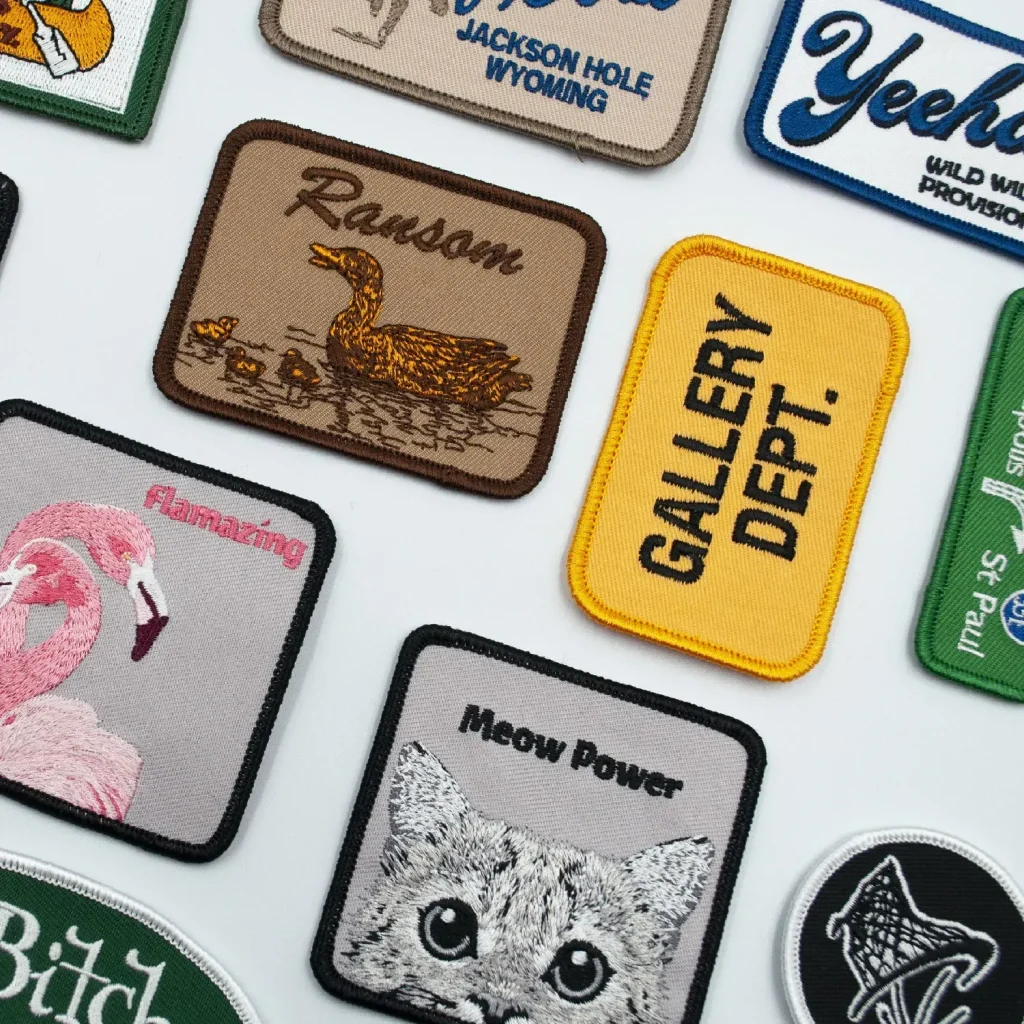
Types of Embroidered Patches That Make Your Brand Stand Out
When we talk about the types of embroidered patches, you’ll encounter several distinct looks and construction methods. Traditional satin-stitched patches on twill or felt are the classic option, offering dense lines, a clean silhouette, and a sturdy Merrow border to prevent fraying. These patches are a staple for uniforms and sportswear where durability and legibility are essential.
Beyond the classic style, 3D puff embroidery patches use foam or plush backing to lift elements of the design, creating a bold, dimensional effect. Chenille patches offer a plush, textured edge ideal for club or team merchandise. Micro-stitched patches handle small designs with fine detail, while reverse appliqué or layered embroidery reveals contrasting colors through multiple fabric layers. Each type serves different branding goals and visual statements.
Patch Materials That Shape Look, Feel, and Longevity
Patch materials influence color vibrancy, texture, wash durability, and price. The base fabric—most often twill, a cotton or polyester blend—provides structure and supports dense stitching. Felt and twill blends are also common, with premium looks sometimes achieved using leather or PVC patches for special applications.
Threads and backing options further define the finished patch. Polyester threads offer durability and colorfastness, while rayon gives a lush sheen with more variable lightfastness. Backing options—such as cloth, twill backing, iron-on heat-activated adhesive, sew-on backing, or heat-seal backing—play a critical role in how the patch attaches and wears over time.
Stitch Counts and Embroidery Density: Balancing Detail, Edges, and Cost
Stitch count is the total number of stitches used to render the patch, and density describes how tightly those stitches cover the surface. The balance between detail and wear determines both appearance and cost. Smaller patches (about 1–2 inches) typically use fewer stitches, while medium and larger patches can reach higher stitch counts depending on the level of detail.
Edge handling and fabric support matter as well. Satin stitches along the border create a solid, crisp edge, but excessive density can stiffen the patch or cause puckering on lighter fabrics. A well-planned density uses more stitches where needed for clarity and fewer fills in large color blocks, aided by the fabric’s stability and careful digitizing.
Backing Options and Finishes: Attachment Methods for Any Garment (Including Iron-On Patches)
Choosing the right backing is crucial for how a patch will be attached and how long it will last. Sew-on backing remains the most durable and cost-effective option for uniforms and durable apparel, while iron-on backing provides a quick, convenient application via heat. Heat-seal backings offer a more secure bond with professional equipment, and removable options like Velcro backings are useful for interchangeable branding.
Border finishing also affects wear and appearance. Merrow borders provide a durable, crisp edge, while laser-cut borders suit non-traditional shapes but may require additional stabilizers. For many applications, iron-on patches are favored for quick branding, but success depends on fabric type and care conditions, so testing on representative materials is recommended.
From Idea to Finished Patch: A Practical Guide to Designing and Producing Patches
The journey begins with concept and design, where artwork is translated into an embroidery-ready file in formats such as DST or PES. Digitizing adjusts stitch types, densities, underlay, and trims for the chosen patch size and backing, ensuring the final look aligns with the brand’s goals.
From there, proofing and production follow. A color-accurate proof helps confirm appearance before full production, and quality control checks ensure stitching density and edge integrity across batches. The care, maintenance, and longevity section highlights washing guidelines and backing maintenance, ensuring patches perform as well in use as they look on display.
Frequently Asked Questions
What are the main types of embroidered patches and how do they differ in look and durability?
Embroidered patches come in several types, including traditional satin-stitched patches on twill, 3D puff embroidery, chenille patches, micro-stitched patches, and reverse appliqué. Each type uses different backing and stitch strategies—twill provides structure; foam or plush backing adds height for puff patches; chenille yields fluffy edges—affecting texture, legibility, and durability.
How do patch materials impact the look of embroidered patches?
Patch materials influence color, texture, and wear. Base fabrics like twill or felt, threads (polyester for durability, rayon for sheen), and backing options (sew-on, iron-on, heat-seal) together determine how the patch looks and lasts, with merrow borders defining a crisp silhouette.
What is stitch count in embroidered patches, and how does it influence cost and durability?
Stitch count is the total number of stitches used to render the patch, and density describes how tightly those stitches cover the design. Higher stitch counts improve detail and edge sharpness but raise production time and thread usage, affecting cost and fabric stability.
What should I know about iron-on patches and backing options for embroidered patches?
Iron-on patches use a heat-activated adhesive, offering quick application but performance depends on fabric type and care. Backing options include sew-on, iron-on, heat-seal, Velcro, and other removable methods—each balancing convenience, durability, and washability.
How do backing options affect the durability and attachment of embroidered patches?
Sew-on backing is typically the most durable for uniforms and heavy wear. Iron-on backing is convenient but can weaken with repeated washing or high heat, while heat-seal offers stronger professional bonding; removable options like Velcro suit interchangeable branding.
How can I design embroidered patches to balance color, size, and legibility across patch types and stitch counts?
Start with the patch size and shape, then choose a patch type (satin, puff, chenille) that supports the artwork. Limit color changes to reduce cost, ensure high contrast for legibility, and plan stitch density—prototype to confirm edge finish and durability before production.
| Topic | Key Points |
|---|---|
| What are embroidered patches and why they matter? | Embroidered patches are decorative fabric pieces produced by machine embroidery stitched onto a backing fabric. The design is digitized into a stitch file guiding the embroidery machine to lay down threads in precise patterns, producing a raised, tactile image that can withstand repeated handling and washing depending on materials and finishing. They offer longevity, colorfastness, and craftsmanship that set them apart from printed patches. They’re ideal for logos with small text, solid color blocks, and intricate shapes where high legibility and durability matter. |
| Types of patches |
Note: While dye-sublimated patches exist, they’re a separate technique that blends printing with embroidery. When we say embroidered patches, we’re focusing on patches where embroidery stitches form the bulk of the surface design. |
| Materials that influence look and durability |
|
| Backing options and finishes that matter |
|
| Stitch counts and embroidery density |
|
| Tips for choosing stitch counts |
|
| Design considerations to optimize patches |
|
| From design to production: the workflow |
|
| Care, maintenance, and longevity |
|
| Choosing the right patch for your project |
|
Summary
Embroidered patches are a versatile and enduring way to communicate identity and values through textiles. They combine threads, backing fabrics, and skilled digitizing to produce raised, colorful motifs that can withstand regular wear and washing. Understanding the types, materials, backing options, and stitch densities helps you balance appearance, durability, and cost. Whether you’re outfitting a team, branding merchandise, or crafting custom insignia, thoughtful design and production choices elevate patches from simple adornments to lasting branding elements. Embroidered patches offer a craft-forward way to tell stories with fabric and thread.