
Advanced Embroidered Design Techniques invite you to explore a world where texture, light, and storytelling unfold on fabric, turning simple stitches into sophisticated art and inviting stitchers to move beyond basics with confidence, while you learn to balance precision with a playful experimentation that supports durable, wearable results. Within this toolkit, satin stitch embroidery provides lush fields of color, French knots embroidery add tiny raised points of texture, and a range of hand embroidery stitches unlock shading, outlines, and decorative details that breathe life into designs. Whether you’re embellishing a small panel or a larger textile piece, mastering these techniques helps you achieve smooth surfaces, dimensional depth, refined color transitions and durable stitching that holds up to frequent handling in garments, home decor, or wall art. To optimize for SEO and reader-friendly web content, the guide weaves practical tips with clear examples, while naturally incorporating related keywords like embroidery design techniques and embroidery stitching tutorials to support creators at every level, and this approach also helps you document your process, track progress, and tailor your palette for projects that range from heirloom pieces to contemporary textiles. As you practice, you’ll build a flexible approach that blends structure with experimentation, enabling you to choreograph stitches, choose materials wisely, and translate inspiration into durable, expressive embroidery projects.
Satin Stitch Embroidery Mastery: Achieving Flat Color and Shine
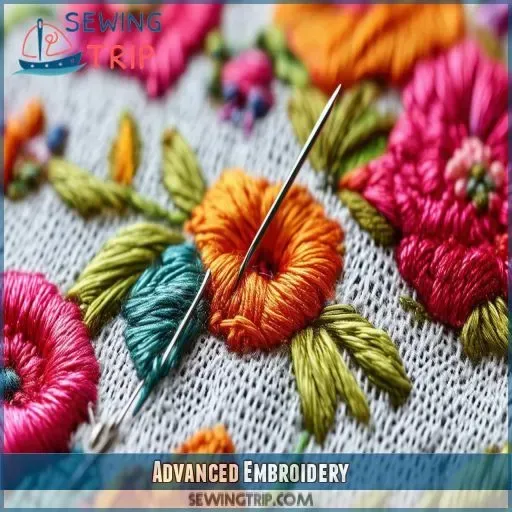
Satin stitch embroidery forms the backbone of many hand embroidery projects, delivering long, smooth fields of color that sit flush against the fabric. Its success hinges on even tension, thoughtful fabric choice, and consistent stitch length to produce that glossy, glassy surface. When planned well, a satin-filled area can create bold motifs or gradient shading by layering stitches of varying lengths and directions.
To begin, map out the area you want to fill and work in horizontal or vertical rows. A size 7 or size 9 needle with six-strand cotton embroidery floss (or separated floss for different effects) gives a firm, uniform fill. Start with anchor stitches to secure the thread, then build long, even stitches across the shape, adjusting length near curves to keep a smooth surface. Short satin stitches offer control on textured fabrics and around complex edges, while a light layer of fabric glaze can add extra sheen after the piece dries.
French Knots Embroidery: Tiny Textures with Big Impact
French knots embroidery adds raised texture that catches light and adds dimension to floral centers, eyes, or decorative specks. The technique involves wrapping thread around the needle before inserting it back through the fabric, creating a compact knot that sits above the surface. When used sparingly or in clusters, these knots can simulate pollen, seeds, or natural speckles with remarkable realism.
Experiment with knot size by varying the number of wraps and the density of wraps along a curved path. Tighter knots read as discrete points, while looser wraps produce more pronounced texture. Mixing colors within a cluster can create subtle shading and highlights, turning a simple detail into a focal point that complements satin-filled areas and other stitches in your embroidery design techniques toolbox.
Integrating Stem, Seed, and Chain Stitches for Depth
Beyond satin stitch and French knots, stem stitch, seed stitch, and chain stitch provide essential texture, outlines, and edge definition. Stem stitch follows curves with a flexible line that blends edges softly, making it a natural partner to filled shapes. Seed stitch adds a painterly, nondirectional texture that’s ideal for background shading or fur-like details.
Chain stitch creates looping edges perfect for borders, vines, and stylized lettering, while backstitch and split stitch offer clean, precise outlines when you need crisp boundaries. When combined with satin-filled areas, these stitches help you build depth and dimension without sacrificing a cohesive, hand-crafted look.
Advanced Embroidered Design Techniques: Color, Shading, and Texture Play
Advanced Embroidered Design Techniques come to life through thoughtful color planning and texture mapping. Start with a deliberate palette that communicates mood and light, then use satin stitch embroidery to model curved surfaces by varying stitch lengths for subtle shading. Layer lighter threads for highlights and gradually introduce darker tones to suggest depth, turning flat fabric into a tactile artwork.
Texture is shaped not only by stitch choice but by thread type and finishing methods. Cotton floss offers a matte, reliable base, while silk threads deliver sheen and smoother transitions. Metallic threads can sparkle with couching or careful bundling, but they require extra attention to tension. As you design, integrate a mix of hand embroidery stitches to create crisp edges, soft pivots, and delicate accents that elevate the overall embroidery design techniques to a high level.
Practical Practice: Building a Satin and Knot Sampler for Mastery
Practice is the engine behind mastery. Create a small sampler that includes satin stitches, long and short variations, and a cluster of French knots to calibrate knot sizes and spacing. A dedicated practice space and regular sessions help you compare how different threads, fabrics, and tensions behave, building your personal reference library for future projects.
Keep records of your experiments—note thread types, needle sizes, stitch lengths, and the outcomes—to guide future work. In addition to hands-on practice, consult embroidery stitching tutorials and similar resources to reinforce technique, then apply what you learn to more ambitious pieces that fuse satin fills with textured knots and complementary stitches.
Finishing and Care for Durable, Exhibition-Ready Work
Finishing is essential to preserve the look and longevity of your embroidery. When the stitching is complete, wash gently if the fabric allows, then press from the back with a low heat setting to avoid flattening satin areas. If metallic threads are present, consider blocking the fabric to restore shape and ensure an even surface.
Presenting your work effectively matters as much as stitching it well. Frame or mount the piece so that its texture is supported without compression, and store or display it away from direct heat or moisture. Regular care helps maintain the sheen of satin stitch embroidery, the lift of French knots embroidery, and the overall harmony achieved through thoughtful embroidery design techniques.
Frequently Asked Questions
What are the key components of Advanced Embroidered Design Techniques, and how does satin stitch embroidery serve as the backbone of these designs?
Advanced Embroidered Design Techniques focus on controlled color, texture, and dimensional effects. Satin stitch embroidery provides long, smooth fills that sit flush with the fabric, forming a glossy surface and a reliable backbone for filling shapes. Achieve this by even tension, planning stitch length, and pairing satin fills with complementary hand embroidery stitches like backstitch for crisp edges or stem stitch for gentle outlines.
How can satin stitch embroidery be paired with French knots embroidery to add texture in advanced embroidered design techniques?
Pair satin stitch embroidery with French knots embroidery to add raised texture and tactile dimension. Use long satin stitches for smooth color blocks and place French knots at centers or focal points to create lifted accents. Vary knot sizes and thread colors to mimic natural shading and add sparkle or interest without overwhelming the satin-filled areas.
Which hand embroidery stitches best complement satin stitch embroidery and French knots embroidery in advanced embroidery design techniques for shading and outlines?
Complementary hand embroidery stitches include stem stitch for graceful outlines and stems, seed stitch for subtle texture, and backstitch or split stitch for clean edges. Bullion knots, chain stitch, and couching can add decorative highlights or metallic detailing. Together, these stitches expand shading, outlines, and texture within advanced embroidery design techniques.
What design planning steps are essential when applying embroidery design techniques to color, shading, and texture?
Plan with a cohesive color palette and a light-to-dark shading strategy within satin-filled regions. Map out focal points, determine where to place French knots or other textured stitches, and decide edge treatments to avoid harsh borders. Consider fabric choice, stabilizers, and the sequence of stitches to maintain smooth color transitions and durable texture.
What fabric, tools, and finishing considerations support durable, glossy results when practicing Advanced Embroidered Design Techniques?
Choose plain-weave fabrics with a stable ground (linen, cotton poplin) and use stabilizers for delicate textiles. Tools include a quality hoop/frame, sharp embroidery needles, and a variety of threads (cotton floss, silk, metallic). Finish by gentle washing and pressing from the back; use blocking for dimensional stability to preserve the satin surface and texture.
What is an effective practice routine to master Advanced Embroidered Design Techniques, including satin stitch embroidery and French knots embroidery?
Create a practice sampler that includes satin stitches, French knots embroidery, and a few complementary stitches (stem, seed, backstitch). Record thread types, stitch lengths, and results, then compare fabric tension and needle sizes. Regular practice builds muscle memory for even satin fields, precise knot sizing, and harmonious color shading.
| Topic | Key Points |
|---|---|
| Satin Stitch | – Backbone technique for long, even color fills that sit flush with fabric. – Requires even tension and careful fabric choice; helps achieve a glossy surface with consistent stitch length. – Plan fill areas, anchor at start, and use a size 7 or 9 needle with 6-strand cotton floss. – Use long stitches for seamless fields; shorten near curves to maintain uniform surface. – For shading, vary stitch lengths; pair with backstitch or stem stitch for crisp edges. – Tips: work on light to mid-weight fabric; consider stabilizer to reduce puckering; optional sheen with fabric paint or thread glaze. |
| French Knots | – Tiny raised texture ideal for centers of flowers, eyes, or decorative seeds. – Anchor with a grab stitch; wrap floss 3–6 times then pull snugly. – Knot size varies with wraps; vary colors for shading/highlights. – Direction matters on curves; place knots along a curved path with spacing variation to simulate organic forms. |
| Expanding beyond satin stitch and French knots | – Stem stitch: flexible line stitch for stems/outlines. – Seed stitch: random texture for subtle shading. – Backstitch / split stitch: clean outlines with varying texture. – Bullion knot: longer coil for decorative elements. – Chain stitch: edge or border work. – Couching: laid thread secured with another thread; good for metallics. – Combine stitches to add texture, outlines, and graceful edges. |
| Design planning: color, shading, and texture | – Plan a color palette to support mood; use light-to-dark values in satin-filled regions. – Thread choice shapes texture: cotton floss (matte), silk (sheen), metallics (sparkle with tension considerations). – Map focal points and stitch sequence; edge treatment (e.g., satin-filled shape bordered by stem or backstitch) for crisp delineation. |
| Fabric, pins, and preparation | – Plain-weave fabrics (linen, cotton poplin, canvas) offer stability. – Use stabilizer for delicate fabrics; remove pins as you progress. – Maintain consistent thread tension to avoid puckering and misalignment. |
| Practice and habit-building | – Create a dedicated practice space with scrap fabric and sampler threads. – Practice satin stitches, French knots, and complementary stitches across varied shapes. – Record threads used, stitch lengths, and results to build a personal reference. |
| Tools and gear for success | – Quality hoop/frame to keep fabric taut; sharp needles suited to thread and fabric. – Variety of thread types (cotton floss, silk, metallic). – Fine-point scissors; fabric markers or transfer tools for sketching designs. |
| Finishing and care | – Finish with gentle washing if appropriate; press from the back with low heat. – Block fabrics with metallics/heavy stitching to restore shape. – Frame or mount to support texture and color without crushing surface. |
Summary
Advanced Embroidered Design Techniques empower stitchers to transform fabric into rich, tactile artwork. By integrating satin stitch, French knots, and complementary stitches with thoughtful color planning and careful preparation, you can achieve pieces that are visually striking and durable. Practice regularly, study how color and texture interact, and draw inspiration from nature, textiles, and traditional embroidery styles. Whether you’re embellishing a decorative panel, a garment, or a textile art piece, these techniques provide a strong foundation for expressive, high-quality embroidery that stands out as a testament to your skills.