
Digitizing Embroidered Design is the essential bridge between artwork and the sewing machine, turning a hand-drawn sketch or vector art into a stitch file that guides movement, stitch length, direction, and density. In today’s embroidery digitizing workflow, designers balance artistry with precise parameters to ensure the final sew matches the imagined concept. From the initial sketch to the finished stitch, mastering the digital embroidery design process helps you predict stitch behavior and produce reliable results. This guide introduces practical tips and best practices, drawing on embroidery digitizing software tips to speed up workflows without sacrificing quality. Whether you’re crafting a logo for a small business or personalizing home decor, understanding from sketch to stitch embroidery and the basics of machine embroidery digitizing basics sets you up for success.
Viewed through an alternative lens, this work becomes a stitch-ready data transformation: turning artwork into machine-friendly embroidery files. LSI-minded terms such as vector-to-stitch translation, stitch path planning, and fabric-friendly underlays capture the same process without relying on a single brand or tool. This approach emphasizes the data flow, translating outlines into paths, setting densities, and choosing underlays to ensure reliable sewing. By framing the topic with related concepts like from sketch to stitch embroidery and the broader embroidery digitizing workflow, you map the idea to related searches and practical understanding.
From Sketch to Stitch Embroidery: The Core of the Digitizing Workflow
From a hand drawn sketch or a clean vector, the digitizing step translates artwork into a machine readable stitch file. In the embroidery digitizing workflow, the choice of stitch types, buildup strategy, and pull compensation shapes how smoothly the design sews and how it wears on fabric.
As you move from sketch to stitch embroidery, planning the order of operations and aligning elements helps reduce thread breaks and puckering. This is the digital embroidery design process where artistry meets calculation to deliver a reliable sew on a real garment or project.
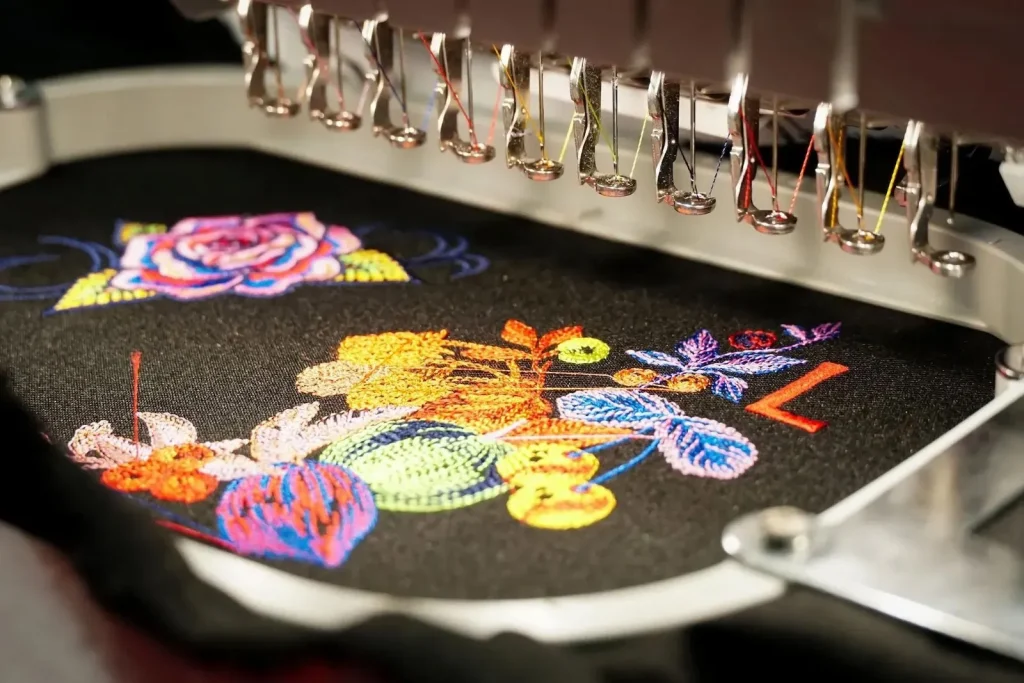
Digitizing Embroidered Design: Principles, Stitches, and Underlay
Digitizing Embroidered Design starts with a crisp outline and thoughtful stitch selection. Edges are often defined with satin stitches, while large filled areas use fills or textures. The underlay foundation shapes coverage, reduces fabric show through, and supports top stitches.
Density decisions are crucial in this phase. Too dense and fabrics pucker; too sparse and the design reveals thread lines. By adjusting underlay and stitch angles, you can optimize the result for different fabrics and thread weights. This ties into the embroidery digitizing workflow to ensure consistent results across projects.
The Digital Embroidery Design Process: A Practical Path from Artwork to Machine Code
The digital embroidery design process moves from artwork preparation to stitch planning and path sequencing. You trace and convert shapes into stitch objects, assign run, satin, and fill stitches, and plan travel paths to minimize jumps and thread breaks.
Verification and test sews at this stage help confirm accuracy before production. A successful test on similar fabric ensures the design sews reliably and matches the original concept. This step is central to the embroidery digitizing workflow and helps catch issues early.
Tools of the Trade: Embroidery Digitizing Software Tips and Best Practices
Choosing the right embroidery digitizing software shapes the entire process. Look for robust auto trace, adjustable underlay options, and flexible stitch libraries. These are the core of embroidery digitizing software tips that speed up work without sacrificing quality.
Practical tips include building a reusable template library, maintaining clean artwork, and documenting settings such as densities and pull compensation. This supports a smooth embroidery digitizing workflow across projects.
Mastering Stitch Types and Densities for Machine Embroidery Digitizing Basics
A solid grasp of stitch types and density is foundational to machine embroidery digitizing basics. Satin stitches give sharp edges, fills create shading, and running stitches can guide movement or outlines. The goal is to balance coverage with fabric behavior.
Practice helps dial in stitch length, direction, and underlay settings for different fabrics. Testing on swatches reveals how fabric weave interacts with stitch density, allowing you to adjust before a production run. These adjustments are part of the machine embroidery digitizing basics.
Verification, Test Seams, and Troubleshooting in the Embroidery Digitizing Workflow
Validation through test sews is essential to confirm that the design performs in real conditions. Running a mock production sew on similar fabric catches issues with thread breaks, skipped stitches, or density problems.
When problems arise, trace the root cause in the embroidery digitizing workflow, adjust underlay or stitch angles, and retest. Document the changes to build a reliable process for future projects.
Frequently Asked Questions
What is Digitizing Embroidered Design and how does the embroidery digitizing workflow turn artwork into stitches?
Digitizing Embroidered Design is the process of converting artwork into a machine‑readable stitch file that tells an embroidery machine how to move, stitch length, direction, and density. The embroidery digitizing workflow covers artwork preparation, tracing, path planning, stitch type choices (run, satin, fill), underlay, density, trims, pull compensation, and verification to ensure reliable sewing.
In the digital embroidery design process, how do you manage the journey from sketch to stitch embroidery?
The digital embroidery design process begins with clean artwork, then tracing to create stitch objects, planning the stitching order to minimize travel and fabric distortion, selecting appropriate stitch types and densities, adding effective underlay, applying pull compensation, and performing a test sew to verify that the design sews smoothly.
What embroidery digitizing software tips are especially helpful for beginners working on Digitizing Embroidered Design?
Key embroidery digitizing software tips include starting with clean, high‑contrast artwork; using vector outlines or clean bitmap traces; choosing appropriate stitch types for edges and fills; building a library of reusable templates; and frequently running test sews to catch issues early.
What are the machine embroidery digitizing basics when considering underlay, density, and pull compensation?
Machine embroidery digitizing basics involve selecting effective underlay to support top stitches, setting densities that balance coverage with fabric show‑through, and applying pull compensation to counter fabric distortion. Also consider machine limitations, hoop size, needle choices, and stitch length for reliable results.
How do you go from sketch to stitch embroidery when digitizing a logo or design?
From sketch to stitch embroidery starts with scanning or photographing the sketch, importing it into your digitizing software, tracing outer edges with satin stitches for crisp borders and using fills for solid areas, then setting stitch lengths and densities, simulating the path, and running a test sew before exporting the final stitch file.
How do you verify Digitizing Embroidered Design with a test sew across fabrics?
Generate a test sew on fabric similar to your production material, inspect for issues like puckering or thread breaks, and adjust density, underlay, stitch directions, and pull compensation. Repeat tests across fabric and thread types to ensure consistent performance.
| Aspect | What It Means | Tips / Notes |
|---|---|---|
| What is Digitizing Embroidered Design | Bridge between artwork and sewing machine; converts sketch/vector into stitch file that controls movement, stitch length, direction, and density. | Involves artistry and technical precision. |
| Workflow Overview | Typical stages from artwork prep to test sew; focuses on planning for efficiency and quality. | Follow standard steps for reliable results. |
| Artwork Preparation | High-contrast clean artwork; convert to vector/bitmap; plan stitch direction early to reduce later edits. | Simplify complex images to reduce stitch complexity. |
| Digitizing and Path Planning | Create stitch objects; assign stitch types; plan order; minimize travel and thread breaks. | Align elements; consider neighboring elements to keep seams clean. |
| Stitch Types, Density & Underlay | Choose stitch types (satin for edges, runs for lines, fills for large areas); set densities; add underlay. | Underlay improves coverage; avoid fabric show-through. |
| Trims, Pull Compensation, Machine Limits | Define trims; apply pull compensation; respect machine capabilities (needle size, hoop size, stitch limits). | Balance design with hardware constraints. |
| Verification & Test Sew | Generate a test sew on similar fabric; inspect issues; adjust density/underlay/direction as needed. | Iterate until the stitch sews as intended. |
| From Sketch to Stitch Path | Scan/trace, outline with satin for edges, fills for shading; set densities; simulate; test sew; export. | anticipate adjustments for distortion. |
| Tools & Tips | Software options: professional, hobbyist, free/open-source; practice clean artwork, consistent directions, and a reusable template library. | Practice and document settings to improve reproducibility. |
| Common Pitfalls | Puckering, thread breaks, sharp corners curling, muddy fills. | Adjust underlay, density, and stitch direction; use corner radiuses. |
| Practice Projects | Wordmarks, simple icons, complex logos to build mastery. | Experiment with fabrics and threads; document what works. |
Summary
Conclusion