
Embroidered patches mounting methods offer flexible options for personalizing clothing, bags, hats, and gear, delivering fast results with iron-on patches, sew-on patches, Velcro patches, and adhesive patches. Choosing the right method not only enhances appearance but also resists washing, wear, and everyday abuse, making it essential to understand how each mounting approach works. From lightweight fabrics to heavy-duty gear, the main options—iron-on, sew-on, Velcro-backed, and patch backing types—shape durability, reversibility, and care. The goal is to help you choose methods that balance convenience with longevity for your fabric and patch design. Whether you are updating a jacket, backpack, or uniform, a well-chosen mounting method keeps a clean, professional look through countless wear cycles.
In other terms, patch attachment approaches, or ways to affix embroidered designs, span a spectrum from temporary to permanent, each with its own care implications. Discussing backing options, surface preparation, and heat or stitch requirements helps readers compare results across fabrics and use cases. LSI-friendly terms such as fabric embellishment methods, garment branding techniques, and patch placement strategies broaden the topic beyond rigid labels. Ultimately, selecting the right method depends on fabric type, wash routine, and how visible you want the stitching or fastening to be. By framing the topic with related terms, readers can discover the same core options—adhesive, heat-activated, stitching-based, or modular systems—without fixating on a single label.
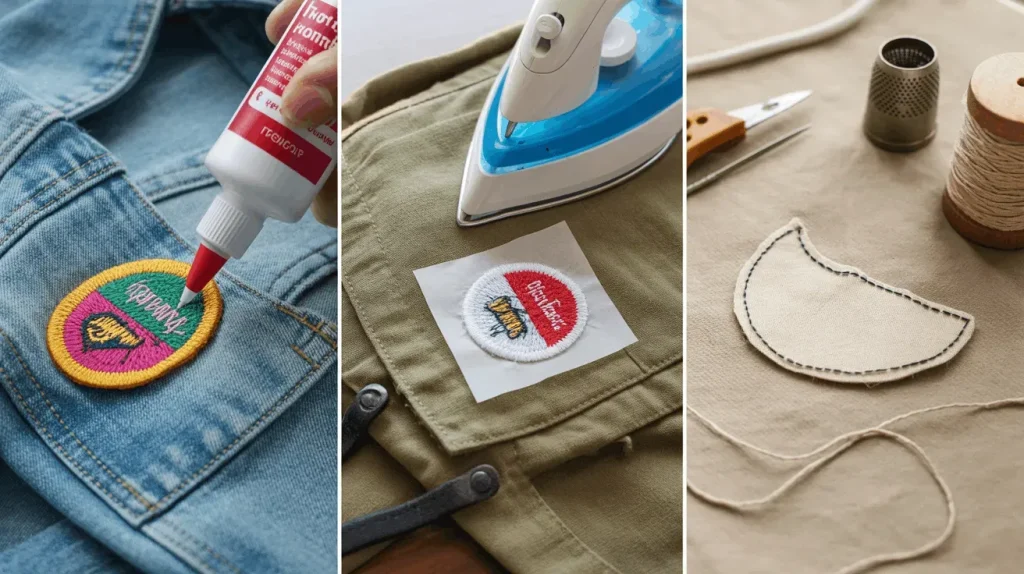
1. Iron-On Patches: Fast, Easy Mounting for Light to Mid-Weight Fabrics
Iron-on patches offer a quick, no-sew mounting option that appeals to DIY enthusiasts and casual wearers alike. The back of these patches contains a heat-activated adhesive designed to bond to fabrics like cotton, denim, and canvas with a careful balance of heat and pressure. For many projects, this method delivers an instantly polished look that resists casual wear and light washing when applied correctly.
To get the best results, choose a patch backing type compatible with your fabric, and follow a steady, even pressing technique. Pre-washing the garment and using a protective cloth helps prevent scorching, while testing a small area first can save you from unexpected damage. Keep in mind that iron-on patches can be less durable on stretch or slick synthetic fabrics, and may require re-sealing after several washes.
2. Sew-On Patches: The Durable Choice for Heavy Fabrics and High-Wear Garments
Sew-on patches rely on a mechanical bond created by stitching around the patch edges, making them a preferred option for denim, canvas, leather, and other sturdy textiles. This method tolerates frequent washing and high heat without losing the bond, providing a long-lasting, repair-focused solution for workwear and athletic gear alike.
You can sew by hand or with a machine, selecting stitches that balance durability with fabric integrity. Techniques like zigzag, satin, or overcasting stitches around the edge help prevent fraying, while matching thread color can create a seamless finish. For lighter fabrics, consider smaller stitches and stabilizers to maintain shape and minimize puckering.
3. Velcro Patches: Interchangeable Designs for Uniforms and Gear
Velcro-backed patches introduce modularity by using a hook-and-loop system that allows easy swapping of designs. This mounting method is popular for uniforms, tactical gear, clubs, and teams where multiple patches may be displayed or updated without removing the garment itself.
The front patch is typically applied with stitching or heat while the Velcro backing is sewn or adhered to the garment. Careful alignment and a secure perimeter can help ensure the hook-and-loop connection remains strong through repeated use. While Velcro patches offer convenience, they can collect lint and may look bulkier on slender fabrics.
4. Embroidered Patches Mounting Methods: A Comprehensive Guide to Options
Embroidered patches mounting methods cover a spectrum from heat-activated to mechanical and modular strategies. This guide helps you weigh iron-on, sew-on, Velcro, and adhesive options to match fabric type, patch design, and lifestyle. By considering patch backing types and the garment’s care requirements, you can select a method that delivers both durability and a clean finish.
In practice, the choice often hinges on fabric, wash frequency, and the patch’s weight. Light fabrics benefit from iron-on or adhesive approaches, while heavy-duty garments respond best to sewing or Velcro with secure backing. When reversibility matters, or you need easy design swaps, pairing methods such as a sewn border with a Velcro backing can offer both security and flexibility.
5. Patch Backing Types: How They Influence Longevity and Appearance
Backings are central to how patches perform over time. Whether you’re using heat-activated adhesives, fabric backings, stabilizers, or Velcro systems, the backing type determines how the patch behaves during washing, stretching, and daily wear. Understanding patch backing types helps you predict durability and decide when a reapplication or reinforcement is needed.
Different fabrics respond to backing types in distinct ways. For instance, cotton and denim tolerate heat-activated adhesives well, while slick synthetics may require a sewn edge or reinforced backing to prevent edge lifting. Considering backing materials alongside your patch design can extend life and keep edges tidy, especially on high-wear areas.
6. Adhesive Patches: Quick-Apply Solutions With Real-World Limits
Adhesive patches provide a rapid, no-sew option ideal for craft projects, temporary displays, or prototypes. These patches often rely on a peel-and-stick backing or a heat-activated adhesive designed to bind without traditional sewing. For some applications, adhesive patches strike the right balance between speed and appearance.
However, durability varies with backing quality and fabric compatibility. Adhesive patches may struggle with frequent washing or rough activity, and some fabrics can be damaged by adhesive residue or heat exposure. When using adhesive options, test on a hidden area first and consider reinforcing with stitching or a secondary method for long-term wear.
Frequently Asked Questions
What are the main Embroidered patches mounting methods, and how do iron-on patches compare with sew-on patches?
The main Embroidered patches mounting methods are iron-on patches, sew-on patches, Velcro patches, and adhesive patches. Iron-on patches offer quick, no-sew application on cotton, denim, and similar fabrics via heat-activated backing, but they’re less durable with frequent washing and on stretch or delicate fabrics. Sew-on patches provide the strongest, longest-lasting bond by stitching around the edge, making them ideal for heavy wear and thick fabrics.
How do patch backing types affect Embroidered patches mounting methods and durability?
Patch backing types determine how patches attach: heat-activated adhesives for iron-on patches, traditional fabric backing for sew-on patches, and hook-and-loop (Velcro) for Velcro patches. The backing choice influences wash durability, heat tolerance, reversibility, and fabric compatibility.
When should you use Velcro patches in Embroidered patches mounting methods?
Velcro patches are best for interchangeable designs, uniforms, and gear that require quick updates. Use a Velcro backing on the garment and attach the front patch with a matching hook-and-loop surface for easy removal and swapping.
Are adhesive patches a reliable option within Embroidered patches mounting methods for everyday wear?
Adhesive patches are fast but generally less durable. They suit light-duty or temporary projects and may not withstand frequent washing or high heat. Test on a hidden area first and follow care instructions for best results.
What are best practices for sewing-on patches as part of Embroidered patches mounting methods on different fabrics?
For sew-on patches, pin in place, choose appropriate needle and thread, and use stitches that balance durability and fabric integrity. Machine sewing with a zigzag or satin stitch around the edge is common; finish with a secure knot (hand) or backstitch (machine) to prevent unraveling.
How do you decide between iron-on patches, sew-on patches, and Velcro patches based on patch backing types for a project?
Consider fabric type, wash frequency, patch weight, and reversibility. Iron-on patches work well on cotton or denim with moderate care; sew-on patches offer rugged durability on thick fabrics; Velcro patches provide easy interchangeability for uniforms or gear that changes designs.
| Method | How it works | Best fabrics & caveats | Pros & cons | Step-by-step |
|---|---|---|---|---|
| Iron-On Patch (Iron-On) | Heat-activated adhesive on the back bonds to fabric with heat and pressure. Some patches have a paper backing that is removed after application. | Cotton, denim, canvas, and blends that tolerate heat; less reliable on low-fiber or tightly woven fabrics; may not hold well on stretch or delicate synthetics. | Fast and convenient; good for quick customization on non-stretch fabrics, but durability can be lower with frequent washing or high-heat cycles. | 1) Pre-wash and dry the fabric. 2) Position the patch on a flat surface. 3) Place a protective cloth over the patch. 4) Iron at around 350°F/175°C with no steam. 5) Apply firm, even pressure for 15–25 seconds while moving the iron. 6) Let cool completely; test and reheat if edges lift. |
| Sew-On Patch (Sew-On) | Attached by stitching around the patch edges; can be done by hand or with a sewing machine. This creates a mechanical bond independent of heat or adhesives. | Across most fabrics, including thick denim, heavy cotton, twill, leather, and sturdy canvas. Fine fabrics may require small, closely spaced stitches. | The strongest and most durable option; highly wash-tolerant and heat-tolerant. May leave visible stitching on lighter fabrics. | 1) Pin the patch in place. 2) By hand: use a sharp needle and matching thread; common is a running stitch or satin stitch. 3) By machine: use zigzag or satin stitch around the edge. 4) Leave small stitch gaps to avoid puckering. 5) Finish with a knot (hand) or backstitch (machine). |
| Velcro Patches and Other Backings | Patch has Velcro backing; garment has matching hook-and-loop backing. The front patch is often attached by sewing or ironing, while the Velcro backing is fixed to the garment (sewn or adhered). | Ideal for uniforms, tactical gear, sport gear, and club apparel where designs may change frequently; works on a range of fabrics. | Easy to swap designs; modularity and interchangeability. May collect lint and look bulkier on thin fabrics. | 1) Attach the Velcro backing to the garment per product instructions (iron or sew). 2) Align the patch over the Velcro and press to engage. 3) For added security, stitch around the patch or secure the Velcro backing to the garment. |
| Adhesive Backings and Quick-Apply Options | Peel-and-stick backing or glue that bonds on contact; may be heat-activated or rely on pressure to set. | Best for light-duty, craft projects, or temporary applications; not ideal for frequent washing or heavy wear. | Quick and easy; variable durability; can risk damage to delicate fabrics or edge peeling over time. | 1) Clean and dry the surface. 2) Peel backing to expose adhesive. 3) Press patch firmly. 4) If heat-activated, follow safe heat instructions for the fabric and patch. |
| Other Mounting Options and Considerations | Sew over seam allowances for extra security; use heat-seal backings with caution on synthetic fabrics; magnetic backings offer temporary display on certain fabrics. | Useful across various fabrics and garment designs; helpful when standard methods don’t fit. | Offers flexibility but may trade off strength, appearance, or comfort depending on the method. | 1) Choose a method based on fabric, design, and wear expectations. 2) Test on a scrap or inconspicuous area before full application. |
| Care and Maintenance for Longevity | General guidance to extend patch life across methods. | Turn garments inside-out before washing; use cold water and gentle cycles; air-dry or tumble on low heat; avoid high heat and aggressive dryers. | Extends patch life, reduces edge lifting, and preserves fabric integrity. | 1) Wash inside out on cold; 2) Use gentle cycle; 3) Air-dry or low-heat tumble; 4) Periodically resecure edges as needed. |
Summary
Embroidered patches mounting methods offer a spectrum of durability, ease, and flexibility. Iron-on patches provide quick updates, but sew-on patches remain the most durable choice for heavy use. Velcro patches are excellent for interchangeable designs, while adhesive backings and other options offer quick solutions for light-duty or temporary applications. By understanding the differences, testing on your fabric, and applying patches with care, you can achieve professional-looking results that stand up to wear and washing. Whether you’re decorating a jacket, backpack, or gear, selecting the right mounting method will help your embroidered patches shine for years to come.