
The world of fabric printing is evolving rapidly, bringing brighter colors and faster turnarounds to designers who seek compelling visuals on everyday textiles, a shift driven by demand for durable graphics and clearer guidance on next steps. UV DTF transfer marks a notable milestone by combining UV-curable inks with Direct-to-Film technology to deliver sharp images on many fabrics, enabling edge-to-edge designs without heavy post-processing; this helps readers quickly identify core advantages and plan next steps. This approach is often discussed alongside UV DTF printing on fabric and the DTF transfer guide as teams compare durability and color fidelity across substrates. Understanding the basics of UV printing on textiles helps you gauge how this method fits dark fabrics, blends, and specialty materials, while considering texture and feel. As you plan, consider how UV DTF vs traditional DTF compares in terms of feel, washability, and workflow efficiency to set realistic production goals.
In plain terms, this modern fabric-printing method uses UV-curable inks on a carrier film and relies on ultraviolet light to set the image fast, producing durable results on textiles. Think of it as a film-based, photopolymer transfer that bonds to cotton, polyester, blends, and more when heat and pressure are applied. LSI-friendly terminology includes phrases like UV-curable digital printing on fabrics, UV ink transfer on textiles, and photopolymer film printing, all pointing to similar outcomes. As you compare options, consider saturation, texture, and wash performance, which are influenced by ink chemistry, substrate choice, and curing strategy.
UV DTF transfer: What it is and how it works
UV DTF transfer is a modern fabric-printing method that uses UV-curable inks printed onto a carrier film, which is then applied to fabric with heat and pressure. This approach creates a permanent print by transferring the image from film to textile.
Because the inks cure instantly when exposed to UV light, you get crisper details, faster production times, and the ability to print on a broader range of substrates. The technique sits somewhere between traditional DTF and direct-to-textile methods, offering a surface-printed feel with reliable durability.
UV DTF printing on fabric vs traditional DTF: A comparative guide
In UV DTF printing on fabric, colors tend to be more saturated and edge definition is sharper thanks to UV-curable inks and precise film. Traditional DTF relies on adhesive powders and heat to fuse pigments, which can introduce a visible texture and color limitations on some fabrics.
A practical comparison also considers substrates, workflow, and cost. The UV DTF vs traditional DTF difference often means faster curing and potentially simpler post-processing, but it requires reliable UV equipment and resin inks. For a complete look, consult a DTF transfer guide to plan your production.
Choosing fabrics and finishes: Best substrates for UV DTF transfer
Popular substrates for UV DTF transfer include cotton, polyester, and cotton-poly blends. UV printing on textiles can maintain brightness across a range of fabrics, with drops in some synthetic blends if their surface is not well prepared.
Testing on swatches is essential before full production to gauge color vibrancy, edge fidelity, and durability. Pay attention to white underbase requirements on dark fabrics and select transfer films suitable for your chosen textile.
Color fidelity, durability, and washability with UV DTF transfer
UV DTF printing on fabric delivers great color fidelity, sharp gradients, and detailed imagery that remains vibrant after multiple washes when properly cured and finished. The finish can feel surface-level on some fabrics, which is often preferred for a soft hand.
Durability hinges on correct curing parameters and press settings. Inadequate cure can lead to edge cracking or premature peeling, so use calibrated UV exposure and controlled heat to maximize wash-fastness and overall life of the print.
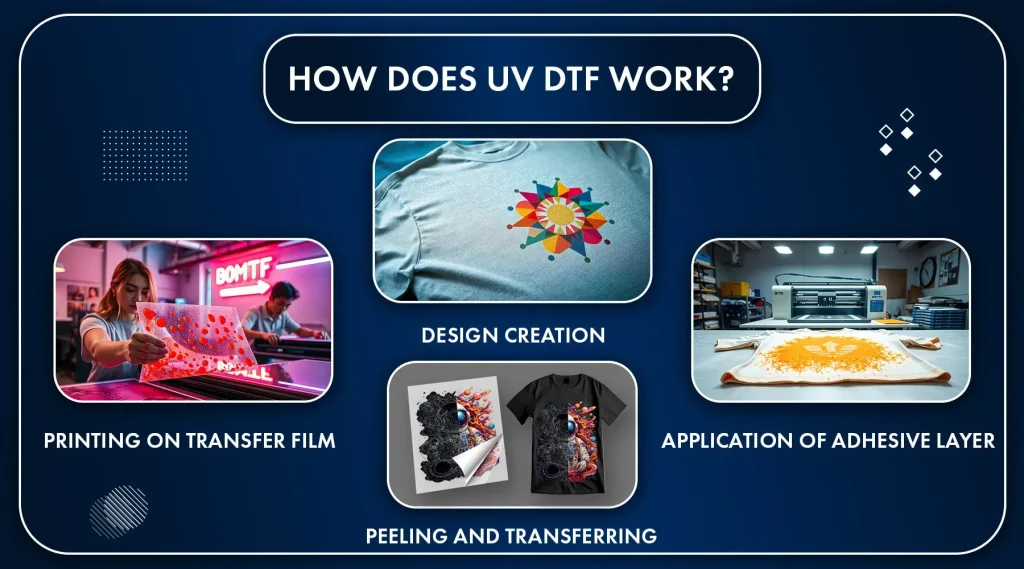
How to apply UV DTF transfer: Step-by-step workflow
The process begins with artwork preparation: create or export high-resolution vector or raster designs, ensure proper bleed, and mirror the image if required. Print onto transfer film using UV-curable inks and verify color accuracy before curing.
Next, cure the printed film with a UV light source to lock color and detail. Then prepare the fabric (pre-press to remove moisture and wrinkles), align the transfer, and apply heat and pressure at the recommended settings. Finally, peel when cooled and follow up with care instructions for best results.
Troubleshooting common challenges with UV DTF transfer
Common issues include ink adhesion on certain fabrics, color misalignment, or the appearance of bubbles or lifts. Refer to a DTF transfer guide and run test swatches to identify the root cause before full production.
Solutions include calibrating color profiles, using appropriate primers or white underbases on dark fabrics, ensuring even heat distribution, and avoiding fabric stretch during transfer. Proper pre-press and alignment practices help prevent drift and repeated failure.
Frequently Asked Questions
What is UV DTF transfer and how does it work on fabric?
UV DTF transfer is a fabric printing method that uses UV-curable inks printed onto a transfer film, which is then heat-pressed onto fabric. The inks cure instantly under UV light, delivering crisp details and quicker production than traditional DTF.
How does UV DTF printing on fabric compare to traditional DTF?
UV DTF printing on fabric often delivers brighter colors and sharper edges due to UV-curable inks, while traditional DTF relies on adhesive powders and heat to fuse the film. Both work on a range of fabrics, but UV DTF typically performs better on dark or blended textiles and can feel lighter on the surface.
What is the UV DTF transfer guide for applying UV DTF transfers to textiles?
The UV DTF transfer guide covers design, printing onto the transfer film, curing with UV light, pre-pressing the fabric, precise alignment, heat pressing, peeling, and optional post-cure. Following these steps helps ensure strong adhesion and durable results.
Can UV DTF transfers be used on dark fabrics, and how can you maximize vibrancy?
Yes, UV DTF transfers can be used on dark fabrics. To maximize vibrancy, use a white underbase when needed and rely on UV inks that maintain brightness across substrates.
What are essential tips for best results when applying UV DTF transfer?
Key tips include pre-pressing the fabric to remove moisture, calibrating color profiles for UV DTF printing on fabric, testing on swatches, applying even heat and pressure, avoiding transfer sliding to prevent bubbles, and following the recommended cure parameters.
What are common challenges with UV DTF transfer and how do you troubleshoot?
Common challenges include ink adhesion on some fabrics, edge lift, color misalignment, and bubbles. Troubleshooting steps include fabric prep or primer, using an underbase when needed, verifying cure times and temperatures, and testing with swatches to refine parameters.
| Aspect | Key Points |
|---|---|
| What is UV DTF Transfer? | A modern fabric printing method using UV-curable inks printed on transfer film, then applied to fabric with heat and pressure. Inks cure instantly under UV light, enabling crisper details, faster production, and broad substrate compatibility. |
| UV DTF Transfer vs Traditional DTF | – Color & detail: UV DTF yields saturated colors and sharp details; traditional DTF can also be detailed but may rely more on adhesive layers. – Substrates: Both handle many fabrics; UV DTF excels on blends and dark fabrics. – Feel/finish: UV DTF can feel softer on some fabrics; traditional DTF may be thicker due to adhesive. – Durability: Both durable when cured; UV DTF can have excellent wash-fastness with proper curing. – Workflow: UV DTF offers faster curing but requires UV equipment and resin inks. |
| Design, Prepress & Artwork | High-resolution artwork, accurate color management, and adequate bleed for edge-to-edge prints. Test printing on sample swatches is essential for UV printing on textiles as fabric behavior varies. |
| Steps to Apply a UV DTF Transfer | 1) Prepare artwork with high resolution and bleed. 2) Print onto transfer film using a UV-curable ink printer. 3) Cure with UV light. 4) Pre-press fabric to remove wrinkles. 5) Align transfer on fabric. 6) Apply heat and pressure (temp/time varies). 7) Peel carrier film after cooling and post-cure if needed. 8) Provide care instructions. |
| Materials & Equipment | UV-curable inks, transfer film, UV curing lamp/system, heat press, and test swatches for fabric-specific optimization. |
| Tips for Best Results | – Start with clean fabric. – Calibrate color profiles. – Use white underbase on dark fabrics when needed. – Test on multiple fabrics. – Prevent bubbles with even pressure. – Ensure edges are fully bonded. |
| Advantages | – Faster production due to instant curing. – High color fidelity and detail. – Wide substrate compatibility. – Durable finishes with proper curing. – Cost-effective for small runs. |
| Challenges & Troubleshooting | – Ink adhesion on some fabrics; may need surface prep or primers. – Cracking/peeling if under- or over-cured. – Alignment drift; pre-press and stable fixtures help. – Color misalignment without proper calibration. |
| Applications & Use Cases | Ideal for custom t-shirts, bags, hats, and home textiles. Excels at reproducing intricate artwork, photorealistic imagery, and layered colors on dark fabrics. |
Summary
UV DTF transfer is a powerful option in fabric printing, combining the speed of UV curing with Direct-to-Film technology to produce vibrant, durable prints across a wide range of textiles. By understanding how UV DTF transfer compares to traditional DTF, applying best design practices, and choosing the right materials, you can achieve professional results with strong color fidelity and wash-fastness. This guide highlights practical steps, potential challenges, and the right workflow for UV DTF transfer to streamline production and deliver high-quality garments and textiles.