
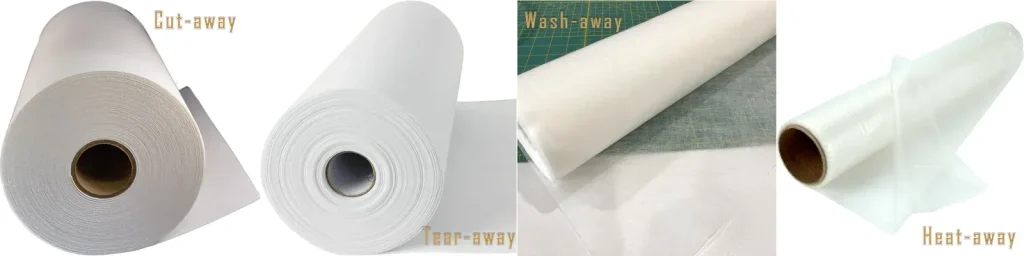
3D embroidery stabilizers add depth and dimension to fabric projects, turning simple stitches into sculpted textures. Choosing the right stabilizers—from tear-away stabilizer to cut-away stabilizer, water-soluble stabilizer, wash-away stabilizer, and adhesive stabilizer options—helps prevent puckering and keeps raised elements crisp. This guide explains how to select stabilizers for 3D embroidery projects by evaluating fabric type, design height, and end-use. A well-chosen stabilizer supports the stitches during hooping and stitching without weighing down the puff, ensuring clean edges and durable texture. With practical criteria, examples, and tested techniques, you’ll gain a straightforward framework for achieving professional-looking, dimensional embroidery.
LSI-friendly terminology for this topic includes dimensional embroidery stabilizers, stabilization layers, or stabilization media that anchor fabric and lift the design. Think of these as backing and support systems—the foam backing for puff, the stabilizing layer behind delicate fabrics, or a gentle overlay that keeps edges sharp without stiffness. Other phrases you might encounter are 3D puff stabilizers, stabilizer backings, or stabilization materials for dimensional stitching, all aiming to prevent shifts and distortion. Selecting the right approach depends on fabric type, volume of the design, and how the finished piece will be cared for, which are the same criteria applied in the first paragraph but described with different terms. By using these alternative terms, you can search broadly for solutions that match your project goals while still achieving clean, elevated embroidery.
Choosing the Right Stabilizer for 3D Embroidery
3D embroidery stabilizers are the foundation of dimensional stitches. When selecting stabilizers for 3D projects, consider fabric type, design height, and end use to prevent puckering, distortion, or flattening of raised elements. This is where the right mix of stabilizers—ranging from tear-away stabilizer to cut-away stabilizer, wash-away stabilizer, water-soluble stabilizer, and adhesive stabilizer—makes all the difference in maintaining crisp edges and durable texture.
In practical terms, start with the goal of your 3D embroidery in mind. For dense, high-puff designs on stable fabrics, a sturdy cut-away stabilizer often provides the strongest foundation. If you’re working on delicate fabrics or want a soft, removable option, pairing a tear-away with a top wash-away or water-soluble stabilizer can yield a clean finish without adding bulk. Remember that 3D embroidery stabilizers are not one-size-fits-all; the best results come from testing a small scrap on the same fabric to balance stability, softness, and durability.
Maximizing Puff and Dimension with Foam and Puff Stabilizers
Foam stabilizers and puff stabilizers create the signature volume that defines 3D embroidery. By placing a foam backing behind the design, you create a spacer that lets stitches sit above the fabric, producing pronounced depth without flattening. This approach works well for decorative elements like flowers, raised letters, or geometric puff motifs, especially on woven or medium-weight canvases.
Pairing foam with the right top and backing stabilizers is critical. A compatible top stabilizer—such as a light tear-away or a wash-away overlay—helps maintain crisp edges while avoiding excessive stiffness. For fabrics that shed or wrinkle, consider a light cut-away backing behind the foam to provide durable support while keeping the final texture soft and flexible.
Tear-Away vs Cut-Away: When to Choose Each for 3D Designs
Tear-away stabilizers are often the first choice when fabric stability is strong and stitch patterns are dense. They stay in place during stitching and are relatively easy to remove afterward, making them ideal for clean edges around raised elements. However, they require careful tearing to avoid pulled fibers or residue on delicate fabrics.
Cut-away stabilizers provide permanent support, which is especially valuable for knit fabrics, stretch garments, or designs that will be machine-washed and worn. They resist distortion over time and work well behind high-puff areas. The trade-off is that trimming close to stitches requires precision to prevent cutting into the embroidery. When in doubt, use a light cut-away under the design or combine it with a tear-away for mixed stability.
Soft Finishes on Delicate Fabrics: Wash-Away and Water-Soluble Stabilizers
Wash-away stabilizers dissolve during washing, leaving no residue behind. They are ideal for sheer fabrics or designs where you want the 3D elements to feel soft and flexible. Film-based wash-away and water-soluble sheets provide different handling characteristics, so choosing the right type helps preserve texture without stiffness.
Because some stitching densifies the stabilizer too much, these options are often paired with a light tear-away or a subtle backing to maintain stability during hooping. A wash-away top layer can also reduce show-through on delicate fabrics, while a water-soluble stabilizer overlay can sharpen edges for fine lettering and tiny 3D elements without compromising fabric feel.
Stability on Curved Surfaces and Hats: Adhesive Stabilizers and Specialty Backings
Adhesive stabilizers offer a practical solution when fabric is slippery, delicate, or difficult to hoop. By sticking directly to the fabric or the hoop, they prevent shifting and distortion on curved surfaces, hats, or irregular textures. They can be used in tear-away or cut-away forms, depending on the project’s durability needs.
When using adhesive stabilizers, be mindful of residue and fabric compatibility. Select high-quality, residue-free options and follow removal guidelines to avoid leaving sticky traces on finished pieces. For caps or curved visors, adhesive stabilizers paired with a compatible top stabilizer can preserve stitch integrity without flattening dimensional details.
Testing, Troubleshooting, and Practical Guidance for 3D Stabilizers
The most reliable way to ensure the right stabilizer mix for 3D embroidery is deliberate testing on scrap fabric that mirrors your final project. Try a few stabilization options—tear-away alone, tear-away with a light wash-away topper, cut-away, and a small foam backing—and compare stitch definition, puff height, edge quality, and fabric distortion.
Common pitfalls, such as puckering, residue from tear-away, or stiff 3D elements, become easier to avoid with a structured workflow. Document which stabilizer combination delivers the best balance of stability, softness, and wash durability. Regularly check needle size and tension as you refine your setup to keep 3D details crisp and resilient for everyday use.
Frequently Asked Questions
What are 3D embroidery stabilizers and why are they important for dimensional threadwork?
3D embroidery stabilizers provide a stable base to support stitches and maintain the height of raised elements. Common types include tear-away stabilizer, cut-away stabilizer, wash-away stabilizer (water-soluble), adhesive stabilizer, and even 3D foam stabilizers. Choosing the right stabilizer helps prevent puckering and distortion, ensuring your 3D design stays crisp and pops from the fabric.
When is tear-away stabilizer the best choice for 3D embroidery projects?
Tear-away stabilizer is ideal for stable fabrics like cotton poplin or canvas and for dense, high-puff designs where easy removal after stitching is desired. It provides a clean edge around raised elements and is quick to remove, helping your 3D details stay sharp. Be mindful of any fibrous residue left behind if you don’t remove it carefully.
How should I choose between cut-away stabilizer and tear-away stabilizer for 3D embroidery on knits or stretch fabrics?
For knit or stretchy fabrics, cut-away stabilizer offers durable back support behind raised elements and helps prevent distortion over time. Tear-away can work on less stretch-sensitive projects, but a cut-away is generally more reliable for maintaining 3D puff on knits. In some cases, a light tear-away with a topper can balance softness and stability.
Can wash-away stabilizer or water-soluble stabilizer be used in 3D embroidery, and when would I pair it with other stabilizers?
Wash-away stabilizers dissolve in water, leaving no residue, making them ideal for delicate fabrics or 3D elements you want to feel soft. They’re best used in combination with a light tear-away or overlay for stability when stitching is dense. Avoid relying on them alone for heavy stitching on thick fabrics.
How do adhesive stabilizers help with troublesome fabrics in 3D embroidery, and what should I watch out for?
Adhesive stabilizers stick to the fabric or hoop, which is especially helpful for slippery, delicate, or irregular surfaces like leather, felt, or hats. They reduce shifting and make setup easier, and they come in tear-away or cut-away variants. Watch for adhesive residue and ensure compatibility with your fabric and embroidery machine.
What role does 3D foam stabilizer play in 3D embroidery, and how should I pair it with other stabilizers to keep the puff from flattening?
3D foam stabilizers act as a spacer behind the stitches to create true volume and dimensional puff. Use foam behind the design and pair it with a compatible top stabilizer (such as tear-away or cut-away, or a wash-away topper) to maintain crisp edges and prevent flattening while still allowing the 3D elements to stand off the fabric.
| Category | Key Points |
|---|---|
| Purpose | Stabilizers provide a stable base to prevent fabric distortion and maintain stitch integrity, especially for 3D elements that stand away from the fabric. |
| Stabilizer Types | Tear-away: easy to remove after embroidery; Cut-away: durable and remains attached; Wash-away: dissolves; Adhesive: sticks to fabric/hoop; 3D Foam: creates volume behind stitches. |
| Fabric & Design Considerations | Consider fabric type (woven, knit, delicate), design height/dimension, thread type, hoop size, and end use (wash/durability requirements). |
| Choosing Stabilizers | Framework: identify fabric; evaluate dimensionality; consider embroidery density and stitch length; factor end use. Use a combination approach as needed. |
| Practical Decision Framework | Rigid fabrics with dense 3D: cut-away; delicate fabrics or soft finish: light tear-away with wash-away topper; hats/curved surfaces: adhesive; 3D puff: 3D foam behind design; frequent washing: wash-away. |
| Practical Testing & Prototyping | Create a scrap sample; test tear-away, tear-away with topper, cut-away, and foam backing; compare stitch definition, edge quality, puff, and distortion; select best option. |
| Scenarios & Checklists | Woven fabrics: heavy stabilizer; delicate fabrics: wash-away top with light behind; knits: cut-away; hats: adhesive; 3D puff: foam behind with compatible top stabilizer. |
| Pitfalls | Puckering, residue from tear-away, stiff 3D elements, adhesive residue—mitigate with proper stabilizer choice and careful removal. |
Summary
HTML table provided above summarizes key points about stabilizers for 3D embroidery.