
3D embroidery mastery is a gateway to turning fabric into a tactile canvas, where every stitch contributes to depth through deliberate layering, careful padding, and precise, patient technique that rewards time spent to study light, shadow, and the way threads hold shape. To bring that depth to life, embroidery layering and appliqué can serve as the backbone for multi-dimensional designs, allowing light to graze each edge and shadow to rest in every crease, while you build color relationships, control edge crispness, and plan how raised elements will interact with the underlying fabric. By strategically placing padding under selected areas and combining raised stitches, you create tangible textures that invite touch, reveal micro-details under different angles, and maintain structural integrity even after repeated handling, laundering, or wear; the effect is a genuine sense of volume rather than a flat pattern. Texture shifts and color depth emerge when you balance fabric choice, backing materials, and thread types, ensuring the surface stays lively yet durable through heat, washing, and time, while subtle highlights catch light as your raised motifs engage the surrounding textiles. This introductory guide blends practical steps, essential tools, and design ideas so both hobbyists and professionals can begin practicing with confidence and joy.
A different framing is to think of this craft as dimensional stitching that builds volume through padding, raised accents, and carefully placed layers. From an information-seeking perspective, readers may search for ideas like volumetric embroidery, stitched sculpture, or fabric relief, all pointing to the same core practice of giving designs physical presence. Alternative phrasing such as raised motifs, layered textile art, and padding-based textures helps maintain relevance for search engines while keeping the reader oriented toward practical technique. By framing the topic with related terms and clear intent, the page can attract audiences interested in texture, technique, and durable, visually dynamic embroidery that stands up to wear. In short, dimensional embroidery can be understood as a deliberate orchestration of layering, padding, and texture that elevates ordinary stitching into tactile, expressive pieces.
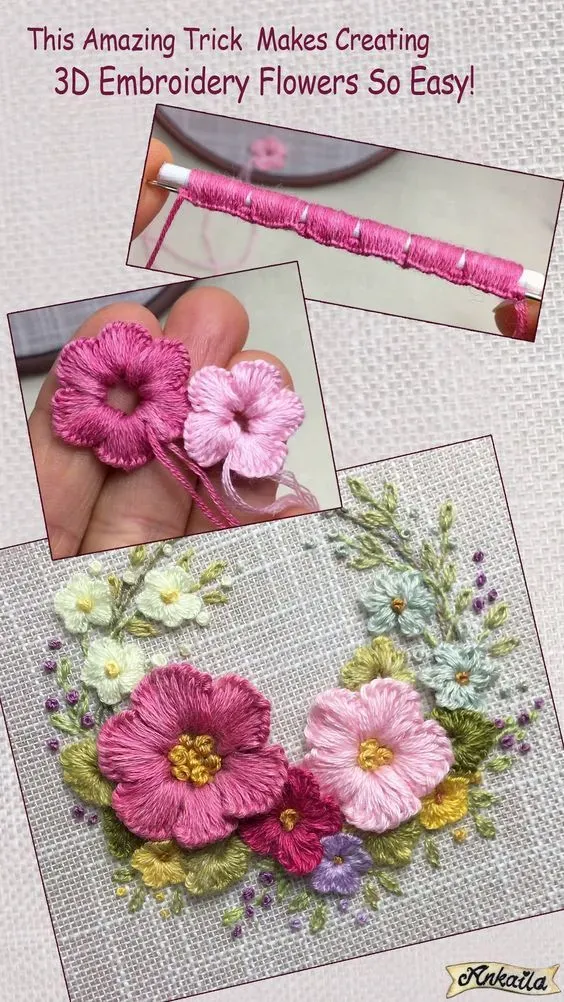
1. 3D Embroidery Mastery: Core Concepts, Layers, and Depth
3D embroidery mastery invites you to think beyond color and stitches, embracing layered fabric, padding, and strategic stitch placement to create tangible volume. When you cultivate this mindset, each element on the fabric reads with a tactile presence—like a sculpture you can touch—thanks to deliberate layering, texture variation, and careful base stabilization. This approach aligns closely with proven 3D embroidery techniques that turn flat textiles into dimensional art while maintaining durability through washing and wear.
To start, focus on depth as a design principle: plan where padding will live and how many layers you’ll stack to achieve the intended silhouette. The goal is to balance lift with structure, so the piece reads as a three-dimensional form rather than a painted silhouette. Incorporating embroidery layering and appliqué can dramatically enhance depth, inviting light and shadow to play across the surfaces and giving your work a signature sense of presence.
2. 3D Embroidery Techniques for Realistic Texture
A solid toolkit of 3D embroidery techniques forms the backbone of convincing dimensional work. Padding and raised stitches create elevated elements, while texture embroidery stitches mimic natural surfaces like fur, leaves, or petals. By combining satin and long-and-short stitches with twist, you can model curves and bulges that feel organic rather than rigid.
Layering becomes a partner to technique here: start with a base layer, then add a second and third for contour and shadow. This harmonious interaction between padding, stitch choice, and layering is what makes the texture convincing. As you experiment, you’ll notice how texture stitches—from coral stitches to whipped notes—help the eyes read both form and texture, reinforcing the illusion of depth.
3. Tools and Materials to Build Depth: Stabilizers, Padding, and More
The right tools are essential to reliably build depth. Stabilizers provide the backbone that keeps layers from sagging or warping as padding lifts elements. Choose sturdy tear-away or cut-away stabilizers based on fabric type and project weight, ensuring your base stays stable as you add multiple layers.
Padding materials—foam, felt, or craft padding—give lift to raised areas without adding bulk that strains the fabric. Pair padding with a curated set of needles, threads, and a secure hoop setup (including multi-peg configurations for larger pieces) to maintain even tension. Finishing touches like light fusible interfacing or fabric glue help anchor padding without distorting the design, keeping your embroidery layering and appliqué crisp and durable.
4. Step-by-Step Guide to a 3D Motif: From Design to Finishing Touches
Begin with design selection and planning: choose a motif with clear contours and distinct layers, and sketch a plan that marks where padding will add dimension. This planning mirrors the first stage of many 3D embroidery techniques, ensuring you map lift and shadow before you touch the fabric.
Then stabilize and layer. Hoop the fabric with a supporting stabilizer, lay down a light basal stitch, and introduce padding under the designated areas. Layer gradually, building depth from lower to higher tiers while applying texture stitches to mimic real-world surfaces. Finish with careful trimming of stabilizers, tight edge finishing, and a light pressing from the back to preserve padding and silhouette—so your machine embroidery 3D effects stay crisp and durable.
5. Texture Stitches for Realistic Surfaces and Effects
Texture stitches are the heartbeat of dimensional embroidery, delivering tactile cues that signal roughness, softness, or sheen. Techniques like long and short fill with smooth transitions, coral stitch, knotted stitches, and whipped or sateen variations bring surfaces to life and help pieces read as natural forms.
Integrate texture stitches with your padding strategy to maximize depth. For example, use texture stitches to define leaf veins or fur direction, while padding pushes the core shapes outward. This synergy between padding and texture stitches is a cornerstone of convincing 3D embroidery, producing surfaces that withstand washing and wear without losing shape.
6. Common Mistakes and Practical Tips: Avoiding Distortion in 3D Embroidery
Even seasoned stitchers encounter missteps on the path to 3D embroidery mastery. Puckering, flattening of raised elements, and uneven padding are common challenges that compromise depth and silhouette. A proactive approach—testing on scrap fabric, selecting the right stabilizer, and gradually layering padding—helps prevent these issues before they affect your final piece.
Tension balance and secure baselines are critical to long-term stability. Regularly check the back of the work for loose threads and ensure padding layers are fully anchored. By applying careful planning, consistent tension, and precise edge finishing, you’ll minimize distortions and enjoy reliable, dimensional results that hold up to use.
Frequently Asked Questions
What is 3D embroidery mastery and how do 3D embroidery techniques contribute to depth and texture?
3D embroidery mastery is the practice of creating dimensional, tactile imagery through layering, padding, and careful stitch work. By applying 3D embroidery techniques such as padding under selected areas, raised stitches, and texture embroidery stitches, you build depth, light, and shadows that make designs pop.
Which texture embroidery stitches are most effective for 3D embroidery mastery?
Texture embroidery stitches like long-and-short fill, coral stitch, sateen variations, whipped stitches, and detached stitches give realistic surfaces; when paired with padding and layering, they heighten dimensional effects in 3D embroidery mastery.
How can I achieve machine embroidery 3D effects while keeping fabric stable?
Use foam-assisted embroidery or thin padding, select sturdy stabilizers, and perform multi-pass embroidery with careful stabilizer management; these machine embroidery 3D effects create volume without warping.
How do embroidery layering and appliqué contribute to depth in 3D embroidery mastery?
Embroidery layering and appliqué build distinct planes by stacking fabric pieces and adding raised features on top; securing edges with clean satin stitches maintains crisp contours while shadows enhance the 3D look, a core tactic in 3D embroidery mastery.
What are common stitching tips for dimensional embroidery to ensure durability and shape after washing?
Use the right stabilizer, test on scrap, build padding gradually, keep tension balanced, baste lightly to prevent shifting, and finish with secure stitches; these stitching tips for dimensional embroidery help maintain shape and color after washing.
Can you suggest a simple practice project to build 3D embroidery mastery?
Try a floral badge with layered petals and a raised center; plan layers, hoop with stabilizer, add padding under petals, use texture stitches for leaf veins, and finish with subtle outlines. This project demonstrates core skills of 3D embroidery mastery.
| Topic | Key Points |
|---|---|
| What is 3D Embroidery Mastery? |
|
| Core Techniques |
|
| Tools & Materials |
|
| Step-by-Step Motif Guide |
|
| Texture Embroidery Stitches |
|
| Embroidery Layering & Appliqué |
|
| Machine Embroidery & 3D Effects |
|
| Common Mistakes |
|
| Project Ideas |
|
| Care & Longevity |
|
Summary
3D embroidery mastery invites you into a world where stitch, padding, and thoughtful layering converge to create tactile, dimensional art. By embracing proven 3D embroidery techniques, selecting the right tools, and practicing deliberate layering and texture, you can elevate your projects from flat to lifelike. This journey rewards patience and experimentation, turning patches, home decor, and wearable art into pieces with depth, shadow, and lasting appeal.