
The UV DTF transfer workflow represents a modern approach to decorating garments, blending the versatility of direct-to-film transfers with the precision and vibrancy of UV-curing inks. Understanding the printing process during design, print, and finishing stages helps brands optimize color, adhesion, and overall production speed. Choosing DTF film and ink compatibility is essential to ensure consistent color reproduction and durable transfers across a range of fabrics. Careful planning of design considerations, color management, and proper bleed ensures the end-to-end workflow yields sharp details and reliable wash-fastness. By aligning design intent with substrate choice and process timing, teams can achieve consistent results across runs.
Another way to describe this approach is a UV-curable film transfer method for textiles, marrying digital design with durable, wash-ready finishes. In broader terms, the technique aligns with modern garment decoration strategies that rely on ink chemistry, substrate compatibility, and precise heat application to achieve vibrant results. Applying these concepts under a different label—such as UV garment printing, film-based transfers, or color-accurate fabric finishing—helps designers plan workflows that scale while preserving quality.
1. UV DTF Printing Process and Color Foundations
The UV DTF printing process uses UV-curing inks to boost color brightness and detail on a wide range of fabrics. By curing inks instantaneously with UV light, the method minimizes spreading and creates sharp edges, which is ideal for small text, fine lines, and bold graphics. This approach also enables efficient production workflows by reducing drying times and enabling quick handling between steps.
Understanding the UV DTF printing process helps in planning substrate compatibility, ink selection, and color outcomes. Pay attention to DTF film and adhesive compatibility, which directly impacts bond strength and wash durability. Proper color management for UV DTF transfers, including substrate color considerations and white underbase needs, ensures vibrant results across light and dark fabrics.
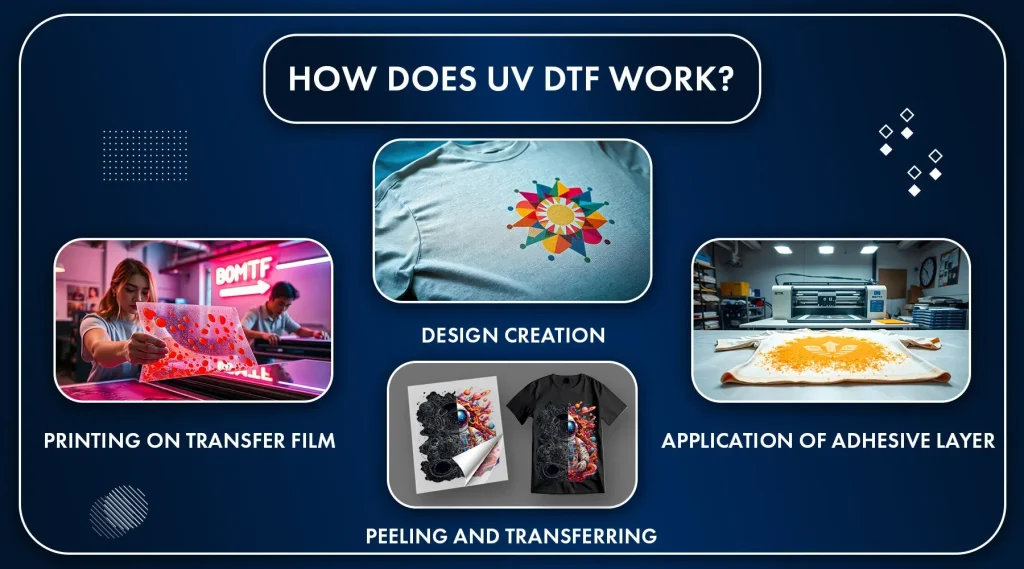
2. UV DTF Transfer Workflow: From Concept to Custom Garments
The UV DTF transfer workflow begins with design preparation, including bleed, color separation, and placement planning. From there, artwork is printed onto a DTF transfer film using UV-curing inks, followed by curing and handling steps to prepare the film for garment application.
The final stage brings the transfer to the fabric via a heat press, where precise garment heat press settings for DTF become critical. Accurate alignment, proper dwell time, and appropriate pressure determine adhesion, color fidelity, and durability, enabling the transition from concept to retail-ready apparel with consistency.
3. Designing for DTF Transfers: DTF Transfer Design Tips and Best Practices
Effective design for DTF transfers starts with high resolution (300–600 dpi) and vector-based logos to maintain crisp lines on fabrics. Consider your color management strategy early, anticipating how colors will translate through the UV DTF printing process and how white underbase might affect vibrancy on darker garments.
DTF transfer design tips include deliberate bleed margins, careful layering, and minimal heavy transparency to avoid ink overprint issues. By testing on similar fabrics and validating color separations, designers can reduce misregistration and ensure legibility of critical details across sizes and placements.
4. Selecting Film, Ink, and Adhesive: DTF Film and Ink Compatibility for Consistent Results
Choosing the right DTF film and ink system is essential for robust bonding and color stability. Look for UV-curing inks formulated for textile transfers that cure quickly under UV light and bond reliably to the adhesive layer on the film.
DTF film and ink compatibility also involves matching the adhesive, printable surface, and substrate. Ensure the film’s adhesive is compatible with your printer and heat-press workflow to prevent edge lifting, color shifts, or incomplete transfers across fabric types.
5. Optimizing Heat Press Settings and Garment Preparation: Garment Heat Press Settings for DTF and Pre-Press Routines
A clean pre-press routine ensures a stable transfer surface by removing moisture and wrinkles. Pre-press times, temperatures, and even pressure selection set the stage for reliable adhesion and consistent color transfer across multiple garments.
When applying the transfer, use garment heat press settings for DTF that balance substrate type and ink density. Medium-to-high pressure with an appropriate dwell time is common, but always follow the film manufacturer’s guidelines and perform test runs on similar fabrics to dial in exact parameters for cotton, poly blends, or performance textiles.
6. Color Management and Quality Control for UV DTF Transfers: Ensuring Consistency Across Fabrics
Color management for UV DTF transfers is a continuous process that starts with accurate reference artwork and calibrated printer profiles. Regularly compare test prints to reference swatches and adjust color balance, saturation, and brightness to achieve consistent results across runs.
Quality control should include opacity checks on dark fabrics, edge fidelity assessments, and adhesion tests after curing. Implement wash durability tests when possible to confirm colorfastness and bond integrity, and document every successful setup to reproduce it on future production batches.
Frequently Asked Questions
What is the UV DTF transfer workflow and why is it advantageous for garment decoration?
The UV DTF transfer workflow is an end-to-end process from design to finished garment using UV-curing inks on DTF transfer film. It combines the precision of UV DTF printing process with the flexibility of transfer applications to produce sharp details, vibrant colors, and durable results across a wide range of fabrics.
In the UV DTF transfer workflow, what are key DTF transfer design tips?
Key DTF transfer design tips include: work at 300–600 dpi for high detail, use vector logos where possible, include 2–3 mm bleeds, plan color separation and white underbase for dark fabrics, minimize heavy transparency, and test on similar textiles to verify legibility and color accuracy.
Within the UV DTF transfer workflow, how should I optimize garment heat press settings for DTF?
Follow the film and adhesive guidelines for heat press settings. Aim for consistent, medium-to-high pressure and a moderate dwell time, perform a pre-press to remove moisture, and use test garments to dial in temperature, time, and pressure for different fabrics.
How do I ensure DTF film and ink compatibility in the UV DTF transfer workflow?
Choose UV-curing inks formulated for textile transfers and pair them with a DTF film and adhesive system that are compatible with your printer and garment substrates. Conduct small test prints to verify adhesion, curing quality, and color fidelity before production runs.
What role does color management for UV DTF transfers play in the UV DTF transfer workflow?
Color management is crucial: calibrate monitors and printer profiles, plan color separation to account for substrate color and white underbase needs, and run test prints to validate color accuracy, saturation, and edge fidelity across fabrics.
What are common troubleshooting steps in the UV DTF transfer workflow?
Common issues and remedies include: fading colors after washing (revisit color management and curing), peeling or cracking (check film/adhesive compatibility and heat settings), misregistration (use alignment aids and precise placement), and grainy texture (confirm proper film drying and avoid over-inking).
| Topic | Key Points |
|---|---|
| Overview of the UV DTF transfer workflow |
|
| End-to-end workflow |
|
| Design considerations |
|
| Printing stage |
|
| Preparing film & substrate |
|
| Transfer & finishing |
|
| Quality control & color management |
|
| Troubleshooting common issues |
|
| Efficiency & quality tips |
|
Summary
Conclusion