
If you’re looking to add a unique, durable touch to apparel, bags, or gear, custom patches are a smart choice. They’re versatile, easy to apply, and can be produced in a wide range of sizes, shapes, and finishes. Whether you’re outfitting a sports team, designing merchandise for a brand, or creating a commemorative patch group, the right approach can save time, reduce costs, and ensure a professional look. This guide walks you through concept and design to ordering and finishing, so you can create embroidered patches that perfectly represent your vision. As you plan, explore patch design ideas and patch ordering tips to help you choose backing, fabric, and finishes for a polished result, including custom embroidery patches.
Seen through an LSI-informed lens, these fabric emblems function as portable branding, team identifiers, and collectible tokens. You might hear them described as badges, insignias, or decorative patches, but the core idea is a durable, visually appealing accent on clothing and gear. Consider how they will be attached—sew-on for long wear, iron-on for quick updates, or Velcro for removable branding. A production-focused workflow uses vector artwork, consistent color references, and reliable finishing to keep the emblem crisp on every material.
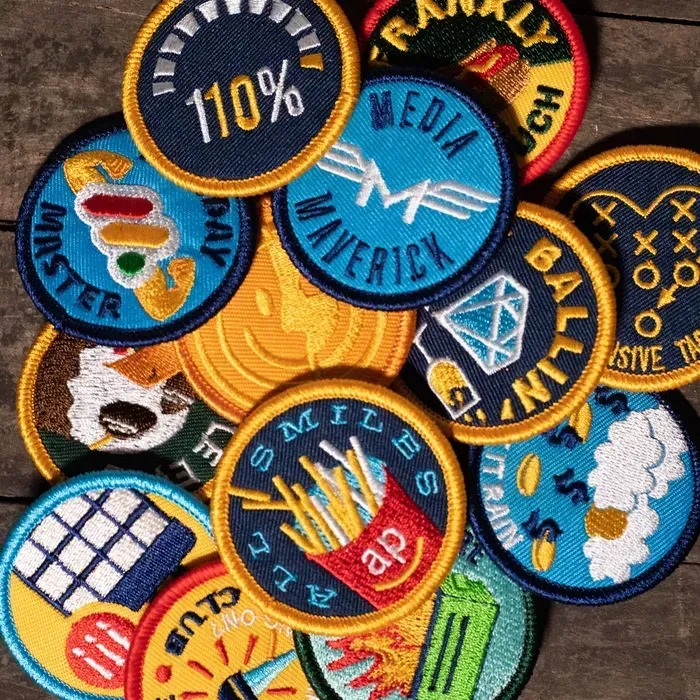
1) Why Embroidered Patches Deliver Texture, Durability, and Brand Identity
Embroidered patches stand out with texture, depth, and a premium feel. The raised stitching creates dimension and resilience that isn’t easily replicated by printed labels. Their merrow or satin borders frame the design, ensuring clean edges whether on jackets, hats, or bags, and making embroidered patches instantly recognizable.
For branding and team identifiers, embroidered patches offer consistent color rendition and durability through many wash cycles. They’re versatile in size and shape, from compact 1″ patches to large 4″ designs, and can be used across uniforms, merchandise, or event swag. When planning patch design ideas, consider how the texture of embroidery communicates identity even from a distance.
2) Iron-On Patches vs Sew-On: Choosing the Right Backing for Your Application
Iron-on patches provide quick, tool-free application with heat-activated adhesive backing. They’re ideal for temporary branding, student events, or outfits that change week to week. The heat-setting process must be compatible with fabric to avoid scorching, and patches that see frequent washing may require re-heating to restore adhesion.
Sew-on patches and alternative backings (Velcro, hot-melt) offer greater durability and reusability, especially on heavy fabrics or uniforms. Consider your washing routine and laundering care when choosing backing options, because some adhesives can degrade after multiple cycles. In practice, many buyers weigh patch longevity against application convenience to decide on the best backing for their use case.
3) Creative Patch Design Ideas to Elevate Your Logo and Team Spirit
Design ideas to elevate your patch begin with a strong concept and clear symbolism. Start with vector artwork and precise color references so embroidery can reproduce cleanly. Using Pantone colors and simple shapes helps maintain legibility when scaled to smaller patches, and exploring different border finishes can transform the overall impression.
Patch design ideas also consider a balance between detail and stitch count. Intricate logos can be simplified for embroidery, while metallic threads or glow-in-the-dark threads can add flair on dark fabrics. In addition, exploring custom embroidery patches as a product line encourages consistency across gear and merchandise.
4) From Concept to Production: The Design-to-Production Pipeline for Custom Patches
From concept to production, the journey for custom patches follows a practical pipeline. Start with a concept and size, decide on a shape, and confirm color references. Providing vector art and specifying backing and finish sets the stage for smooth digitizing and prototyping.
The pipeline continues with digitizing the design into stitch data, reviewing proofs, and then moving into production with your chosen fabric and backing. Finishing and quality control ensure clean edges and secure backing, translating the creative brief into reliable, wearable patches. Following patch ordering tips helps you manage timelines, proofs, and costs.
5) Materials, Sizes, and Shapes: How Fabric, Thread, and Backing Shape Your Patch
Material choices drive the look and longevity of embroidered patches. Denim, twill, or felt bases influence texture and durability, while polyester or cotton threads affect color and sheen. Backing options—from iron-on to Velcro—determine ease of use and care implications, making the selection part of your overall patch strategy.
Size and shape decisions also impact appearance and production cost. Classic circular patches suit branding, while custom die-cut shapes reinforce identity. A thoughtful density planning ensures legibility and reduces thread breakage, especially for small text. Whether you’re working with embroidered patches or other finishes, the base materials set the stage for the final look.
6) A Practical Roadmap for Getting Your Patches Made: MOQ, Proofs, Turnaround, and Care
Getting patches made involves a practical roadmap: establish MOQ targets, request proofs, and set realistic lead times. Suppliers often offer MOQs in the range of 50–100 patches, with smaller runs possible at higher per-unit costs. Planning ahead helps you align production with events, launches, or limited-edition drops.
Once production begins, care and use instructions preserve performance: machine wash gentle cycles, avoid excessive heat on iron-on backs, and store patches away from direct sunlight to prevent fading. By following patch ordering tips—proof reviews, clear color references, and agreed timelines—you ensure the final result matches your vision and delivers lasting value for your gear and brand.
Frequently Asked Questions
What are custom patches and why choose embroidered patches for your apparel?
Custom patches are small fabric pieces featuring a design, logo, or text that are embroidered or woven and finished with an edge. Embroidered patches are the most common type of custom patches, offering texture, durability, and a premium, tactile feel. They’re ideal for jackets, hats, bags, and uniforms and pair well with sew-on or iron-on backings for reliable application.
How do I choose between embroidered patches and iron-on patches for my project?
Embroidered patches provide durability and can be sewn on; iron-on patches offer quick, heat-activated application. For heavy use or frequent washing, embroidered patches with sew-on or Velcro backings are often better; iron-on patches are convenient for temporary branding or fast-turn projects.
What are patch design ideas to make your custom embroidery patches stand out?
Strong patch design ideas include bold borders (merrow or satin), shield or round shapes, limited color palettes with Pantone references, and the use of initials or logos. Add texture with metallic or specialty threads, ensure legibility at small sizes, and simplify detail to translate well to embroidery.
What are patch ordering tips to ensure accuracy and on-time delivery?
Patch ordering tips: start with a clear concept and size, provide vector artwork, specify backing and finish, request a digital or physical proof, confirm color references and stitch count, check minimums, and plan lead times to avoid rush fees.
What backing options should I consider for custom patches and how do they affect wear?
Backing options include iron-on, hot-melt adhesive, Velcro, and sew-on backings. Iron-on is quick but can wear with washing; hot-melt is stronger but requires heat-setting; Velcro enables removable branding; sew-on offers maximum durability. Choose based on fabric type, wash routine, and whether you need removability.
How should I prepare artwork for custom patches and what file formats work best?
Provide vector files (AI, EPS, PDF) if possible; if not, supply high-resolution raster at 300 DPI. Ensure text is legible at the intended patch size and use Pantone color references. Request a proof to verify color accuracy and stitch count before production.
| Key Point | Summary |
|---|---|
| What Are Custom Patches | Small pieces of fabric or felt embroidered or woven with a design; finished with an edge and affixed by sewing or ironing; durable, textured, and ideal for identifying teams, brands, or groups. |
| Why They Matter | Durability, texture, and recognizable identity; worn on jackets, hats, backpacks, or uniforms; can be identifiers, rewards, or collectibles. |
| Patch Types & Finishes | Embroidered: stitched with merrow or satin border; Woven: flat with tight weaving; Iron-on: heat-activated backing; Sew-on: edge-stitched; Backings: iron-on, hot-melt, Velcro, or sew-on. |
| Design First | Start with concept; decide size/shape; choose colors and thread types; decide edge finish; prepare artwork (AI/EPS/PDF or high-res raster); include a proof. |
| From Concept to Production | 1) Artwork submission 2) Digitizing 3) Prototyping/proofing 4) Production 5) Finishing and quality control. |
| Materials | Fabric options (twill, felt, denim, leather); Thread options (polyester, cotton, metallic); Backing options (iron-on, hot-melt, Velcro, sew-on). |
| Sizing, Shapes, and Detail | Size ranges 1–4 inches; Shapes include circular, shield, rectangular, or custom; Detail density affects clarity; Text legibility at size. |
| Production Considerations | MOQ commonly 50–100; Always request a proof; Lead times vary from days to weeks; Consider shipping and international factors. |
| Care and Longevity | Wash care: gentle cycles; Iron-on: avoid high heat; Reattachment: iron-on adhesions may fade; Storage: keep patches flat, away from sunlight. |
| Use Cases | Team uniforms/clubs; Brand merchandise; Events/commemoratives; Cosplay/fashion. |
| Choosing the Right Partner | Review portfolios and client feedback; Seek clear communication and proofs; Check technical capabilities; Favor consistent quality and service. |
| A Quick Roadmap | Finalize concept/size; Prepare artwork; Choose backing/finish; Request a proof; Approve and produce; Apply and care. |
Summary
Key Points: The HTML table above summarizes the core ideas from the base content about custom patches, including what they are, why they matter, types and finishes, design steps, production flow, materials, sizing and shapes, production considerations, care, use cases, partner selection, and a roadmap. A concise guide for understanding and planning a custom patches project.