
Step-by-Step Embroidery Tutorials turn intricate threadwork into a series of doable, friendly tasks, making embroidery accessible to beginners and hobbyists alike. This guided approach breaks complex designs into bite-sized steps, helping you gain confidence while discovering quick embroidery projects you can complete in a single sitting. By following clear demonstrations, beginner embroidery steps help you learn essential stitches, build muscle memory, and see tangible results through easy embroidery techniques. Along the way, you’ll pick up hand embroidery tips and practical tips for planning color, floss selection, and fabric compatibility. With a structured path and repeatable methods, these tutorials connect you to embroidery design tutorials that inspire your next project.
Viewed through an alternative lens, the concept becomes a sequenced stitching guide that makes threadwork approachable, breaking motifs into small, repeatable steps across beginner-friendly projects. In the broader realm of fiber arts, this method is discussed as decorative stitch workflows, color planning, and fabric handling—designed to deliver consistent progress without overwhelming the learner. By framing the idea with terms like stitch guides, embroidery workflows, and design tutorials, you still capture the same value: mastering techniques step by step and steadily expanding your portfolio of hand-crafted pieces.
Step-by-Step Embroidery Tutorials: Quick Wins for Beginners
Step-by-Step Embroidery Tutorials offer a clear, beginner-friendly path that turns daunting motifs into a sequence of tiny, satisfying victories. By breaking designs into manageable bites, you can celebrate progress with each small completed stitch and build momentum toward larger projects. This approach aligns perfectly with the idea of quick embroidery projects that feel achievable in a single sitting or over a short weekend. As a result, new stitchers gain confidence without being overwhelmed by complexity, making skill-building feel natural and rewarding.
When you approach embroidery through structured tutorials, you also tap into practical resources that emphasize beginner embroidery steps, steady repetition, and muscle memory. The guided format helps you choose projects that balance texture, color, and technique, so you practice essential stitches in a real design context. With each completed section, you’ll notice improved control, smoother transitions, and a greater sense of pride in your growing repertoire, all rooted in the reliable rhythm of step-by-step guidance.
Easy Embroidery Techniques to Build Confidence Fast
Easy embroidery techniques form the backbone of quick progress. By focusing on reliable stitches like the back stitch, satin stitch, and running stitch, learners can cover a lot of ground with minimal fuss. The emphasis on straightforward methods reduces hesitation and invites experimentation, which is essential for turning initial results into repeatable habits. This practical approach is well suited to beginners who want to see steady gains without getting bogged down in every minute detail.
Practice with a small project that highlights each technique—think simple shapes or a tiny bouquet—that reinforces confidence while keeping the process enjoyable. Incorporating hand embroidery tips, such as trimming threads neatly and maintaining steady tension, helps you preserve stitch quality across your practice sessions. As you master these techniques, you’ll find yourself embracing longer embroidery sessions with less frustration and more flow.
Beginner Embroidery Steps: A Clear Roadmap to Progress
A well-defined set of beginner embroidery steps turns a vast, intimidating canvas into a stepwise journey. Start with preparation: secure the fabric in a hoop, align your design, and thread your needle with a clean finish. Then move through foundational stitches in increments, letting each completed unit serve as a building block for the next. This roadmap keeps you oriented and motivated as you experience tangible wins along the way.
As you advance, the path should weave in a growing library of embroidery design tutorials that illustrate how simple stitches combine to form more complex motifs. This progression mirrors the way professional projects unfold—from idea to execution—so you can translate a concept into real texture, color, and form. By treating each session as a step forward, you’ll gradually expand your skills while preserving the joy of creating.
Quick Embroidery Projects: Build Momentum with Small Motifs
Small motifs are perfect catalysts for momentum. Quick embroidery projects centered on leaves, flowers, or geometric shapes provide immediate visual feedback, which is incredibly motivating for beginners. Each motif offers a focused practice area—whether it’s consistent satin fills, clean outlines, or subtle shading—allowing you to complete a piece quickly while still learning essential techniques.
Taking on a series of little designs keeps your practice fresh and varied, preventing burnout. Overlaying these mini projects with hand embroidery tips—like checking for even tension and avoiding thread tangling—helps you polish technique incrementally. Over time, stitching faster comes naturally as you apply the same few stitches to a widening array of motifs.
Embroidery Design Tutorials: Translating Ideas into Stitch Mastery
Embroidery design tutorials teach you how to translate a concept into a tangible stitched representation. By breaking designs into layers, sections, and stitch choices, you learn to map color, texture, and line work onto fabric. This explanatory approach aligns with the spirit of embroidery design tutorials, making it easier to see how a simple sketch becomes a finished textile piece.
A thoughtful collection of tutorials helps you move from beginner embroidery steps to more advanced applications, such as shading, layering, and texture building. With clear diagrams, close-up photos, and annotated stitch paths, you gain the confidence to experiment with new ideas while maintaining a reliable workflow. This translates into faster design execution and a richer, more satisfying embroidery practice.
Hand Embroidery Tips: Consistency, Tension, and Texture
Hand embroidery tips emphasize the craft’s tactile nature—the feel of fabric under the needle, the glide of thread through fibers, and the quiet rhythm of stitching. Focusing on consistent tension, fabric stability, and careful thread control helps you produce even, professional-looking results. When you tune into these sensory cues, progress becomes more predictable, turning even modest projects into impressive outcomes.
Incorporating these tips into daily practice supports long-term growth. Regularly checking hoop tension, using shorter thread lengths to minimize tangling, and maintaining a clean working area all contribute to smoother sessions. As you accumulate small wins through steady repetition, you’ll notice faster completion times, cleaner finishes, and a stronger sense of mastery—hallmarks of a practiced hand embroidery routine.
Frequently Asked Questions
What are Step-by-Step Embroidery Tutorials and how can they help beginners?
Step-by-Step Embroidery Tutorials break complex designs into small, repeatable tasks, making stitching feel doable for beginners. They align with beginner embroidery steps, showcase quick embroidery projects, and teach easy embroidery techniques one stitch at a time to build confidence and speed.
How do Step-by-Step Embroidery Tutorials guide you to complete quick embroidery projects efficiently?
By presenting a clear sequence, these tutorials let you celebrate small wins as you master each stitch and technique. This supports quick embroidery projects and embroidery design tutorials, helping you build muscle memory, reduce decision fatigue, and improve consistency in your work.
What tools and materials are recommended when following Step-by-Step Embroidery Tutorials for beginners?
Start with lightweight to medium-weight fabric, a hoop, size 7–9 embroidery needles, a few colors of cotton embroidery floss, scissors, and simple transfer tools. Keeping a concise stitch chart and a quick reference guide also supports hand embroidery tips and makes the learning curve gentler.
Can you outline a simple Step-by-Step Embroidery Tutorial workflow, such as a leaf motif?
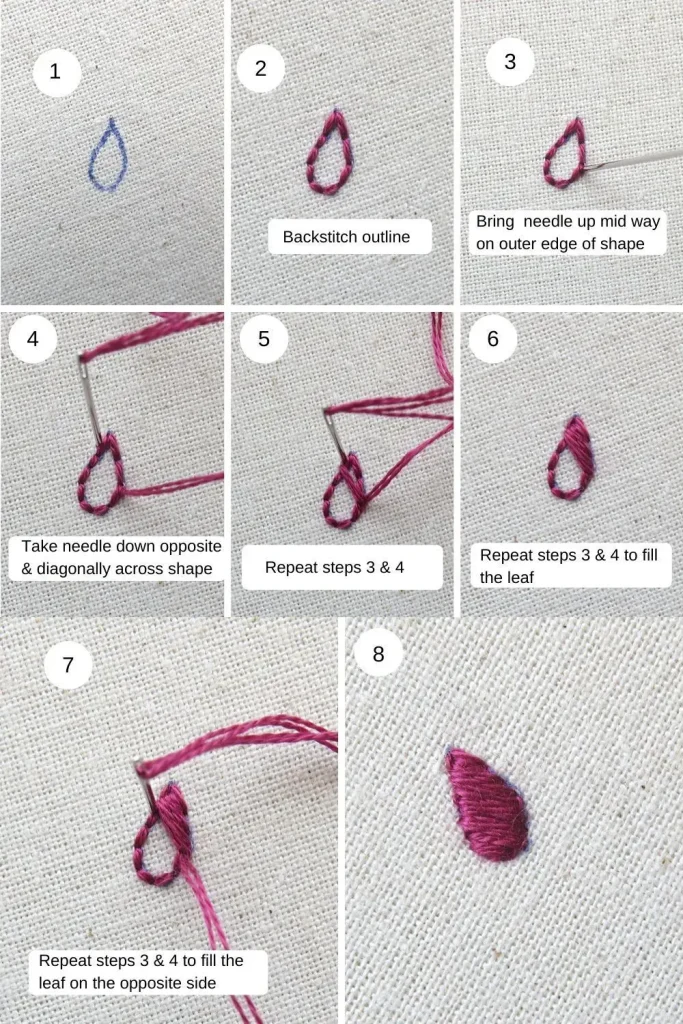
Steps: 1) Prepare the fabric and transfer the design; 2) Outline with a basic back stitch; 3) Fill the leaf with satin stitches; 4) Add texture with a running stitch or stem stitch; 5) Finish and tidy up. This leaf motif illustrates how Step-by-Step Embroidery Tutorials deliver quick wins through a repeatable sequence.
How do Step-by-Step Embroidery Tutorials help with troubleshooting and achieving consistent results?
They provide a repeatable framework that reduces decision fatigue and helps you maintain even stitches and stable fabric tension. Follow practical hand embroidery tips on tension, thread length, color planning, and mistake recovery to troubleshoot common hurdles and maintain consistency.
How can I grow from simple motifs to more complex designs using Step-by-Step Embroidery Tutorials?
Build a library of embroidery design tutorials that break designs into stages, then progress from basic back stitch and satin stitch to longer stitches, texture stitches, or applique. This mirrors a path from beginner embroidery steps to more advanced techniques while staying guided by Step-by-Step Embroidery Tutorials.
| Aspect | Key Points |
|---|---|
| Focus and Purpose | Center on Step-by-Step Embroidery Tutorials as a method to make embroidery accessible, turning the focus keyword into a practical learning path. Aligns with related keywords like quick embroidery projects and beginner embroidery steps. |
| Why Quick Wins (Progression) | Tutorials use a progressive, repeatable sequence that reveals small successes, builds muscle memory, reduces overwhelm, and increases speed and confidence over time. |
| Choosing the Right Project | Select simple shapes or small motifs that fit in a hoop, with clear, repeatable stitches and texture contrasts; aim to finish in one sitting or a few short sessions. |
| Essential Tools and Materials | Light to medium-weight fabric, hoop/frame, versatile embroidery needles (size 7–9), a few colors of embroidery floss, transfer tools, and a concise stitch reference chart. |
| A Step-by-Step Project Example | Leaf motif workflow: 1) prepare fabric and transfer; 2) outline with back stitch; 3) fill interior with satin stitches; 4) add texture with running/stem stitch; 5) finishing touches and tidy up. |
| Skill Building and Library | Grow from single motif to a library of design tutorials that clearly break designs into stages, expanding from basic stitches to longer or textured stitches and applique, all guided by step-by-step instructions. |
| Troubleshooting | Tackle common hurdles: tension and fabric stability, thread control, stitch consistency, color transitions, and mistake recovery with practical tips. |
| Expanding Repertoire | Transition to monograms, floral/geometric repeats, and texture experiments using the step-by-step framework to apply to larger or more complex designs. |
| Practical Tips for Practice | Set micro-goals, build a stitch library, schedule regular practice, document progress, and engage with a community for feedback and new tutorials. |
| SEO and Audience Alignment | Content supports quick embroidery projects, beginner embroidery steps, and easy embroidery techniques—organized to meet search intent and support readers from novices to more advanced practitioners. |