
Apply patches like a pro and extend the life of clothing and gear with precision and confidence. This patch application guide helps you understand the goals, materials, and steps so you can try it at home. From denim to canvas and knits, choosing the right option for the material matters. You’ll see how expert patching practices translate into durable repairs that hold up over time. With clear steps and careful prep, you gain consistency and pride in every repair.
Beyond the basics, this topic frames fabric repair as a practical craft that protects garments and extends their life. The idea translates into garment mending, patch placement, and durable adhesions as approachable methods. Consider backing materials, stitch styles, and surface prep as key factors shaping longevity. This broader view aligns with related concepts like fabric restoration, gear upkeep, and decorative yet functional fixes. Seen through these terms, repairs become deliberate craft with lasting value.
Understanding the Patch Application Guide: What It Covers and Why It Matters
A patch application guide acts as a roadmap for selecting materials, prepping fabric, and choosing the right attachment method for different wear conditions. It helps you understand the goals of repair, the differences between sew-on, iron-on, and fusible options, and how to tailor your approach to fabrics from denim to canvas to knits. By framing the repair as a practical process, you gain clarity on what to test, what to pre-cut, and how to anticipate edge finishing needs.
Following an organized patch application guide also supports consistency in results. It guides you through planning for placement, choosing mounting methods, and caring for patches after application, all of which contribute to long-lasting patch results. Related concepts from fabric patching tips and professional patching techniques are woven into the guide to help you build a durable, repeatable workflow.
Choosing Patch Types for Durable Repairs
There are several patch types to consider—iron-on patches for quick repairs, sew-on patches for thick or high-wear fabrics, and fabric patches with heat-activated adhesive for a balance of ease and strength. Each type behaves differently under stress, so selecting the right option matters for performance and appearance. This section emphasizes the connections between patch type, fabric weight, and expected wear, tying back to professional patching techniques.
Matching patch type to fabric and use-case is essential for long-lasting patch results. For example, denim and canvas tolerate denser stitching, while delicate knits benefit from gentler attachment methods. By aligning material choice with the intended use, you set the stage for a durable repair that looks intentional rather than temporary.
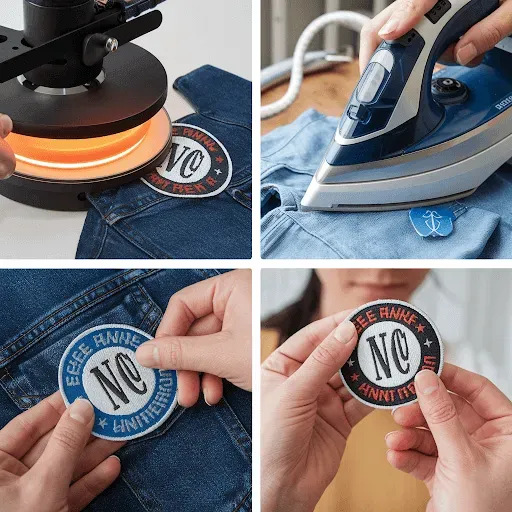
Apply patches like a pro: A Step-by-Step Approach to Patch Work
Step-by-step, the process starts with preparing the fabric and patch surface so adhesives bond firmly or stitches sit cleanly. If you’re unsure about final placement, temporary baste the patch to keep it from shifting while you verify alignment. This section also covers how to apply patches, including choosing between sew-on, iron-on, or fusible methods based on fabric and patch type.
With placement confirmed, the guide next covers securing the patch through stitching or adhesive, finishing edges, and caring for the patch post-attachment. Following these steps helps ensure durable edge finishing and reduces bulk on tight seams. The approach is designed to yield long-lasting patch results while accommodating different fabrics and wear scenarios.
Tools and Prep for Smooth Patching: Elevate Your Fabric Patching Tips
Having the right tools makes patching easier and more precise. Gather scissors, pins or fabric clips, a needle and thread matching the patch back or fabric color, and a seam ripper for adjustments. If sewing, a sewing machine or sturdy hand-stitch setup is essential; for iron-on or fusible patches, a clean ironing surface and a press cloth matter for clean heat transfer. This setup aligns with fabric patching tips to minimize mistakes.
Proper preparation also includes marking the patch location and protecting delicate surfaces during pressing. Chalk or fabric markers help position the patch accurately, and spare fabric scraps can shield the surface during heat. When you start with a calm workspace and the right tools, you’re more likely to achieve a neat, secure patch that withstands regular use.
Edge Finishing and Securing Patches for a Polished Look
Edge finishing defines the durability and appearance of a patch. Options like a narrow zigzag, satin stitch, or a fine border of hand stitches seal edges and reduce fraying. For heavy wear areas, adding a second row of stitching or a decorative topstitch can reinforce the attachment while enhancing the design. This emphasis on professional patching techniques helps produce long-lasting patch results with a clean, integrated look.
Careful edge finishing also minimizes bulk and puckering, especially on thick fabrics like denim and canvas. By choosing the right stitch type and spacing, you maintain fabric flexibility while ensuring secure adhesion. A well-finished edge is a visible sign of a deliberate repair that blends with the item rather than standing out as a quick fix.
Care, Maintenance, and Troubleshooting for Patch Longevity
After the patch is in place, follow careful washing and drying practices to protect the bond. Turn garments inside out and wash on a gentle cycle if possible, avoiding high heat that can weaken adhesives or degrade stitches. Air-drying is often the safest option to maximize durability and extend the life of the patch.
Regular inspection after a few wears helps catch loose edges early and prompts re-securing before damage spreads. With proper care—regular checks, gentle washing, and mindful drying—you can ensure long-lasting patch results across a range of fabrics and projects. This maintenance mindset ties back to the core ideas of the patch application guide and reinforces the value of deliberate, professional patching techniques.
Frequently Asked Questions
How can I apply patches like a pro using a patch application guide?
Follow the patch application guide: start with a clean, prepared fabric; select a patch type that suits the material and wear (sew-on for durability, iron-on or fusible for quick fixes); position the patch accurately and temporarily baste if needed; secure with stitching or heat as appropriate; finish edges neatly (zigzag, satin stitch, or topstitch); and follow care steps to maximize longevity for long-lasting patch results.
What are some fabric patching tips for achieving long-lasting patch results?
Key fabric patching tips include testing the patch on a hidden area first, choosing the right patch type for the fabric and wear, aligning with seams, using matching thread, reinforcing edges, using appropriate stitch length, and following manufacturer heat/press guidelines to protect the fabric and ensure long-lasting patch results.
Which patch types support professional patching techniques and how to apply patches effectively?
Professional patching techniques involve selecting the patch type to suit the fabric (sew-on for thick fabrics like denim, iron-on or fusible for quick fixes, or fabric patches with adhesive where appropriate), and applying them with secure stitches (backstitch or tight zigzag), proper heat, edge finishing, and post-patch care to achieve durable results.
How do you apply patches on denim or canvas to ensure long-lasting patch results?
Denim and canvas benefit from a sew-on approach for durability. Use reinforced stitching (backstitch or dense zigzag), shorter stitch length to reduce bulk, and a neat edge finish. Consider topstitching or a second row for extra security, then follow care instructions to maintain the bond for long-lasting patch results.
What does a patch application guide say about edge finishing and care after patching?
The guide recommends finishing edges to prevent fraying with a narrow zigzag, satin stitch, or a small border of hand stitches, and strengthening heavy wear areas with additional stitching. Post-patching care includes gentle washing, turning inside out, air drying when possible, and inspecting patches after wear to resecure edges for long-lasting patch results.
What common mistakes should be avoided when applying patches like a pro?
Avoid rushing the process, skipping surface prep, misalignment, skipping temporary baste work, using excessive heat or wrong stitch length, failing to test patch placement, and neglecting edge finishing. Steering clear of these mistakes helps you achieve a clean, professional finish and long-lasting patch results.
| Topic | Key Points |
|---|---|
| Introduction | Patching is a long‑standing, practical skill for extending the life of clothing and gear; this guide helps you use patches across fabrics (denim, canvas, knits) and covers what a patch application guide should include and how to achieve lasting results. |
| Why patching matters | Patching preserves fabric strength, extends usability, and can add a custom look; planning and using the right technique for the material improve outcomes. |
| Choosing the patch type | Types include iron‑on, sew‑on, fabric patches with heat‑activated adhesive, and fusible interfacing; match patch to fabric and use; long‑lasting results depend on correct type and proper application. |
| What you need before you start | Tools: scissors, pins or fabric clips, needle and thread, seam ripper, sewing machine or sturdy hand stitch, iron and flat surface for patches, chalk or fabric marker, spare fabric scraps. |
| Step-by-step patch application guide | Step 1–Prepare surface; Step 2–Choose mounting method; Step 3–Position patch; Step 4–Attach temporarily; Step 5–Secure with stitching or adhesive; Step 6–Edge finishing; Step 7–Care and maintenance. |
| Pro tips for different fabric types | Denim/canvas tolerate heavy stitching; knit fabrics require stretch stitches or zigzag; delicate fabrics like silk/satin benefit from lighter patches or fusible with barrier; always test a small area. |
| Common mistakes and how to avoid them | Rushing, misalignment, skipping prep, using too much heat or wrong stitch length; recheck seam lines, secure edges after wear, aim for a clean professional finish. |
| Additional techniques for a polished result | Edge stitching along seams, embroidery around the patch, fabric appliques for cohesion, or design features to create an integrated look. |
| Conclusion | Patching extends the life of fabrics while allowing personal expression. By following a clear patch application guide, you can achieve durable results with sew‑on and iron‑on options; prepare the fabric, choose the right patch, position carefully, finish edges, and maintain the patch. With patience and care, you will apply patches like a pro and enjoy long‑lasting results across projects. |
Summary
Apply patches like a pro by approaching patching as a craft: understand materials, choose the right patch type, prepare thoroughly, and follow a step-by-step method to achieve durable, long-lasting results. Patching is a practical skill that extends the life of fabrics and lets you express personal style. By selecting the appropriate patch type for each material, preparing the surface, positioning carefully, and finishing with proper stitching or adhesive, you can achieve professional-looking results on denim, canvas, knits, and delicate fabrics. With good care and maintenance, patches endure through washes and wear, preserving both function and character across a wide range of projects.