
Custom Banner Measurement is the quiet backbone of every successful banner project, guiding you from precise sizing to a flawless on-site presentation, and it acts as a shared language between clients, designers, and printers. A reliable approach combines a custom banner size guide with careful measurements to prevent cropping, ensure clean margins, and set up vinyl banner printing that truly stands out, while also considering environmental conditions, printing tolerances, and trim allowances for near-edge graphics. From banner mounting to roll-up banner installation, knowing the exact footprint helps you select the right hardware, align graphics, and reduce back-and-forth during proofing, with clear guidance on bleed, safe margins, and how the hardware interacts with the display surface. Whether you’re outfitting a trade show booth, storefront, or conference space, accurate measurements improve readability and ensure your brand message lands with impact, providing a reliable baseline for layout decisions, asset preparation, and installation planning. Starting with measurement also simplifies file prep, material selection, and installation planning, letting designers, printers, and installers work from a shared, precise reference, and it helps you build a budget, timeline, and quality checkpoints early in the project.
Beyond straightforward measurement, this practice can be framed as precise dimensioning for signage, where width, height, bleed, and safe margins dictate the final appearance. Imagine it as a coordinated process of typography, graphics, and hardware that uses a shared language of space, distance, and alignment. This LSI-friendly framing mirrors print-prep conventions, where artwork is prepared to exact specs and tolerances before it ever leaves the studio. When teams adopt terms such as size optimization, layout readiness, and installation compatibility, communication improves and costly revisions shrink.
Custom Banner Measurement: The Foundation for Flawless Print and Install
Putting up a banner that looks great and fits perfectly starts with precise measurement. Custom Banner Measurement isn’t just about numbers—it’s about translating space into print-ready specifications. Begin by gathering your tools and defining the display area: measure width and height, account for mounting surfaces, lighting, and viewing distance, and decide whether you’ll mount on a wall or use a roll-up banner stand. When you define the space, consult your printer’s custom banner size guide to confirm the ideal width, height, and tolerances so the finished banner fills the area without crowding adjacent elements.
With accurate measurements, you set up a smooth collaboration with designers and printers. You’ll capture both the physical footprint and the desired visible area, note any depth constraints, and record measurements in inches and millimeters to avoid conversion errors. This foundation supports successful vinyl banner printing by ensuring bleed and safe margins are correctly applied, reducing the risk of cropped graphics or misaligned text and saving time and cost in production.
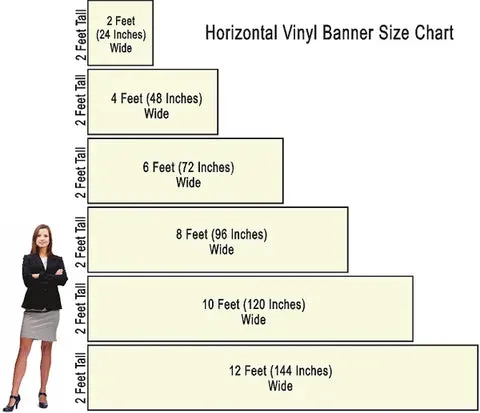
Using the Custom Banner Size Guide to Achieve the Perfect Fit
To achieve a perfect fit, start with the guide. The custom banner size guide helps you select a width and height that maximize the available display space while preserving margins and avoiding overlaps with nearby graphics. It clarifies tolerances for trimming, safe margins for logos, and how to account for curved stands or frames. By aligning your final print size to this guide, you reduce rework and set up a print-ready file that integrates smoothly with the installation plan.
The guide also informs decisions for different banner types, such as wall banners versus roll-up banners. It maps how much visible area will be seen when mounted and how to factor in hardware or frames. Using the guide during design ensures your banner mounting plan remains consistent from artwork through installation.
Bleed, Safe Area, and Resolution: Preparing Print Files for Descriptive Results
Once measurements are set, translate them into print-ready files with clear bleed and safe areas. Plan for a bleed of at least 0.125 inches (3 mm) on all sides and keep all critical content 0.25 inches (6 mm) away from the trim to prevent clipping. Confirm that the final size matches your measurements and ensure the printable area fits within the stand width for roll-up banners or the wall space for wall banners. High printer resolution—typically 300 dpi for sharp results—keeps text and images crisp at large formats.
Color management matters too. Use CMYK for production and request the printer’s ICC profile if they have a preferred color workflow. Common file formats include PDF, TIFF, or high-resolution JPG, and you should include crop marks if requested. If you’re unsure, ask for a proof to verify color, alignment, and edge trim before committing to a full run.
Roll-Up Banner Installation: Tips for Tension, Alignment, and Rapid Setup
Roll-up banner installation demands attention to the visible area versus the footprint. Measure the stand’s width and the maximum height available when extended, and include small top and bottom margins to prevent content from cropping when the banner is taut. During installation, ensure the graphic is centered and level using edge guides, and maintain even tension to avoid buckling or creases. This is where the precise measurements translate into a clean, professional display.
Practical installation tips include requesting a mock-up or digital proof that shows the exact canopy of the roll-up banner with the stand, keeping the print flat during handling, and avoiding excessive bending. Align with the stand’s edge guides and confirm that critical content remains within the safe area. Following these banner installation tips reduces rework and helps you achieve a professional, distraction-free presentation.
Banner Mounting Best Practices: Surfaces, Frames, and Safe Setup
Banner mounting begins with preparing the mounting surface. For wall banners, use a level and appropriate adhesive or mounting hardware, marking anchor points with painter’s tape to ensure straight placement. If the wall isn’t perfectly flat, consider shims or mounting brackets that accommodate irregularities, ensuring a clean edge and consistent margins.
For roll-up banners and frame-mounted displays, choose hardware that supports the weight and size of your banner, and ensure the setup remains stable in the display environment. Lighting plays a role too—position fixtures to minimize glare and hotspots. Outdoor banners require weatherproofing and wind resistance considerations to keep the banner taut and legible.
Material Matters: Vinyl Banner Printing and Outdoor Durability
Material choice drives durability and print quality. Vinyl is a standard choice for banners, offering durability, color fidelity, and strong outdoor performance when properly finished. For indoor use, fabric banners can reduce glare and soften the appearance, depending on space and lighting.
Finish options matter as well. Decide between matte and gloss finishes based on readability under your lighting conditions. Consider UV resistance and protective laminates for outdoor displays to extend color life and prevent surface wear. When you pair the right material with precise measurements, you maximize the banner’s impact and longevity, whether for a trade show booth or storefront display.
Frequently Asked Questions
What is Custom Banner Measurement and why is it essential for vinyl banner printing and display?
Custom Banner Measurement defines the planned footprint and the visible area of your banner, guiding bleed, margins, and alignment. For vinyl banner printing, starting with precise measurements prevents cropping, ensures a clean edge, and supports banner mounting and installation. A solid measurement process reduces reprints and helps your design look sharp in wall banners and roll-up banners alike.
How can I use a custom banner size guide to choose the right size for a wall banner?
Begin by measuring the display space (width and height). Then consult a custom banner size guide to identify standard dimensions and tolerances. Choose a size that uses most of the width with even margins and compatible mounting hardware; always factor in bleed and printer constraints.
What measurements are essential for roll-up banner installation?
Measure the stand width and the maximum printable height when the banner is extended. Include top and bottom margins to accommodate hardware, and note any curvature or depth that affects tension and alignment. These measurements ensure a level, centered roll-up banner installation and minimize cropping or misalignment.
How do I prepare print files using Custom Banner Measurement for vinyl banner printing?
Convert your measurements into the final print size and printable area, add at least 0.125 inches (3 mm) of bleed on all sides, and keep critical content 0.25 inches (6 mm) from trims. Design at 300 dpi (or 150 dpi for distant viewing) in CMYK, and provide print-ready formats (PDF preferred). Request a proof to verify alignment with your measurements before vinyl banner printing.
What is the difference between the visible area and the footprint, and why does it matter for banner mounting?
The footprint is the actual physical size of the banner package, while the visible area is the portion printed and seen after mounting. Understanding both helps ensure correct banner mounting and alignment with edge guides and hardware, preventing cropping or off-center results during banner installation.
What common measurement mistakes happen and how can I avoid them during installation?
Common mistakes include skipping a test fit, ignoring bleed and safe margins, and failing to measure at multiple points. Avoid them by performing a site measurement, using a custom banner size guide, reviewing mock-ups, and following banner installation tips to check alignment with mounting hardware.
| Topic | Key Points |
|---|---|
| Foundation | Measurement accuracy is the foundation for a flawless print and install. |
| Assess Space | Identify space dimensions, mounting method, lighting and viewing distance to guide all decisions. |
| Banner Types & Measurements | Measure for wall banners (width/height, footprint) and roll-up banners (stand width, maximum height; consider margins). |
| Bleed, Safe Areas, & Resolution | Bleed 0.125 in; safe margins 0.25 in; design at 300 dpi; CMYK; account for distance. |
| Print Materials & Finishes | Material choices (vinyl, fabric); indoor vs outdoor; finishes affect glare/readability; UV protection. |
| Roll-Up Specifics | Visible area vs footprint; top/bottom margins; tension and alignment; request mock-ups. |
| Installation Best Practices | Prepare mounting surface; ensure level; maintain tension; check margins and alignment; lighting considerations. |
| Design & Content Considerations | Choose legible fonts, safe logo areas, high-resolution images, align elements with banner edges. |
| Maintenance & Reuse | Cleaning, storage, and reuse strategies; protect print; plan for updates to reduce waste. |
Summary
Custom Banner Measurement is the cornerstone of delivering professional banners that look great in every setting. By measuring the display space accurately, preparing precise bleed-safe files, choosing the right materials, and following installation best practices, you ensure a perfect fit for wall banners and roll-up banners alike, while maximizing impact and minimizing waste. With careful planning and consistent measurements, brands can achieve balanced compositions, durable prints, and a smoother production process, turning every banner into a clear, high-impact message for audiences in trade shows, storefronts, or offices.