
Digitizing Your Embroidered Design is the critical first step that shapes how your final piece will look and perform on fabric, turning a simple image into a precise, machine-readable plan that guides every stitch, holds the design together in motion, and sets the foundation for durable, professional embroidery. As you translate art into stitch paths, densities, pull compensation, and carefully defined color stops, you establish expectations for edge sharpness, fill consistency, density balance, and how the design behaves across different hoop sizes and fabric textures under routine machine stitches. By combining smart digitize embroidery techniques with well-planned stabilizers and underlay—chosen for the fabric type and hoop you’ll use—you reduce puckering, thread breaks, and distortion while keeping transitions smooth and colors visually aligned. This guide offers embroidery digitizing tips that address common defects, provide practical workflows, and help you optimize stitch types for embroidery so you can keep production efficient, minimize rework, and achieve reliable results from the first run. Whether outlining a brand logo, tracing a decorative motif, or filling large areas, selecting stitch types for embroidery and managing color changes will elevate the final look, enhance wear resistance, and translate artwork into a robust digital file.
A digital embroidery preparation workflow reframes art into a stitch plan that your sewing machine can execute with precision. Think in terms of stitch paths, thread color sequencing, and densities rather than a single image; these related terms reflect the same idea through an LSI-friendly vocabulary such as embroidery digitization and stitch planning. If you optimize stabilizers, underlay patterns, fabric-dependent settings, and hoop selection, your design translates into smooth machine stitches with minimal distortion. Exploring topics like stitch types for embroidery, color blocking, and test stitches helps build a production-ready file set that preserves artistry while meeting practical constraints. By embracing these interconnected concepts, designers create digital outputs that translate well across machines and materials and support consistent results in real-world stitching.
Understanding Digitizing Your Embroidered Design: Why It Determines Stitch Quality
Digitizing Your Embroidered Design is the critical first step that shapes how a final embroidery project looks and performs. A well-planned stitch plan translates artwork into precise paths, densities, and color stops, directly influencing edge sharpness, fill evenness, and overall durability across fabrics and hoop sizes.
When you digitize, you are choreographing machine stitches to run smoothly from the first test. This planning mindset minimizes jump stitches, reduces run time, and helps prevent fabric distortion. In practice, it’s not just technique—it’s a disciplined approach to embroidery digitizing tips that yields consistent results.
Essential Tools and File Formats for Embroidery Digitizing Tips
To digitize embroidery effectively, you need the right software and export formats. Select tools that fit your skill level while giving you control over densities, stitch angles, and pull compensation so you can craft the stitch types for embroidery you’ll use most often.
Export formats matter because different machines read DST, PES, EXP, and JEF among others. Preserve color stops, stitch counts, and density values during export, and verify that underlay settings stay intact when you share or convert designs. This workflow keeps your machine stitches consistent across platforms and brands.
Digitizing Your Embroidered Design for Seamless Machine Stitches
Digitizing Your Embroidered Design for seamless machine stitches hinges on stabilizing the fabric and planning underlay. Start with a lightweight underlay to stabilize the weave and reduce fabric pull, especially on knits or delicate fabrics, so the top threads land where intended.
Define stitch regions with appropriate types—satin stitches for crisp borders and fill stitches for larger areas—while monitoring density and distribution to maintain even coverage. Thoughtful color stops and optimized stitch directions further minimize distortion, helping your final result stay flat and professional.
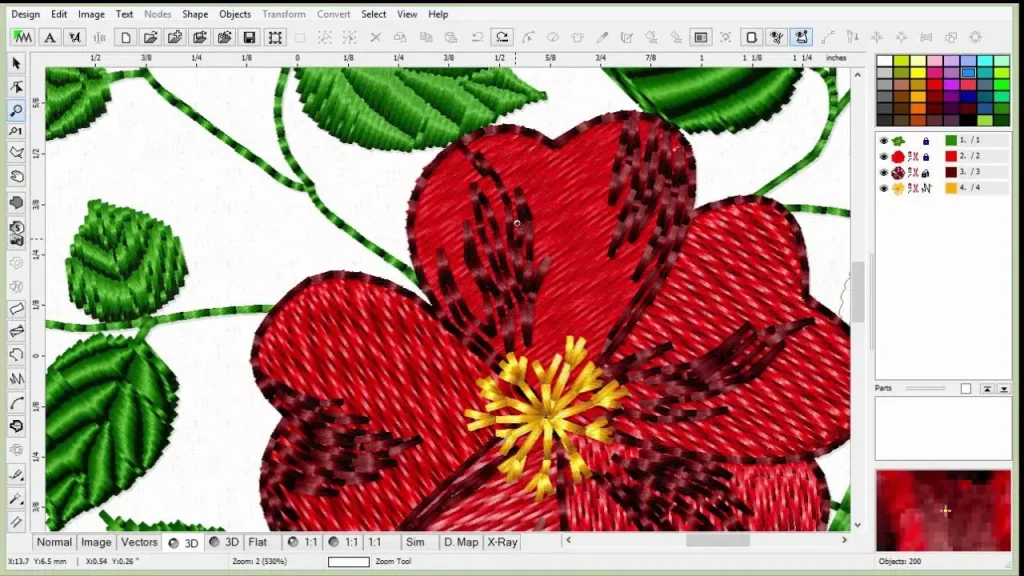
Mastering Stitch Types for Embroidery: From Running to Satin to Fill
A solid grasp of stitch types for embroidery is essential. Running stitches provide subtle outlines and detail, satin stitches create bold, glossy edges, and fill stitches cover larger areas with consistent texture. Choosing the right mix is key to achieving clean contours and smooth color transitions.
Across designs, matching stitch types to the fabric and motif ensures durability and appearance. For logos and borders, run-and-satin combinations often deliver sharp edges; for large fills, careful density and stitch length control produce even, natural-looking coverage that stands up to wear and washing.
Stabilizers and Underlay: The Quiet Core of Perfect Embroidery
Stabilizers and underlay are the unsung heroes behind flawless embroidery. Stabilizers provide support, especially on stretchy or delicate fabrics, while underlay helps control weave distortion and improves fabric handling under the needle.
Choosing the right stabilizers and underlay patterns based on fabric type and hoop size reduces puckering and improves seam alignment. A thoughtful balance between underlay structure and fabric characteristics helps top stitches land cleanly and keeps edges crisp throughout the design.
Testing, Refining, and Troubleshooting: Embroidery Digitizing Tips in Practice
Testing is an essential step in any digitizing workflow. Run controlled test stitches on scrap fabric to evaluate edge sharpness, fill uniformity, and underlay effectiveness, using this as a learning opportunity to refine your approach.
Evaluate density, color transitions, and thread tension, and don’t hesitate to iterate. Gather feedback, adjust stitch lengths, underlay, and color stops, and apply embroidery digitizing tips until the design stitches out reliably in production, delivering consistent machine stitches and a polished finished look.
Frequently Asked Questions
What is the first step in Digitizing Your Embroidered Design to ensure clean machine stitches?
Begin with Digitizing Your Embroidered Design by turning the artwork into a stitch plan. Start with a lightweight underlay to stabilize the fabric, then choose the machine stitches that fit the design edges (running stitches and satin stitches for outlines, fill stitches for large areas). Plan color stops and test the file on a fabric similar to the final result to verify edge quality and stitch flow, while checking stabilizers and underlay settings to prevent puckering.
How do you choose stitch types for embroidery when Digitizing Your Embroidered Design?
Decide stitch types for embroidery based on edge quality and area coverage. Use satin stitches for crisp borders, fill stitches for large blocks, and running stitches for fine outlines. Align the stitch choice with the fabric and hoop size, keeping in mind a balanced distribution of density for a smooth Digitizing Your Embroidered Design.
Why are stabilizers and underlay important in Digitizing Your Embroidered Design?
Stabilizers provide fabric support and prevent distortion, while underlay stabilizes the weave before top stitches. They reduce puckering on stretchy or delicate fabrics and improve embroidery machine stitches. Choosing the right stabilizer and adding a light underlay are essential steps in Digitizing Your Embroidered Design.
What embroidery digitizing tips help improve machine stitches quality when Digitizing Your Embroidered Design?
Follow practical embroidery digitizing tips such as preparing artwork with high contrast, simplifying fine details, planning color blocks, testing on scrap fabric, and verifying underlay and density settings. These embroidery digitizing tips help ensure clean edges and even coverage across Digitizing Your Embroidered Design.
How do you manage density and pull compensation in Digitizing Your Embroidered Design to achieve seamless machine stitches?
Density controls stitch closeness; set it to avoid puckering but ensure coverage. Use pull compensation to balance thread tension across fills. Test on similar fabric and hoop, then adjust density, stitch length, and the direction of fills. This approach supports seamless machine stitches in Digitizing Your Embroidered Design.
Which file formats and tools are best for digitizing your embroidered design to ensure compatibility with machines?
Export to common formats such as DST, PES, EXP, and JEF, depending on your machine. Use software that supports your target stitch types for embroidery and preserves color stops, density, and underlay when exporting. Verify the exported file matches machine expectations to maintain seamless machine stitches in Digitizing Your Embroidered Design.
| Aspect | Key Points |
|---|---|
| What Digitizing Your Embroidered Design is | A stitch plan that translates art into a machine-readable path, using layers of paths, shapes, and densities to guide each stitch (outline, edges, fills) and optimize fabric behavior. |
| Core Stitch Types | Common stitch types include running stitches (outlines), satin stitches (narrow glossy borders), and fill stitches (large areas) to control edge clarity and coverage. |
| Preparing Artwork | Simplify complex shapes, use clean high-contrast art, plan color blocks, and consider ultimate size and fabric to prevent puckering. |
| Tools and File Formats | Choose software suitable for your skill level and goals; export in formats such as DST, PES, EXP, JEF, preserving color stops, stitch counts, and density. |
| Underlay and Stabilizers | Use lightweight underlay to stabilize fabric and support top stitches; select stabilizers based on fabric stretch and hoop size to reduce puckering. |
| Step-by-Step Workflow | Outline and underlay first; define regions with appropriate stitch types; manage density and pull compensation; plan color stops; optimize stitch angles; account for fabric and hoop. |
| Common Pitfalls | Puckering from over-density or insufficient stabilizer; stitch wandering; layering conflicts; trims and jump stitches; color mismatches. |
| Testing and Refinement | Run controlled tests, evaluate edge sharpness and fill evenness, adjust density/underlay, check color transitions, and iterate based on feedback. |
| Practical Tips | Use stabilizers and underlay effectively; maintain consistent hooping; tune thread tension and needles; plan for fabric behavior; test before production. |
| Outcome | A well-digitized design yields reliable machine stitches, cleaner edges, even fills, and better performance across fabrics and hoop sizes. |