
DTF transfers 101 is a practical guide designed for beginners who want to achieve high-quality prints with direct-to-film transfers. If you’re new to the world of this transfer method, you’ll discover why it’s popular for hobbyists and small businesses. You’ll also learn the essential gear, a step-by-step workflow, and practical tips for avoiding common issues. By focusing on substrates, color management, and a straightforward workflow, you’ll gain confidence in repeatable results. By the end of this guide, you’ll be ready to create durable, vibrant transfers that stand up to wear and washing.
From a broader perspective, this coverage uses alternative terms such as film-to-fabric transfer and PET-film printing to describe the same process. The overview emphasizes the practical elements—PET film, adhesive powders, and the curing step—that turn printed designs into durable garments. It also discusses compatible substrates (cottons, blends, and some synthetics), color handling, and the importance of a robust white underbase for vivid results. With tips on heat application, drying, and quality checks, this primer supports beginners in moving from hobby experiments to dependable small-batch production.
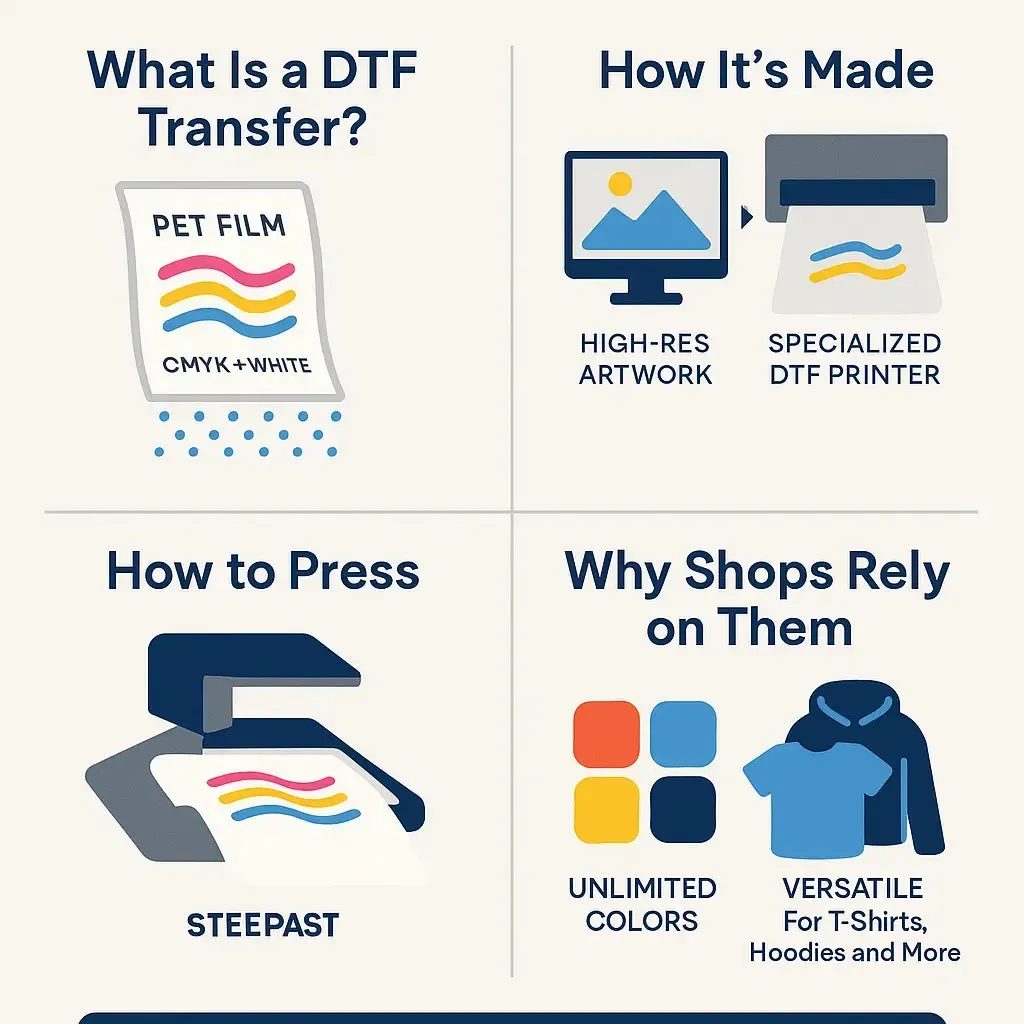
DTF transfers 101: A Beginner’s Guide to Direct-to-Film Printing
DTF transfers 101 introduces beginners to direct-to-film printing and how it compares to traditional methods. By printing onto a PET film, applying adhesive powder, and then transferring with a heat press, you can achieve vibrant colors and a soft hand on many fabrics. This guide focuses on practical gear, a straightforward workflow, and tips to help you produce durable DTF prints with predictable results.
Understanding the core concepts of DTF printing helps you plan projects with confidence. You’ll learn how the direct-to-film process achieves bright color density on dark fabrics via a white underbase, and how substrate choice influences wash-fastness and hand feel. With a clear design-to-cure workflow, you can improve DTF print quality and build repeatable results.
Understanding DTF Printing: How Direct-to-Film Transfers Create Vivid Results
DTF printing, short for direct-to-film transfers, involves printing the image onto a PET film, applying an adhesive powder, curing the powder, and then transferring the image to fabric with a heat press. The result can be incredibly sharp, with deep color saturation and a soft hand feel, making it especially effective on dark garments and blends.
For hobbyists and small businesses, DTF transfers offer a relatively approachable path to professional-looking apparel. The workflow is more forgiving than some color-separated methods, and you can scale from single-item prototypes to small batches without heavy setup. This makes DTF printing a versatile option for T-shirts, hoodies, tote bags, and other substrates.
Gear, Substrates, and Setup for Consistent DTF Print Quality
A successful DTF run starts with quality inputs and a tidy workspace. Key gear includes a DTF printer with white ink capability, DTF PET film, adhesive powder and a curing setup, and a reliable heat press with adjustable temperature, time, and pressure. Correctly choosing and testing these parts helps you achieve consistent DTF print quality across jobs.
Substrates and compatibility matter: 100% cotton, cotton blends, and some poly blends respond differently to ink deposition. On dark fabrics, a solid white underbase is often required to achieve vibrant color density. Test a few fabrics before larger runs to understand how the fiber composition affects saturation and hand feel.
DTF Transfer Tips: Practical Guidance for Consistent Results
DTF transfer tips focus on achieving even coverage and strong adhesion. Ensure powder is distributed uniformly, cure the film thoroughly, and verify the white underbase is solid before adding color layers. Accurate alignment and proper pre-press help prevent off-register designs and edge lifting, both of which can compromise DTF print quality.
Color management and design considerations matter as much as hardware. Mirror text and orientation for the final transfer, plan your palette for possible shifts after the white underbase, and perform small test prints to confirm edge sharpness and detail retention. These DTF transfer tips set the foundation for reliable, repeatable results.
Heat Press Settings for DTF: Achieving Sharp Details and Soft Hand Feel
Heat press settings for DTF determine how well the design embeds into the fabric. A common starting point is around 160°C (320°F) for 12–15 seconds with light to medium pressure, but you’ll fine-tune for different substrates and films. Maintaining consistent time and temperature helps preserve color fidelity and a soft hand feel.
Next-level calibration involves testing on sample garments and recording the parameters used. Consider fabric thickness, platen temperature, and press duration, and adjust in small increments (5–10 seconds or degrees) to dial in the best balance between vivid color and pliable hand.
Troubleshooting DTF Print Quality: Common Issues and Fixes
Troubleshooting DTF print quality addresses the most common issues like color bleed, edge lifting, and cracking. Bleeding often points to insufficient white underbase or improper color separation, while lift can result from incomplete curing or insufficient pressure. Start with verifying the cure, powder distribution, and pre-press conditions before re-pressing.
Durability testing and routine maintenance close the loop on quality. Run wash tests on sample garments, document how colors hold after cold cycles, and keep the printer, film, and powder in good condition to preserve DTF print quality over time. Regular calibration and a simple QC checklist help you catch problems early.
Frequently Asked Questions
What is DTF transfers 101 and how does DTF printing work for beginners?
DTF transfers 101 is a beginner-friendly guide to direct-to-film transfers. In DTF printing, artwork is printed onto a PET film, an adhesive powder is applied and cured, and the image is transferred to fabric with a heat press, delivering sharp color and a soft hand feel.
What equipment do I need for DTF printing as outlined in DTF transfers 101?
Essential gear includes a DTF printer with white ink capability, DTF PET film, adhesive powder, a curing step, and a quality heat press. You will also want prep tools like a lint roller and a reliable pre press routine for best results.
What are practical DTF transfer tips for improving results?
DTF transfer tips include evenly distributing powder, fully curing the film, pre pressing the garment to remove moisture, and ensuring a solid white underbase on dark fabrics. Following the DTF transfers 101 workflow helps maintain consistency and color accuracy.
What heat press settings for DTF should I start with?
Start with around 160°C (320°F) for 12 to 15 seconds and use medium pressure. These heat press settings for DTF provide a baseline; adjust time, temperature, and pressure for your substrates and film as you gain experience.
How can I ensure strong DTF print quality across fabrics?
Focus on proper design and color management, a robust white underbase on dark fabrics, and test prints on different substrates. These steps help improve DTF print quality and color consistency.
What common issues occur with DTF transfers and how can I fix them?
In DTF printing workflows described in DTF transfers 101, common issues include color bleed, edge lift, cracking, and curling. Fixes include ensuring a solid white underbase, fully curing the adhesive powder, using appropriate heat press time and pressure, and performing a final pre press to flatten the garment.
| Topic | Key Points | Why It Matters |
|---|---|---|
| What is DTF printing | DTF printing involves printing onto PET film, applying adhesive powder, curing, and transferring the image to fabric with a heat press. Results are sharp, with deep color saturation and a soft hand feel, making it especially good for dark fabrics where white underbase is often required. | Foundational understanding of the process and its outcomes. |
| Why DTF transfers appeal to beginners and small businesses | Accessible, cost-effective entry; scalable gear; forgiving workflow for small batches; strong color reproduction; versatile for T-shirts, hoodies, bags, and more. | Helps beginners and small businesses decide if DTF fits their needs. |
| Gear, materials, and workspace you’ll need | DTF printer with white ink capability; DTF PET film; adhesive powder and curing equipment; a fresh, quality heat press (typical settings ~160°C/12–15s, medium pressure); weeding tools, lint roller, and pre-press setup. | Ensures reliable, repeatable transfers and reduces errors. |
| Substrates and compatibility | DTF works on 100% cotton, cotton blends, and some poly blends. For dark fabrics, white ink underbase is often required. Test a few fabrics before larger runs to gauge color saturation and hand feel. | Guides substrate choice and expected results. |
| The step-by-step DTF transfer workflow (beginner-friendly) | 1) Design and preflight (300–360 dpi, CMYK, mirror when needed); 2) Print preparation; 3) Print base + white layer; 4) Powder application and curing; 5) Pre-press garment; 6) Align and transfer; 7) Peel and finish; 8) Cooling and quality check. | Provides a reliable, repeatable process with room to optimize. |
| Design notes and color management | Resolution 300–360 dpi; CMYK workflows; mirror for text; robust white underbase; consider film-to-fabric dynamics and color shifts on dark fabrics. | Aims for predictable color and sharp details across substrates. |
| Tips for achieving consistent high-quality prints (DTF print quality) | Calibrate printer regularly; use appropriate color profiles; ensure even powder distribution and complete curing; control temperature/time/pressure; prep substrate cleanly; advise on post-transfer care. | Reduces variability and improves batch-to-batch consistency. |
| Common issues and practical fixes | Color bleed: verify white underbase and color separation; peeling: ensure complete cure and adequate press time/pressure; cracking: reduce adhesive/push for gentler transfer; off-gassing/curling: longer pre-press and flat surface. | Troubleshooting to keep quality consistent. |
| Care and testing for durability | Wash tests, cold water, air-dry if possible; inspect color stability and adhesion; perform regular printer and curing maintenance. | Ensures longevity and predictable performance over time. |
Summary
DTF transfers 101 provides a practical foundation for beginners who want to explore direct-to-film transfers and achieve high-quality prints on a variety of fabrics. By understanding the end-to-end workflow—from design through curing to final heat-press transfer—you’ll gain confidence in producing durable, vibrant designs. Invest in quality gear, calibrate your printer and heat press regularly, and test with different substrates to dial in the settings that work best for your business or hobby. With patience and practice, your DTF printing skills will grow, delivering reliable results and expanding your creative possibilities.