
Embroidery design for beginners invites you to explore a timeless craft that blends creativity with careful technique. This approachable art form helps you build confidence as you learn foundational stitches, choose simple patterns, and establish a calm, satisfying routine. If you’re unsure where to begin, this guide shows how to start embroidery with light, beginner-friendly projects and patient practice. With a small toolkit and steady progress, you’ll move from basic stitches to tidy outlines and gentle shading. By focusing on core techniques and manageable projects, you’ll enjoy consistent improvement and personal satisfaction.
To reframe the topic for new stitchers, think of embroidery as hands-on textile art that blends design sense with steady technique. Starting with a clear plan, you’ll assemble a starter kit featuring essential embroidery tools such as a hoop, light fabric, sharp needles, and colorfast threads. This approach emphasizes process over speed, guiding you through beginner-friendly stitches, simple transfers, and patient practice. With these building blocks, you’ll tackle approachable projects for beginners that build confidence while teaching color, texture, and proportion. As you gain familiarity, you’ll expand to more intricate patterns using the same core skills, making every new piece a natural step forward.
Embroidery design for beginners: Mastering the basics with confidence
Embroidery design for beginners invites you into a gentle learning curve where clear fundamentals set the stage for lifelong skill. By focusing on essential stitches, simple patterns, and steady practice, you’ll build confidence while developing a consistent hand. This approach emphasizes a calm pace, deliberate movements, and a willingness to learn from every small mark you make on fabric.
Starting with a solid foundation also means choosing beginner-friendly patterns and basic tools that align with beginner embroidery techniques. As you progress, you’ll notice how the same stitches unlock more complex textures and designs, turning initial sketches into finished pieces you’re proud to display. With patience and curiosity, you’ll translate simple lines into personal embroidery that reflects your style.
Essential embroidery tools and setup for successful beginner projects
Equipping yourself with essential embroidery tools creates smoother sessions and steadier results. A wooden embroidery hoop in a comfortable size keeps fabric taut, while light, even-weave fabrics like cotton Aida or linen make stitches easier to see and control. Quality needles, a small scissor pair, and a basic six-strand floss set give you a wide palette without overwhelming you.
A tidy workspace matters as much as the tools themselves. Good lighting, a comfortable chair, and a dedicated spot for skeins, needles, and transfer tools help you maintain focus during practice. Thinking about how to start embroidery becomes easier when you have a simple setup where everything is organized, labeled, and within reach, letting you practice beginner embroidery stitches with less distraction.
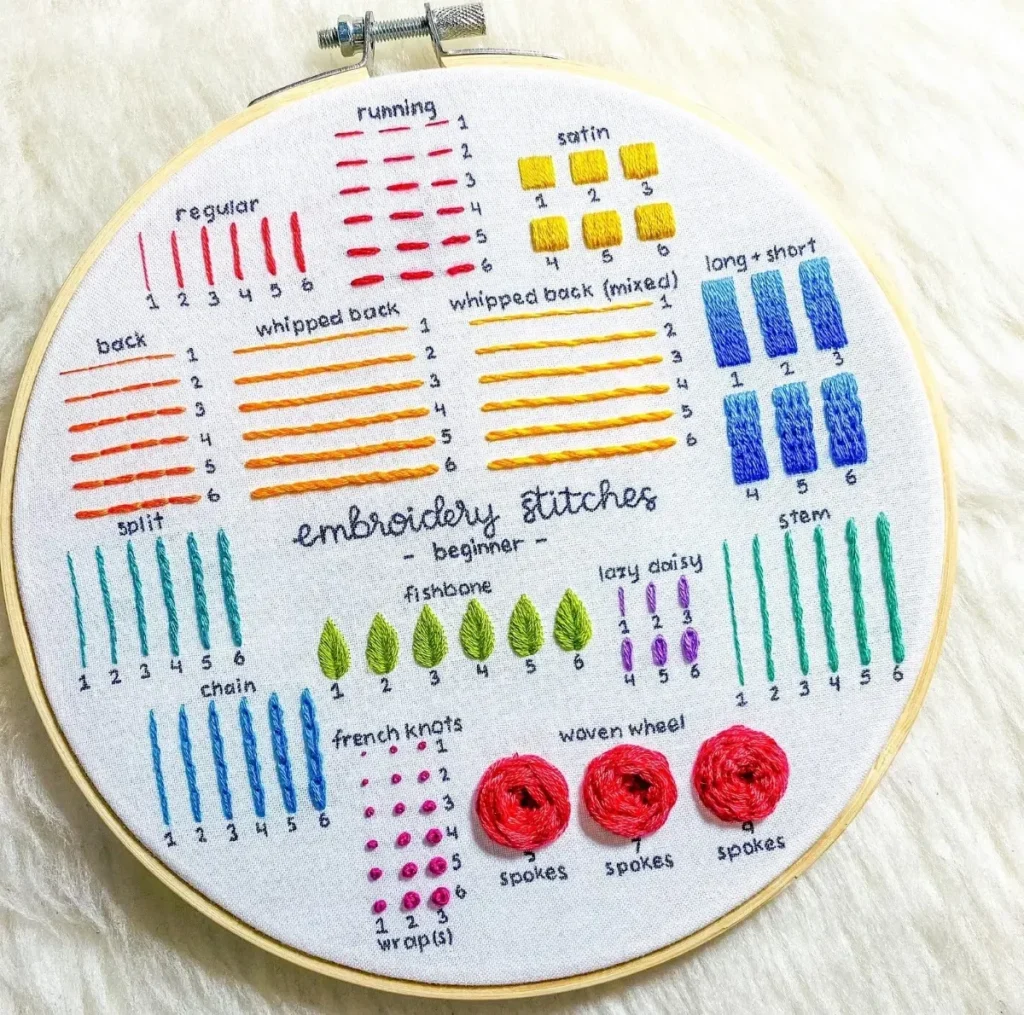
Beginner embroidery stitches: Core stitches that build a strong foundation
The core stitches are the backbone of any beginner project. Mastering backstitch, running stitch, satin stitch, split stitch, and French knots gives you a versatile toolkit for outlining, filling, and adding detail. Each stitch teaches different tension and placement, letting you experiment with texture and line quality as you learn how to start embroidery more confidently.
Practice is key to turning these stitches into steady habits. Work on small scraps to compare stitch length, tension, and smoothness, gradually increasing the complexity of your patterns. As your control improves, you’ll find that combining these stitches yields more harmonious designs and helps you approach more ambitious beginner embroidery projects with less hesitation.
Transferring designs and preparing fabric for smooth stitching
A clean transfer keeps your embroidery design neat and readable. Methods like light tracing with a water-soluble pen, iron-on transfer papers, and graph transfer give you reliable options to get patterns onto fabric without guesswork. Stabilizers may be needed for stretchy fabrics, ensuring that stitches stay even and crisp throughout the process.
Preparing the fabric also means managing fabric tension and using the right fabric choice. Practice with scrap fabric to dial in how tight or loose you want your weave to feel, ensuring it doesn’t pucker or sag as you work. By pairing proper transferring methods with steady fabric preparation, you’ll reduce common mistakes and keep your beginner embroidery stitches neat from start to finish.
Color planning and texture: Elevating embroidery projects for beginners
Color planning helps you create cohesive designs even when working with a limited palette. Limiting the number of colors to a manageable 3-5 colors during early projects makes it easier to learn color relationships, contrast, and shading. Layering textures with satin stitches, seed stitches, and French knots adds depth without overwhelming the piece.
Texture and composition matter as you move beyond simple outlines. Consider focal points, balance, and negative space to ensure your embroidery projects for beginners read clearly. Thoughtful color placement and varied stitches will gradually transform plain fabric into expressive works that teach you how to start embroidery with intention and style.
From practice to projects: simple embroidery projects for beginners and starter ideas
Transitioning from practice to finished pieces is a key milestone. Start with small motifs like a single flower, a seasonal ornament, or a basic alphabet sampler. These beginner embroidery projects provide clear goals, manageable color palettes, and straightforward transfers, allowing you to apply what you’ve learned about stitches and tension in concrete, satisfying results.
A practical plan helps you build momentum without burnout. Break the process into motif selection, transfer, stitching, and final finishing, then repeat with gradually more complex patterns. This approach keeps your momentum high and your skills growing, while maintaining the joy and sense of accomplishment that comes with completing embroidery projects for beginners.
Frequently Asked Questions
What is the first step in practicing Embroidery design for beginners, and what are the essential embroidery tools I should have?
Starting with Embroidery design for beginners begins with a simple setup and clear basics. The essential embroidery tools are a 6-8 inch hoop, light, even-weave fabric (Aida or linen), a sharp embroidery needle, six-strand cotton floss in a few colors, small scissors, and a fabric marker. Practice basic stitches on scrap fabric before moving on to a small project.
Which beginner embroidery stitches should I learn for Embroidery design for beginners?
Focus on the beginner embroidery stitches: backstitch, running stitch, satin stitch, split stitch, and French knot. Practice each on scrap fabric to build control, then combine them for simple patterns.
For a complete novice, what is the best approach to start embroidery within the context of how to start embroidery and Embroidery design for beginners?
To a complete novice, how to start embroidery begins with a simple plan: choose an easy pattern, transfer it to fabric, secure it in a hoop, and start with a light backstitch. Practice on scrap fabric and keep colors limited. This builds confidence and forms a solid foundation for Embroidery design for beginners.
Which beginner embroidery techniques should I focus on first when learning Embroidery design for beginners?
Focus on beginner embroidery techniques like backstitch, running stitch, satin stitch, split stitch, and French knot. Master a few stitches at a time on scrap fabric before attempting a small project.
Can you suggest simple embroidery projects for beginners that fit the Embroidery design for beginners path?
Great starter options include a small floral motif, a seasonal ornament, or a simple alphabet sampler. These embroidery projects for beginners let you practice basic stitches, transfer methods, and color planning in a compact piece.
How can I progress from basic stitches to more complex Embroidery design for beginners projects while staying on track?
As you gain confidence in Embroidery design for beginners, gradually expand your palette and try projects with moderate detail. Increase color choices, layer textures (satin with French knots), and keep transfers simple. Finish with a small, framed piece to celebrate progress.
| Topic | Key Points |
|---|---|
| Purpose | Embroidery design for beginners aims to master essential techniques, tools, and stitches; start and complete simple beginner projects. |
| Tools & Setup | Hoop/frame, fabric (Aida/linen), needles, threads (2–3 colors for starters), scissors/marking, patterns/transferring methods; set up a well-lit, organized workspace. |
| Core Stitches | Backstitch, running stitch, satin stitch, split stitch, French knot; practice on scrap fabric before full projects. |
| Transferring Design | Light tracing, iron-on transfer, graph transfer; use stabilizers; ensure even fabric tension to avoid sagging or puckering. |
| Beginner Project | Choose a small motif (flower, ornament, alphabet); transfer, outline with a base backstitch, fill with appropriate stitches, finish edges; progress gradually. |
| Techniques in Depth | Plan composition, limit palette to 3–5 colors, layer textures (satin, seeds, French knots), finish by washing, ironing, and mounting. |
| Common Mistakes | Tension issues, uneven stitches, thread fraying, skipped stitches; prevent with steady technique, proper needle use, and regular practice. |
| Practice Plan | Week 1: backstitch and running stitch; Week 2: add satin stitch; Week 3: French knots and outlining; Week 4: transfer design and finishing. |
| Expanding Beyond Basics | Move to beginner-friendly patterns with moderate detail, limited palette, small size, and simple transfer methods. |
| Care & Maintenance | Hand wash cold, lay flat to dry, iron on reverse with a pressing cloth, store away from direct sunlight. |
| Putting It All Together | Apply multiple stitches to complete a small piece confidently and build a foundation for future projects. |