
Embroidery mistakes and fixes are not just problems to be solved; they are opportunities to deepen your understanding of fabric behavior, thread interactions, and the subtle choreography between needle, hoop, and stabilizer, whether you’re working with delicate heirloom linens, lightweight cottons, or bold, modern textiles, because the way a design lays on the surface reveals how well you’ve balanced tension, placement, stitch type, and stabilization across every stage of the project. By recognizing common embroidery mistakes across different projects and learning the typical causes—from fabric shift and needle incompatibility to over-tensioned threads and stabilizer misjudgments—you can anticipate where trouble is most likely to appear, set up preventive steps before you start, and apply targeted fixes before a small error becomes a visible flaw, which means fewer wasted yards of fabric, less rework, and a steady sense of progress as your skill grows. This introductory guide distills practical, actionable steps you can implement on both hand and machine embroidery, covering everything from selecting the right needle and thread to hooping correctly, stabilizing the fabric, testing on scraps, and evaluating how different stitch densities interact with fabric weight so you understand how each choice influences density, balance, and the final look of your piece. We’ll also explore diagnostic approaches that help you identify issues quickly, explain how to adjust thread tension, re-thread paths, and revise stitch plans so that any miscue is repaired with minimal fabric distortion and downtime, and we’ll share tips for keeping tools sharp and setup consistent, because a well-prepared workspace sets the foundation for more reliable stitching. With a structured approach, you’ll turn early missteps into learning milestones, cultivate patience for the process, and build a reliable toolkit of techniques that supports consistent results across projects and media, empowering you to enjoy the craft while steadily raising the quality of your stitches and the satisfaction you feel when a design finally comes to life.
In broader terms, these concepts span all forms of needlecraft, including stitching missteps, fabric puckering, and uneven seams, which can be understood through tension management, fabric stabilization, and stabilizer choice. From a semantic perspective, discussing thread pull, density, and alignment using synonyms like stitching flaws, textile craft defects, and technique adjustments helps readers connect ideas across hand and machine methods. LSI-driven topics to explore include controlling stitch rate, ensuring proper hooped tension, selecting compatible threads, and testing on swatches to forecast how a design will behave under real-world conditions. By framing the discussion with related terms, you’ll see how solutions transfer from one project to the next, reinforcing the core messages of preparation, measurement, and mindful execution.
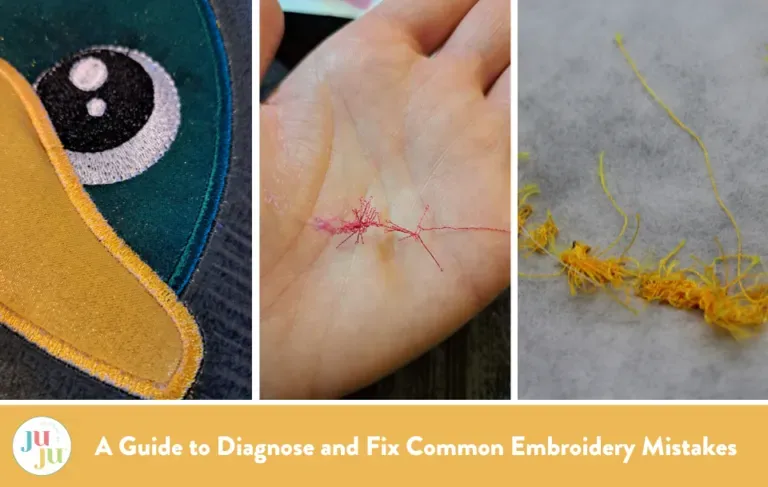
1. Understanding Common Embroidery Mistakes and Their Root Causes
Embroidery errors often fall into identifiable categories such as skipped stitches, tension problems, puckering, and fraying. By recognizing these patterns, you can apply targeted fixes and reduce the likelihood of repeating mistakes on future projects. This aligns with the goal of viewing embroidery through a troubleshooting lens and using practical knowledge to prevent issues before they derail a piece.
Knowing the typical suspects behind embroidery mistakes helps you choose the right tools and setup from the start. Treat each project as a learning opportunity, and use embroidery troubleshooting tips to map out a plan for stabilization, stitching order, and material compatibility. With a proactive mindset, common embroidery mistakes become manageable challenges rather than roadblocks.
2. Embroidery mistakes and fixes: Practical Solutions for Machine and Hand Embroidery
Whether you work with a sewing machine or by hand, the fixes for embroidery errors share core principles: re-threading, verifying tension, and testing on scrap fabric. This approach helps address skipped stitches, thread breaks, and misaligned paths by eliminating variable causes and confirming that each component—from needle size to stabilizer choice—supports the intended design.
For hand embroidery, slow, deliberate stitching and consistent grip are crucial, while machine embroidery benefits from precise bobbin tension and stable hooping. By applying these practical fixes for embroidery errors, you can chart a clear path to improved stitch consistency and a cleaner final appearance, regardless of the technique you prefer.
3. How to Avoid Embroidery Mistakes: Pre-Project Setup and Planning
Preventing issues starts before you thread the needle. Choose the right needle and thread for the fabric weight, and select stabilizers that suit the project’s complexity. This pre-project setup reduces fraying, puckering, and tension problems by aligning materials with the design demands from the outset.
Planning also means testing. Load a small scrap piece with the intended design to preview stitch density, tension, and color choices. This practice, part of a broader strategy to how to avoid embroidery mistakes, lets you catch potential issues early and adjust before committing to your final fabric.
4. Troubleshooting Tips: Quick Checks to Resolve Embroidery Errors
When problems arise, a concise checklist can save time and fabric. Start by verifying fabric and stabilizer compatibility, then re-thread the machine and confirm bobbin orientation and tension. A quick test stitch on a swatch reveals whether the tension, stitch length, and alignment are on target.
Next, inspect the thread path for snags, confirm design placement, and consider colorfastness if dye transfer is a concern. These embroidery troubleshooting tips help isolate the issue and guide you toward the appropriate fix, keeping the project moving forward.
5. Mastering Thread Tension: Preventing Thread Tension Issues in Embroidery
Thread tension is the heartbeat of a polished embroidery piece. If the top thread is too tight, puckering and breakage can occur; if it’s too loose, stitches appear loose and uneven. Understanding how to balance tension—through adjustments to the top thread, proper re-threading, and checking bobbin tension—is essential for consistent results.
Practical steps include testing on a scrap fabric, using the correct needle for the thread type, and maintaining steady stitching speed. By focusing on thread tension issues in embroidery, you reduce common problems and cultivate reliable, repeatable outcomes across projects.
6. Stabilizers, Needles, and Backings: Building a Solid Foundation for Flawless Stitching
A well-chosen stabilizer and appropriate needle size form the foundation of a clean, stable stitch. Tear-away for light fabrics, cut-away for heavier or dense designs, and wash-away for delicate materials each play a role in preventing puckering and edge distortion. Pairing these with the right needle type minimizes friction and reduces the risk of skipped stitches and frayed edges.
Hooping correctly and stabilizing both sides when needed help preserve stitch integrity throughout the process. As you build your toolkit, remember that the stabilizer strategy is part of the broader set of fixes for embroidery errors, and choosing wisely from available options supports smoother stitching and fewer interruptions to your project flow.
Frequently Asked Questions
What are common embroidery mistakes and fixes I should know to prevent issues in hand or machine embroidery?
Common embroidery mistakes and fixes often come down to fabric shifting, tension, and stabilization. Start with a scrap swatch to test stitch density and tension, re-thread both the needle and bobbin, and hoop the fabric securely. Use the right stabilizer for the fabric weight and choose the appropriate needle size to reduce skipped stitches and puckering.
What embroidery troubleshooting tips can help diagnose and fix thread tension issues in embroidery?
Thread tension issues in embroidery can cause puckering or loose stitches. Balance top thread tension and bobbin tension, re-thread carefully, and verify the needle type and size match the thread. Test on a swatch, inspect the thread path for snags, and adjust the stabilizer or hooping as needed to achieve even stitches.
How can I avoid embroidery mistakes such as puckering and uneven stitches, and what fixes for embroidery errors work best?
To avoid embroidery mistakes like puckering and uneven stitches, stabilize the fabric with the correct stabilizer, hoop evenly, and consider reducing stitch density for delicate fabrics. For machine embroidery, stitch slowly and use a grid or guide; for hand embroidery, maintain consistent tension and grip. Always test on a scrap before starting the final piece.
Which stabilizers and hooping techniques address puckering and frayed edges as part of embroidery mistakes and fixes?
Choosing the right stabilizer (tear-away, cut-away, or wash-away) and hooping the fabric evenly are core embroidery fixes. Ensure the fabric is flat and taut without distortion, and consider backing the back with a temporary stabilizer for delicate fabrics. This approach reduces puckering and helps prevent frayed edges.
What steps explain how to avoid embroidery mistakes when selecting needles and threads to prevent shredding and color bleed?
Avoid embroidery mistakes by selecting the proper needle size and type for the fabric and thread, and using suitable threads that move smoothly through the needle. Pre-wash fabrics to minimize color transfer and choose colorfast threads or stabilizers that protect against dye bleed. Secure and trim threads neatly to prevent fraying.
What quick checks are recommended in embroidery troubleshooting tips to prevent skipped stitches and alignment problems?
In embroidery troubleshooting tips, perform quick checks: verify fabric and stabilizer compatibility and hoop stability; re-thread the machine and inspect bobbin orientation and tension; ensure the thread and needle match the fabric weight; run a test stitch on a swatch to observe tension and alignment; look for snagging and confirm design placement.
| Key Point | Common Issues / Causes | Fixes / Preventive Tips |
|---|---|---|
| Skipped stitches and uneven stitching | Causes: fabric shifts during stitching; needle size mismatch; stitch path interrupted; machine bobbin tension or tangled path | Fixes: re-thread needle and bobbin; test on scrap; secure fabric hooped or stabilized; hand embroidery: slow, deliberate stitching and consistent grip |
| Tension problems | Causes: top thread too tight causes puckering and thread breakage; top thread too loose results in loose, loopy stitches | Fixes: adjust the top thread tension on your machine using a test fabric or swatch; re-thread carefully; check bobbin tension; and ensure you are using the correct needle for the thread type |
| Puckering and fabric distortion | Causes: fabric not properly stabilized; stabilizer insufficient for weight or complexity; hoop overtightened | Fixes: use the right stabilizer (tear-away, cut-away, or wash-away as appropriate); hoop evenly; and stabilize the back side with a temporary stabilizer |
| Frayed edges and shredding threads | Causes: thread too thick for the needle; fabric frays at the stitch line; needle is dull or wrong for the project | Fixes: select the proper needle size and type (embroidery needle for machine work or a finer hand needle for detailed work); choose a suitable thread; and trim and secure threads neatly to prevent fraying |
| Needle breakage | Causes: harsh fabric, thread catching, or a dull needle | Fixes: switch to a sharp, appropriate needle size for the fabric and thread; check the thread path for snags; and avoid forcing stitches through thick areas |
| Color bleed or dye transfer | Causes: fabrics bleed dye, especially darker cottons and synthetics | Fixes: use colorfast fabrics or pre-wash fabrics; test colorfastness on a scrap; and consider using stabilizers that protect against dye transfer |
| Uneven stitch length and alignment | Causes: inconsistent hand control or poor design transfer | Fixes: mark starting and ending points, practice with a stencil or grid, and work steadily with consistent hand pressure; for machine embroidery, ensure needle position, thread tension, and bobbin winding are set correctly |
| Thread shredding and breakage | Causes: rough threads, friction against the needle eye, or a damaged needle | Fixes: replace the needle with the correct size and type, thread through the machine or needle eye cleanly, and use smoother or higher-quality thread if needed |
| Preemptive setup and best practices | Causes: setup issues or lack of planning | Fixes: choose the right needle and thread; stabilize fabric appropriately; hoop with care; plan and test; use grid lines or transfer marks; practice good thread management |
| Troubleshooting quick checks | Causes: multiple potential sources including fabric, stabilization, tension, and transfer errors | Fixes: verify fabric and stabilizer compatibility and hoop stability; re-thread the machine and check bobbin orientation and tension; confirm thread type and needle size; do a test stitch on a swatch; inspect for snagging; confirm design placement; check colorfastness if dye transfer is a concern |
Summary
Embroidery mistakes and fixes are a natural part of the learning journey in needlework. By understanding common issues, their causes, and practical strategies—such as choosing the right needle and thread, stabilizing fabrics properly, planning and testing, and applying targeted fixes—you can approach each project with confidence. With consistent practice, careful hooping, and deliberate troubleshooting, you’ll reduce frayed edges, puckering, and thread breakage while improving stitch consistency and overall finish. This approach turns problems into opportunities to refine technique, expand your toolkit of troubleshooting tips, and enjoy a smoother, more satisfying embroidery process from start to finish.