
Patch design is where creativity meets production know-how, turning fabric into wearable art. From concept to finished product, it blends aesthetics with durability to look great and wear well. Whether you’re making DIY patches for a club, a band, or a personal project, mastering design and printing can transform clothing, backpacks, hats, or jackets. In this guide, you’ll learn how to design patches from concept to finished product, with practical tips on patch patterns, patch printing techniques, and how to prepare artwork that printers and embroiderers will love. A strong patch communicates a message at a glance, using clear silhouettes and thoughtful color choices that stay legible on fabric.
Viewed through the lens of LSI, these fabric emblems function as badges of identity rather than simple decorations. In the broader world of apparel embellishments, terms like DIY patches and patch printing techniques show how a single concept travels across hobbyist, craft, and brand workflows. Another way to describe it is through embroidered patches design and patch patterns for clothing, each path adding texture, color, and durability to garments. Understanding backing, edge finishes, and color management helps translate a concept into a wearable item with consistent branding. By framing the topic with related ideas such as custom patch design, you align your content with search intent and give designers and manufacturers a clear guide to plan, mock up, and produce patches.
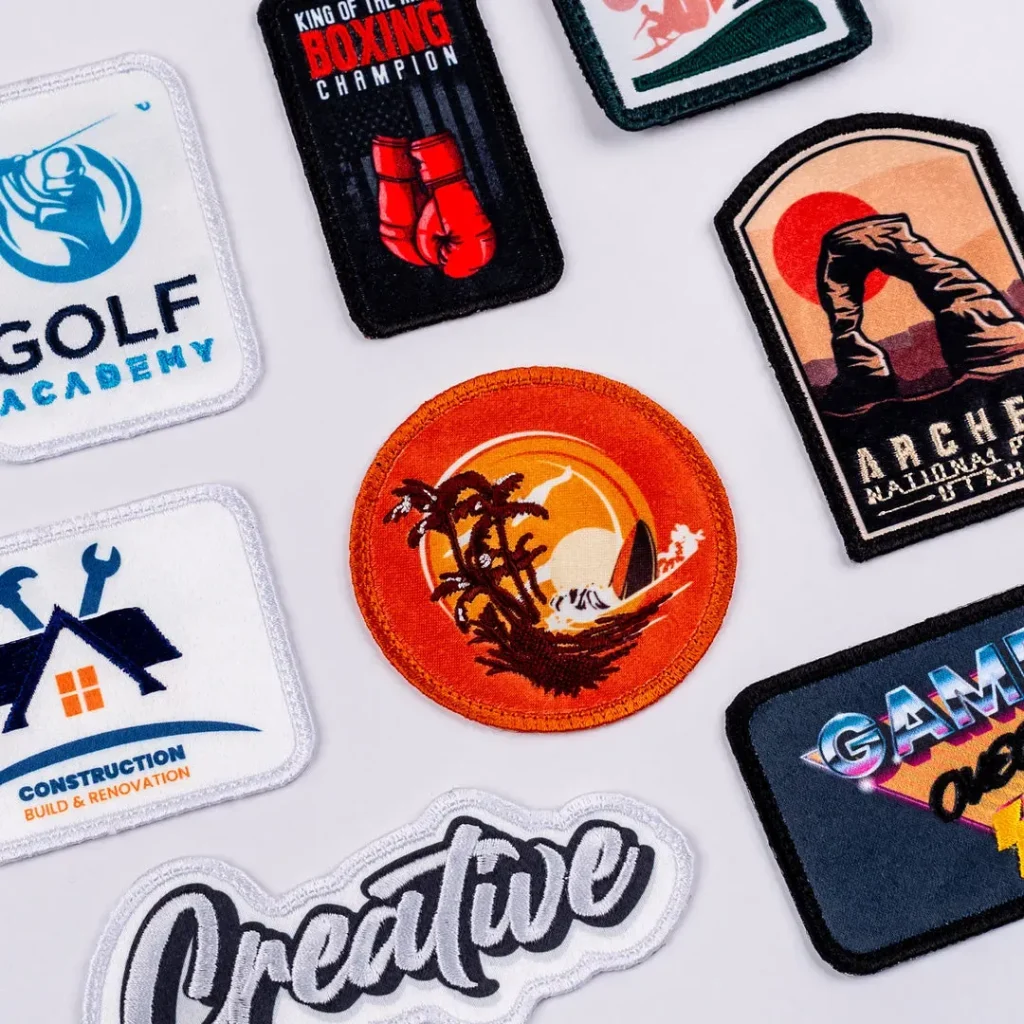
Understanding patch design fundamentals for DIY patches
Patch design is more than just artwork on fabric; it starts with practical decisions about size, shape, color palette, stitching or printing method, and backing. For anyone diving into DIY patches, the goal is to create something that is visually compelling, durable, and easy to apply. By aligning aesthetics with production constraints, you can craft patches that communicate a clear message while remaining wearable on jackets, bags, or hats. This is where concepts like custom patch design come into play, guiding you to think beyond a single motif to the whole patch system.
A solid foundation also means planning around patch patterns for clothing. Consider how your design reads from a distance and up close, how the silhouette balances with negative space, and how color choices translate when embroidered or printed. When you start with a clear concept for DIY patches, you’re laying groundwork for efficient translation into stitch plans or print files—and you’re setting yourself up for scalable production if you expand to groups or brands.
Embroidered patches design vs. printed patches: choosing the right look
Choosing between embroidered patches design and printed patches shapes the final texture, edge finish, and feel of your patch. Embroidery builds the image with thread layers, offering a tactile, premium look and long-lasting durability. If your project calls for clean lines and a traditional charm, embroidered patches design can deliver strong character that wears well over time. On the other hand, printed patches excel at reproducing photographic detail, gradients, and bright color without the bulk of stitching.
When you decide, you can even combine techniques for mixed-media patches that blend texture and color. If you’re aiming for bold color blocks or photographic imagery, patch printing techniques paired with embroidery for accent areas can create a dynamic result. This choice also affects your design constraints, including edge finishing, thread counts, and backings, which are all part of a thoughtful custom patch design strategy.
Mastering patch patterns for clothing: layout, borders, and typography
A strong patch design relies on clear patch patterns and thoughtful layouts. Start with a simple grid or silhouette and gradually add detail, ensuring it reads well from a distance and at the size of your target patch. When your theme includes text, select legible typography and maintain enough contrast with the background to preserve readability. Borders matter too; merrow borders deliver a clean, professional edge, while satin stitch borders offer a subtler, stitched outline that complements the design.
Color and contrast are central to patch design. Plan thread color sets and weights for embroidery, or color separations and profiles for printing. Limiting your palette to a practical range—often 3–7 colors—helps manage production costs while preserving impact. For DIY patches, bold, high-contrast palettes frequently yield striking results that translate well across fabrics and applications.
Patch design and production: from artwork to patch backing and edge finishes
Effective patch production begins with production-ready artwork. Provide a clear brief that specifies patch size, shape, color palette, and edge finishing. For embroidery, vector artwork (AI, EPS, or SVG) is ideal to keep lines scalable without pixelation. For printed patches, high-resolution raster images (300 DPI or higher) or vector files help preserve detail when enlarged.
Backings, interfacings, and edge finishes shape how the patch attaches and wears. Choose between iron-on or self-adhesive backings for DIY patches, heat-activated backing for easier application, or sew-on backings for durability. Complement with a suitable edge finish—merrowed edges for a polished look or satin borders for subtle definition—and pair materials like cotton twill, felt, or leather to achieve the desired texture and support for your design.
Patch printing techniques and color management for vibrant results
Understanding patch printing techniques is essential to reproduce your design faithfully. Dye-sublimation yields vibrant colors and smooth gradients but works best on light backgrounds or white polyester bases. Direct-to-fabric printing captures detail efficiently, while heat-transfer methods are versatile for small runs or DIY projects like iron-on patches.
Color management is crucial to ensure the final patch matches your intent. Plan color separations, color profiles, and test prints to verify accuracy before full production. Whether you’re producing DIY patches or working with a manufacturer, starting with clean edges and sufficient resolution helps printers reproduce your design consistently, supporting a strong, scalable custom patch design.
From concept to wearable art: DIY workflow and quality control
A practical DIY workflow keeps patch design approachable while delivering professional results. Begin with a rough concept sketch, then translate it into a polished vector or high-resolution raster version. Decide on the patch style—embroidered patches design for a tactile, classic feel, or printed patches for bold color accuracy—and prepare a test run to confirm size, color, and edge finishing before committing to larger batches.
Quality control and customization are essential for consistent results. Test patches on the intended fabrics, verify color tolerances, and request production proofs. Whether you’re manufacturing for a club, band, school, or brand, a disciplined workflow—from concept to final patch—ensures that your patch patterns for clothing translate smoothly into wearable art that communicates a message at a glance.
Frequently Asked Questions
For DIY patches, what patch design considerations should I prioritize to achieve a great result?
Start with a clear concept and keep the size within typical ranges (about 1–4 inches). Choose a shape that suits the motif and limit colors to 3–7 to control costs and ensure clean embroidery or print. Decide on backing and edge finishing early (iron-on vs sew-on; merrow vs satin borders) since these affect wear and application. For DIY patches, simplicity often yields the strongest, more scalable results.
How do patch printing techniques influence a custom patch design, and when should I choose embroidery vs printing?
Patch printing techniques determine how your design translates to fabric. Embroidered patches design builds the image with thread, offering durability and a tactile feel, while printed patches reproduce photos and gradients more accurately through dye-sublimation or direct-to-fabric printing. When planning a custom patch design, tailor artwork for the method—plan stitch counts and backing for embroidery or optimize resolution and color separations for print. Always request a production sample to verify fidelity.
What are the key differences between embroidered patches design and printed patches in a custom patch design?
Embroidered patches design creates texture with stitches, delivering a durable, classic look but with limited fine detail. Printed patches can render smooth color transitions and photographic detail but rely on ink or dye and different edge finishes. In many projects, a mixed-media patch design that combines embroidery and printing can offer both texture and color accuracy.
How should you plan patch patterns for clothing to maximize legibility and cohesion in your patch design?
Start with a simple grid or silhouette and ensure the design reads well from a distance and up close. Use a legible font if text is involved, maintain strong contrast with the fabric, and choose a consistent border treatment (merrow or satin) to define edges. Coordinate spacing, symmetry, and color choices to avoid clutter and achieve a cohesive look on jackets, jeans, backpacks, or hats.
What artwork preparation steps are essential to ensure your patch design translates well to embroidery or printing?
Prepare production-ready files: use vector formats (AI, EPS, SVG) for embroidery and high-resolution raster images (300 DPI+) for print. Manage color with Pantone guidance and test color separations. Create stitch plans that balance coverage and thread counts, and simplify complex textures into workable embroidery outlines. Request a production sample to confirm the design translates cleanly to fabric and threads or ink.
What practical tips help balance aesthetics, durability, and production efficiency in patch design for merch, bands, or clubs?
Clarify tolerances for color, size, and edge quality; test patches on the intended fabrics; choose a durable backing and appropriate edge finishing; and limit color counts to reduce costs. Develop a clear patch design workflow from concept to production and request proofs before full runs to ensure the final patches meet expectations for wearable merch or group branding.
| Aspect | Summary |
|---|---|
| What is Patch Design? | A blend of artistry, production know-how, and practicality to create patches that look great and communicate a message. |
| Key decisions | Size, shape, color palette, stitching or printing method, backing, and how the patch will be attached. |
| Manufacturing choices | Embroidered patches use thread for texture; printed patches use ink. Choice affects detail, edge finish, texture, and durability; mixed-media options are possible. |
| Patterns & layouts | Use a simple grid/silhouette, legible typography, strong borders (merrow/satin), and mindful symmetry/spacing for cohesion. |
| Color & contrast | Plan thread colors or color separations; limit palette to 3–7 colors to reduce costs and maintain impact; ensure contrast for readability. |
| Techniques overview | Embroidery: satin, fill, split stitches; durable and tactile. Printing: dye-sublimation, DTG, heat transfer for gradients and photos. |
| Printing details | Dye-sublimation, DTG, heat-transfer; consider background color, backing, and production run length; plan edges and color accuracy. |
| Materials & backing | Backings: iron-on, heat-activated, sew-on; edges: merrow or satin; bases such as cotton twill, felt, leather, PVC; choose for durability and compatibility. |
| Artwork preparation | Provide briefs; embroidery uses vector files (AI/EPS/SVG); printing requires high-res raster (>=300 DPI) or vector; plan color separations and test prints. |
| DIY workflow | Rough concept → polished vector/high-res → choose embroidery or printing → test run for sizing, color, edge finishing. |
| Quality & customization | Set tolerances, request proofs, test on target fabrics, and consider branding/packaging for scalable production. |
| Common pitfalls | Overly complex designs reduce legibility; colors may not translate to thread/ink; fraying edges; test at actual patch size; limit colors. |
Summary
Patch design is a rewarding blend of art and technique. This overview highlights how patch design decisions—size, shape, color palette, stitching or printing method, backing, and attachment—drive aesthetics and durability. From embroidery to print, careful artwork prep, and a practical production workflow, Patch design enables patches for jackets, bags, and more to communicate a message clearly while withstanding wear. With attention to color management, edge finishes, and testing on target fabrics, Patch design outcomes become wearable art that looks great and lasts.