
UV DTF transfer at home can be a game-changer for anyone who loves customizing apparel. This approach blends the flexibility of Direct-To-Film with UV-curable inks and serves as a practical UV-curable DTF transfer guide for home projects. With the right setup, you can achieve professional-looking transfers without the overhead of a full shop. This guide walks you through practical steps, from design prep to finishing, for beginners and hobbyists alike, supporting home-based garment printing with DTF. You’ll encounter terms like UV DTF printing at home and DTF transfer at home steps as you familiarize yourself with reliable resources and optimize your workflow.
For those exploring at-home fabric decoration, this method pairs a film-based workflow with ultraviolet-curing inks to produce sharp, color-rich results. Think of it as a DIY UV DTF transfer that uses UV-curable pigments on a carrier sheet, then heat-presses onto apparel, totes, and other fabrics. Alternative phrases such as ultraviolet-ink transfer, UV-ink film transfer, and home-based garment printing with DTF reflect the same concept from different angles. With the right setup, crafters can start with small runs and gradually grow into a broader line while keeping control over timing, consistency, and durability.
UV DTF transfer at home: Start-to-finish guide for beginners
A UV DTF transfer at home lets you design, print, and apply bold images to apparel without a full professional shop. By combining UV-curable inks on a DTF transfer film with a heat press, you can achieve vibrant colors, smooth gradients, and wash-fast designs. This approach fits into a DIY mindset and aligns with home-based garment printing with DTF, allowing hobbyists and micro-businesses to test concepts quickly.
While it requires a few key components, the payoff is a more controllable, repeatable workflow. This quick-start guide references terms like UV DTF printing at home and DTF transfer at home steps to help you locate reliable information and build a consistent process. Following a clear sequence—from design and print to cure, powder, and press—reduces surprises and improves consistency.
Choosing the right setup for UV DTF printing at home
Your setup should support reliable results: a printer capable of UV-curable inks or a workflow that accepts pre-printed UV DTF films, compatible transfer film, a heat press with even pressure, and a drying or curing option. For DIY projects, think about a flexible system that supports UV-curable inks and a robust post-print handling routine. The goal is a stable platform suitable for UV DTF printing at home and home-based garment printing with DTF.
Invest in quality components and safety features—dust-free print paths, clean film handling, and proper ventilation for powders and inks. Calibrating the heat press, using silicone release sheets, and storing supplies properly all contribute to consistent results and reduce waste. This stage also invites you to explore DIY UV DTF transfer setups that align with your budget and space constraints.
Design and file prep for successful UV DTF transfers
Effective UV DTF transfers start with artwork that prints cleanly on film and translates well to fabric. Use high-resolution vector or raster files and plan for mirror imaging if needed. When optimizing for at-home workflows, name files with UV DTF printing at home keywords and color profiles so you can easily reproduce the look later, a practice that also supports the DTF transfer at home steps.
Prepare color separations, choose appropriate color profiles, and perform test prints on standard film before committing to production runs. A well-prepared design minimizes ink wastage and reduces the risk of mis-registration on the garment. This stage blends graphic design best practices with practical considerations for home-based printing and the specific demands of UV-curable inks.
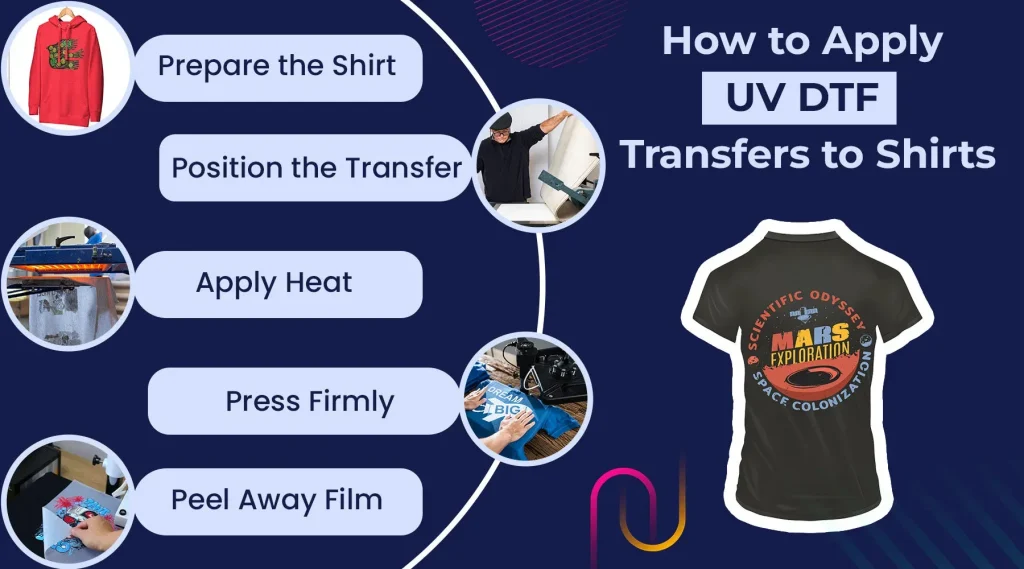
Step-by-step workflow: DTF transfer at home steps you can follow
Begin with artwork placement, mirror-imaging if your process requires it, and a test print to check alignment. The DTF transfer at home steps typically include printing on UV transfer film, optional UV curing, powder application, and pre-pressing the garment to remove moisture. Document each test so you can refine settings and build a repeatable routine.
Next comes the transfer: align the film on the garment, apply heat and pressure as specified, and peel while the film is at the correct stage of cure. Some workflows call for a re-press or a final curing step to harden the ink. Following these steps in sequence helps you achieve consistent, durable results, whether you’re pursuing a single custom piece or a small collection in a home-based setup.
Post-press finishing and care for durable UV DTF transfers
After transfer, ensure any post-print UV curing is completed if required, and allow the surface to cool before handling. This phase, described in many UV-curable DTF transfer guide resources, helps ensure proper powder curing and a careful cool-down period to keep the design bonded to the fabric.
Store finished transfers flat or rolled in a cool, dry area to prevent scratches or powder migration before application. When you’re ready to apply, keep a clean workspace and use protective sheets to minimize heat transfer to other designs. This stage also supports a long-term, scalable approach to home-based garment printing with DTF.
Troubleshooting common issues in home-based DTF printing
Faded colors or uneven brightness often signal ink curing or post-print handling issues. Revisit the UV curing step, curing time, and film compatibility with the garment material. For the DIY UV DTF transfer process, ensure your materials are within the recommended storage and usage guidelines to reduce color loss after washing.
Peeling edges, cracking, or misalignment can stem from insufficient powder coverage, inadequate pre-press, or uneven heat distribution. Recheck powder application, press platen calibration, and garment preparation. By treating these problems as part of the home-based garment printing with DTF workflow, you’ll build resilience and improve yields over time.
Frequently Asked Questions
What is UV DTF transfer at home and why should I try it for DIY apparel?
UV DTF transfer at home refers to printing with UV-curable inks onto a transfer film, then using a heat press to apply the design to fabric. This method offers vibrant color, sharp detail, and strong wash-fastness, making it ideal for home-based garment printing with DTF and DIY UV DTF transfer projects. It gives you control over timing, design variety, and production pace.
What equipment do I need for UV DTF printing at home to get reliable results?
Key gear for UV DTF printing at home includes a printer capable of UV-curable inks or ready-made UV DTF films, UV DTF transfer film, heat press, adhesive powder, silicone release sheets, a flat pre-press surface, personal protective equipment, and design software. Optional items include a UV curing lamp and a RIP/print driver if required by your workflow. This setup supports consistent home-based garment printing with DTF.
What are the DTF transfer at home steps in a typical UV-curable workflow?
A practical UV-curable DTF transfer guide at home follows these steps: design and test print; print on UV transfer film; UV cure if required; apply and cure adhesive powder; pre-press the garment; align and place the transfer; apply heat and pressure; peel and re-press if needed; final cure and care. Following DTF transfer at home steps helps you achieve reliable, repeatable results.
How can I optimize color accuracy and durability in a UV DTF transfer at home?
Optimize results by starting with high-quality artwork and proper print profiles, calibrating your heat press for even pressure, and ensuring thorough powder curing. Maintain clean film surfaces and test on practice garments before larger runs. This approach supports consistent UV DTF printing at home and durable, vibrant designs for home-based garment printing with DTF.
What common issues might occur with DIY UV DTF transfer and how can I troubleshoot?
Common issues include faded colors after washing, peeling edges, and film glare. Troubleshooting tips: verify ink curing and bonding, ensure uniform powder coverage, check heat and time settings, and confirm proper garment pre-press. Addressing these issues helps you maintain quality in DIY UV DTF transfer projects.
Is UV DTF transfer at home safe, and what maintenance does it require?
Safety requires working in a well-ventilated area and following manufacturer guidelines for UV inks and powders, plus wearing protective gear. Regular maintenance includes cleaning printer and heat press surfaces, inspecting electricals, and storing films and powders properly. Safe practice supports long-term success in home-based garment printing with DTF.
| Aspect | Summary |
|---|---|
| What is UV DTF transfer? | UV DTF transfer uses UV-curable inks printed on transfer film, then applied to fabric with heat. The UV ink cures rapidly under UV light, producing sharp, colorful images with good wash-fastness. It can offer a broader color gamut and smoother finish, especially on light and dark fabrics. |
| Benefits |
|
| What you need to start |
|
| Preparation: designing for UV DTF printing at home |
A successful UV DTF transfer at home starts with a design that prints cleanly on film and scales well on fabric. Prepare files at high resolution (vector AI/EPS/SVG or high-res PNG/TIFF). Consider mirror-imaging if required so the final transfer reads correctly. For SEO-friendly workflow, include terms like UV DTF printing at home in file naming and notes. |
| Step-by-step guide to performing a UV DTF transfer at home |
|
| Tips for best results and consistency |
|
| Common issues and quick fixes |
|
| Safety and maintenance considerations |
|
Summary
UV DTF transfer at home offers a flexible, hands-on path to bold, durable designs on fabric without a full-scale production setup. With the right tools, careful workflow, and attention to curing and pressing details, you can achieve professional results while maintaining control over time, budget, and creativity. As you gain experience, you’ll refine your workflow, reduce setup time, and unlock new project ideas and revenue streams.