
DIY Embroidered Patches have exploded in popularity, turning plain garments into personal canvases and inviting you to transform a simple sketch into a finished accessory that reflects your style and intentions. This creative, economical approach blends artistry with practical sewing, whether you’re patching a denim jacket, a backpack, or a tote bag, and it offers a satisfying, hands-on project you can customize for any season. In this guide, you’ll move from rough sketch to wearable piece while following essential techniques highlighted in an embroidered patches tutorial, with tips on planning, transfer methods, and stitch choices that beginners can master. You’ll also discover a wide range of patch embellishment ideas to spark your own unique designs, from layering motifs to mixing textures and playing with color, so every patch tells a personal story. By the end, you’ll have a confident workflow for creating DIY fabric patches that look polished and durable, whether you’re a first-timer or brushing up on your embroidery craft, and you’ll feel ready to tackle stylish projects right away.
Think of it as textile embellishments, where small sew-on emblems and embroidered badges transform jackets, bags, and other everyday items. This approach overlaps with terms like embroidered patches tutorial, DIY fabric patches, machine embroidery patches, and patch embellishment ideas, providing a broader context for search engines while staying true to the craft. From the perspective of a crafter, you’re mastering the patch-making workflow, transfer methods, and stitching strategies that also apply to appliqués, fabric badges, and sewn-on decorations. Using synonyms such as textile embellishments, sew-on emblems, and fabric patches helps ensure LSIs are covered so readers discover related ideas even if they don’t search for the exact phrase.
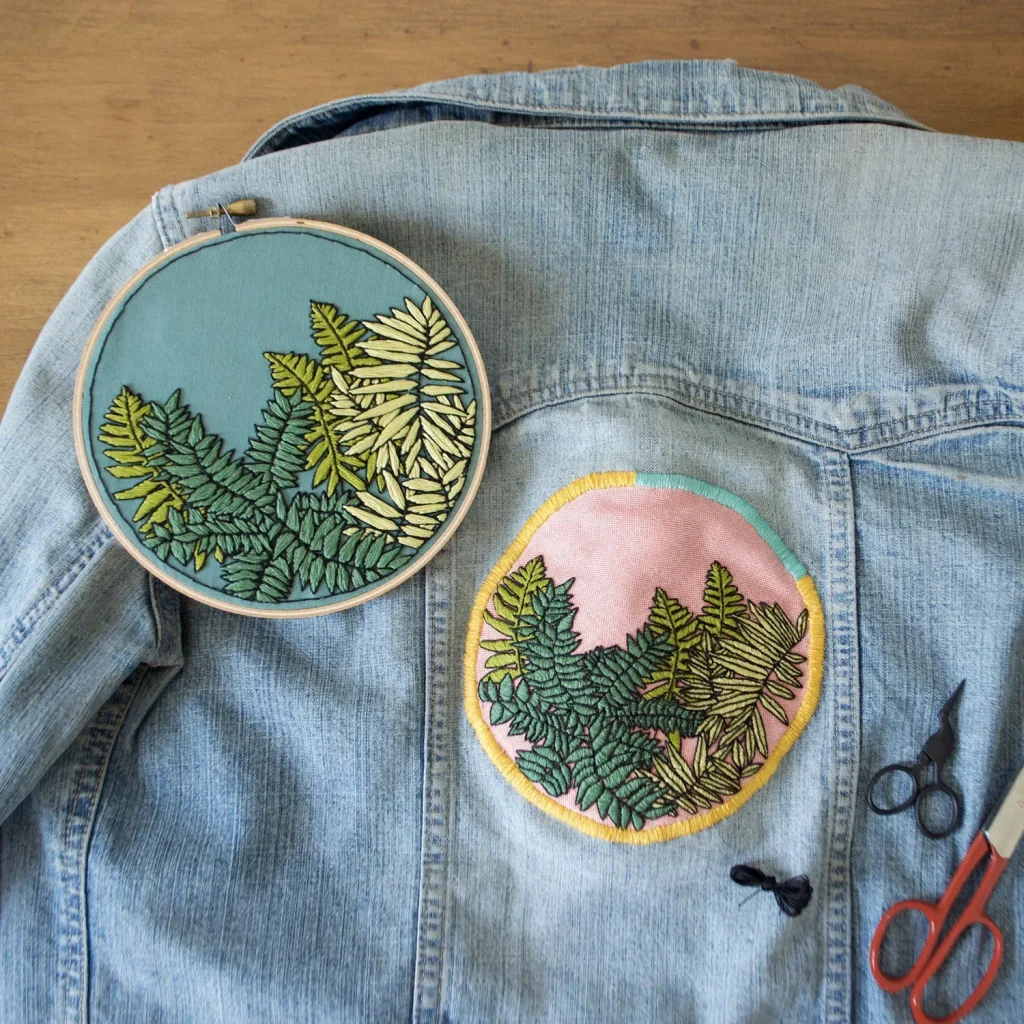
DIY Embroidered Patches: From Sketch to Durable Wearable Art
DIY Embroidered Patches turn a simple sketch into wearable art, transforming fabrics into a personal canvas where color, shape, and texture tell a story about you. Each stitch adds character, making the patch feel intentional and durable enough for daily wear.
Following an embroidered patches tutorial can clarify your workflow, guiding you from idea to execution while you explore patch embellishment ideas. As you work, you’ll practice the basics of DIY fabric patches and even try machine embroidery patches for faster results.
DIY Embroidered Patches: From Sketch to Durable Wearable Art
In this journey, you’ll translate rough sketches into clean outlines that translate well to thread and fabric, ensuring the finished patch aligns with the garment’s style. The planning stage sets the tone for texture, color balance, and overall impact.
By embracing a structured approach that blends creativity with practical sewing steps, you can develop a workflow that yields polished patches suitable for jackets, bags, and accessories. This mindset echoes the spirit of patch embellishment ideas, helping you craft unique DIY fabric patches.
Choosing the Right Materials for High-Quality Embroidered Patches
A stable fabric base—twill, denim, felt, or canvas—gives embroidery a solid foundation and helps the patch hold its shape over time. Pairing this with the right stabilizer, such as tear-away for lighter designs or cut-away for dense fills, minimizes distortion and fraying.
If you’re working with machines, using a compatible hoop and high-quality embroidery threads—polyester for durability—will improve stitch definition and wash-fastness. These material choices are central to successful DIY fabric patches and to creating machine embroidery patches that endure years of wear.
Choosing the Right Materials for High-Quality Embroidered Patches
Quality threads determine the look and longevity of your patch. Polyester threads resist fading and abrasion, making them ideal for patches on garments and bags. Selecting the proper needle size and backing ensures consistent stitches and a professional finish.
For machine embroidery patches, the backing choice matters just as much as the fabric and threads. A stable backing reduces puckering, while the right stabilization extends the life of the patch on wear-tested surfaces. With thoughtful material selection, your DIY fabric patches will stay vibrant and secure.
Transferring Your Sketch: Accurate Pattern Placement for Perfect Patches
Getting the pattern onto fabric accurately saves time and reduces stitch distortion later. Options include tracing the sketch, using carbon transfer sheets, or employing heat-activated markers that disappear after stitching.
On fabrics with texture or stretch, stabilizers under the embroidery help maintain crisp lines and precise placement. This careful transfer process is a core insight you’ll practice across many embroidered patches tutorial guides and is essential for clean patch outlines and balanced color blocks.
Transferring Your Sketch: Accurate Pattern Placement for Perfect Patches
Before stitching, verify the size and orientation against the garment to ensure the patch sits where you intend. A quick test on scrap fabric can confirm scale and alignment, reducing the need for rework once you’re ready to sew.
This planning mindset pairs well with patch embellishment ideas, allowing you to visualize how layers and motifs will nest on the final surface. When you’re happy with the layout, you’ll be ready to translate your design into stitches that sing.
Stitching Techniques for Durable, Professional-Looking Patches
Stitch choice is the heartbeat of a strong patch. Satin stitch outlines provide crisp edges, while dense fills built with long-and-short or tatting-like stitches create a smooth surface that resembles machine embroidery patches.
Hand or machine embroidery both work, as long as tension is balanced and texture is controlled. Building the patch in layers—outline first, mid-tones next, highlights last—adds depth and resilience, aligning with the goals of DIY fabric patches and the seam of machine embroidery techniques.
Stitching Techniques for Durable, Professional-Looking Patches
Layered stitching helps you achieve dimension without unnecessary bulk. Start with a light underlay to stabilize the shape, then add color and details in successive passes. This approach is commonly taught in embroidery practice and pairs well with patch embellishment ideas to elevate the final look.
Experiment with thread types—metallics, variegated colors, and even beads—to add texture and shine. These embellishments can be integrated carefully so the patch remains durable enough for washing and everyday wear, a hallmark of well-executed DIY fabric patches.
Creative Patch Embellishment Ideas to Elevate Your DIY Fabric Patches
Creative patch embellishment ideas invite texture and personality. Layer small motifs over a larger base to create a three-dimensional feel, or weave beads and metallic threads into the embroidery for subtle shimmer.
Mixing fabrics and appliqué elements can turn a simple patch into a storytelling piece on a jacket or bag. This playful experimentation aligns with the broader world of DIY fabric patches and inspires new looks while keeping the design sturdy and washable.
Creative Patch Embellishment Ideas to Elevate Your DIY Fabric Patches
Thematic collections and varied patch sizes can tell a story across a wardrobe, from bold centerpieces to delicate accents. Using patch embellishment ideas, you can craft sets that coordinate with color palettes and garment styles, enriching your embroidery repertoire.
As you test ideas, remember that the embroidery tutorial approach—planning, stitching, and finishing—helps you translate imagination into durable patches. The more you experiment with textures and layouts, the more confident you’ll become creating distinctive DIY fabric patches.
Finishing, Attaching, and Maintenance: Long-Lasting Patches for Everyday Wear
A neat finish around the edge reinforces the patch and prevents fraying. A tight satin stitch or a thin sealing border can help preserve the shape during repeated wear and washing.
Choose between iron-on backing for quick decoration or sew-on backing for the strongest attachment in high-wear zones. For machine embroidery patches, ensure backing compatibility with the garment and press gently to avoid damaging stitches. Proper finishing turns stitched motifs into reliable, long-lasting adornments.
Finishing, Attaching, and Maintenance: Long-Lasting Patches for Everyday Wear
Care instructions are essential for longevity: hand washing or using a gentle cycle on cool helps preserve colors and prevent edge unraveling. Turning the garment inside out protects the patch surface and minimizes abrasion during laundering.
If threads loosen, re-stabilize the area and re-stitch as needed. With mindful finishing and regular maintenance, your patches retain vibrancy and structure for years, making each new DIY fabric patches project a satisfying milestone in your embroidery journey.
Frequently Asked Questions
What is DIY Embroidered Patches and how can an embroidered patches tutorial guide a beginner through the process?
DIY Embroidered Patches are custom-made fabric patches created at home to personalize clothing or bags. An embroidered patches tutorial walks you from initial sketch to finished patch, covering planning, transferring the design, selecting stitches, and finishing touches, so beginners can build confidence and produce durable patches.
Which materials and tools are essential for DIY fabric patches, and how can patch embellishment ideas shape your design?
Essential materials for DIY fabric patches include a stable fabric base (like denim or twill), a suitable stabilizer, embroidery threads, needles or a hoop, and backing options. Let patch embellishment ideas guide your design choices—start with a simple motif and a limited color palette to keep stitching crisp and reduce fraying.
How do you transfer a sketch to fabric in a DIY Embroidered Patches project, and what role do stabilizers and transfer methods play in an embroidered patches tutorial?
To transfer a sketch for DIY Embroidered Patches, you can trace the design, use carbon transfer, or work with stabilizers underneath to keep stitches accurate. This transfer step, outlined in the embroidered patches tutorial, helps minimize puckering and misalignment before you begin stitching.
Which stitching techniques are most durable for machine embroidery patches in a DIY Embroidered Patches project, and how do satin stitches and dense fills contribute to a polished finish?
For machine embroidery patches, prioritize durable stitches such as satin outlines and dense fills (long-and-short or contour fills). In a DIY Embroidered Patches project, layering the patch—edge outline first, then mid-tones and highlights—adds depth while preserving wear resistance.
What are the pros and cons of iron-on backing versus sewing for attaching DIY Embroidered Patches, and how can patch embellishment ideas influence placement on a garment?
Iron-on backing offers quick, temporary attachment, while sewing patches provides lasting durability. Consider patch embellishment ideas for placement and edge finishes, and choose the method that best suits the fabric and wear pattern.
How should you care for and maintain DIY fabric patches to extend their life, following guidance from embroidered patches tutorial?
Care for your DIY fabric patches by washing on a cool, gentle cycle and turning the garment inside out to protect the patch. Inspect loose threads and re-stitch as needed; following the embroidered patches tutorial’s care tips will help patches stay vibrant and durable through many washes.
| Aspect | Key Idea | Notes |
|---|---|---|
| Purpose & Appeal | Turns plain garments into personal canvases; economical and creative. | Applicable to jackets, bags; DIY-friendly path from sketch to wearable patch. |
| Core Workflow | Sketch to pattern; transfer to fabric; stitch; finish. | Step-by-step approach; emphasizes patch embellishment ideas; builds confidence. |
| Materials & Tools | Foundation for success; better stitch quality and durability. | Fabric base options, stabilizers, threads, needles/hoop, backing, transfer tools, cutting tools, optional beads/sequins. |
| Design & Transfer | Plan design; transfer accurately to fabric. | Shape/size, linework/fill, color palette (2–5 colors), theme; transfer methods: tracing, carbon, stabilizers. |
| Stitching & Color | Durable construction and thoughtful color use. | Techniques: satin stitches, dense fills, running stitches; layering for depth; color choices for cohesion. |
| Finishing & Attaching | Secure, finished patch ready to attach. | Edge finishing with satin stitch; iron-on vs sew-on; appropriate backing; care to prevent fraying. |
| Care & Maintenance | Keep patches looking fresh over time. | Gentle washing, turning inside out, avoiding high heat; re-stitch loose threads; regular care. |
Summary
DIY Embroidered Patches offer a practical way to personalize clothing and accessories, turning ordinary garments into one-of-a-kind canvases. Starting with a simple sketch, you move through pattern creation, transfer, and stitching to a durable, ready-to-wear patch. A careful selection of materials, stable fabrics, and proper color choices helps ensure clean edges and wash-fast results. This journey from concept to finished patch not only yields great results but also teaches essential embroidery techniques that can be applied to future projects.